PydanticAI 中文指南
2025年3月6日
官方原版:PydanticAI
开源仓库页面:pydantic-ai
本文由AI翻译和排版,请辨别使用。本文只用于学习。
简介
PydanticAI 是一个专为 Python 设计的代理框架,旨在简化使用生成式 AI 构建生产级应用的过程,让开发者体验更加顺畅。

FastAPI 通过提供创新且人性化的设计,基于 Pydantic 的基石,革命性地推动了 Web 开发。这一设计不仅提升了开发效率,也使得 Web 开发变得更加便捷和高效。
类似地,几乎所有的 Python 代理框架和LLM库都采用了 Pydantic,但当我们开始使用 Pydantic Logfire 中的LLMs时,我们没有找到能给我们带来同样感觉的东西。
我们构建 PydanticAI 的初衷,就是将 FastAPI 的便捷性带到 GenAI 应用开发领域。
为什么选择 PydanticAI
- 由 Pydantic 团队打造:该团队也是 OpenAI SDK、Anthropic SDK、LangChain、LlamaIndex、AutoGPT、Transformers、CrewAI、Instructor 等众多项目的幕后力量。
- 支持 OpenAI、Anthropic、Gemini、Deepseek、Ollama、Groq、Cohere 和 Mistral 等模型,并提供了简单易用的接口,方便扩展对其他模型的支持。
- Pydantic Logfire 集成:无缝与 Pydantic Logfire 集成,为您的LLM-驱动应用程序提供实时调试、性能监控和行为跟踪,让您轻松实现应用调试和性能监控。
- 类型安全:旨在让类型检查尽可能强大且对您来说信息丰富,以提升您的体验。
- 以 Python 为中心的设计:利用 Python 熟悉的控制流和代理组合,轻松构建您的 AI 驱动项目。这使得您能够应用在任意其他(非 AI)项目中常用的标准 Python 最佳实践,使项目开发更加便捷。
- 利用 Pydantic 的力量验证和结构化模型输出,确保每次运行生成的响应保持一致。
- 依赖注入系统:提供可选的依赖注入功能,以便为您的智能体系统提示、工具和结果验证器提供数据和服务的功能。这种功能对于进行测试和基于评估的迭代开发特别有用,可以大大提高开发效率。
- 提供流式响应功能,可连续输出LLM信息,并即时验证,确保结果既快速又准确。
- Pydantic 图形支持通过类型提示定义强大的图,这在标准控制流退化成面条代码的复杂应用中非常有用。这种用法在处理复杂应用时尤其有用,因为它可以避免代码变得难以管理。
你好,世界
这里是一个 PydanticAI 的简单示例:
hello_world.py
from pydantic_ai import Agent

agent = Agent(
    'google-gla:gemini-1.5-flash',
    system_prompt='Be concise, reply with one sentence.',
)

result = agent.run_sync('Where does "hello world" come from?')
print(result.data)
"""
The first known use of "hello, world" was in a 1974 textbook about the C programming language.
"""
(本示例完整,可以直接运行)
交易过程应极为简洁:PydanticAI 将系统提示和用户查询发送至LLM,模型将给出文本回复。
目前内容还不够吸引人,但我们可以轻松地加入“工具”、动态系统提示和结构化响应,以构建更加强大的智能体。
工具与依赖注入示例
这里是一个使用 PydanticAI 构建银行客服代理的简洁示例:这是一个使用 PydanticAI 构建银行客服代理的示例,非常简洁。
bank_support.py
from dataclasses import dataclass

from pydantic import BaseModel, Field
from pydantic_ai import Agent, RunContext

from bank_database import DatabaseConn


@dataclass
class SupportDependencies:
    customer_id: int
    db: DatabaseConn


class SupportResult(BaseModel):
    support_advice: str = Field(description='Advice returned to the customer')
    block_card: bool = Field(description="Whether to block the customer's card")
    risk: int = Field(description='Risk level of query', ge=0, le=10)


support_agent = Agent(
    'openai:gpt-4o',
    deps_type=SupportDependencies,
    result_type=SupportResult,
    system_prompt=(
        'You are a support agent in our bank, give the '
        'customer support and judge the risk level of their query.'
    ),
)


@support_agent.system_prompt
async def add_customer_name(ctx: RunContext[SupportDependencies]) -> str:
    customer_name = await ctx.deps.db.customer_name(id=ctx.deps.customer_id)
    return f"The customer's name is {customer_name!r}"


@support_agent.tool
async def customer_balance(
    ctx: RunContext[SupportDependencies], include_pending: bool
) -> float:
    """Returns the customer's current account balance."""
    return await ctx.deps.db.customer_balance(
        id=ctx.deps.customer_id,
        include_pending=include_pending,
    )


...


async def main():
    deps = SupportDependencies(customer_id=123, db=DatabaseConn())
    result = await support_agent.run('What is my balance?', deps=deps)
    print(result.data)
    """
    support_advice='Hello John, your current account balance, including pending transactions, is $123.45.' block_card=False risk=1
    """

    result = await support_agent.run('I just lost my card!', deps=deps)
    print(result.data)
    """
    support_advice="I'm sorry to hear that, John. We are temporarily blocking your card to prevent unauthorized transactions." block_card=True risk=8
    """
完整示例 bank_support.py 示例
为了简洁,这里展示的代码不完整( DatabaseConn 的定义缺失);您可以在以下链接中找到完整的 bank_support.py 示例。
使用 Pydantic Logfire 进行仪表化的内容
为了理解上述运行的流程,我们可以通过 Pydantic Logfire 观察代理的行为,这样可以使描述更加自然易懂。
要完成这项任务,我们需要先配置好 logfire,然后在代码中加入以下内容:
bank_support_with_logfire.py
...
from pydantic_ai import Agent, RunContext

from bank_database import DatabaseConn

import logfire

logfire.configure()
logfire.instrument_asyncpg()

...

support_agent = Agent(
    'openai:gpt-4o',
    deps_type=SupportDependencies,
    result_type=SupportResult,
    system_prompt=(
        'You are a support agent in our bank, give the '
        'customer support and judge the risk level of their query.'
    ),
    instrument=True,
)
这足以让你一睹你的代理在行动中的风采:
查看监控和性能以获取更多信息。
下一步行动
尝试使用 PydanticAI,请按照示例中的说明进行操作。
阅读文档,了解如何使用 PydanticAI 构建应用程序的详细信息。
阅读 API 参考文档,以理解 PydanticAI 的接口使用方法。
安装指南
PydanticAI 可在 PyPI 上以 pydantic-ai 的形式获取,安装过程非常简便:
(需要 Python 3.9 及以上版本)
这将安装 pydantic_ai 包、核心依赖项以及使用 PydanticAI 中包含的所有模型所需的库。如果您只想使用某个特定模型,可以安装 PydanticAI 的“精简版”。
使用 Pydantic Logfire
PydanticAI 与 Pydantic Logfire 的集成非常出色(虽然这是完全可选的),能够帮助您查看并理解代理的运行情况。
使用 PydanticAI 与 Logfire 集成时,请安装 pydantic-ai 或 pydantic-ai-slim ,并选择包含 logfire 的可选组件:
pip install "pydantic-ai[logfire]"
uv add "pydantic-ai[logfire]"
请按照以下步骤进行配置,遵循 Logfire 的安装指南。
运行示例
我们将 pydantic_ai_examples 目录独立打包成 PyPI 包( pydantic-ai-examples ),这样做可以极大地方便用户进行自定义和运行示例。
安装示例时,请使用可选的 examples 组:
pip install "pydantic-ai[examples]"
uv add "pydantic-ai[examples]"
运行示例,请参照示例文档中的操作指南。
精简安装
如果您已知将使用哪个模型,并希望避免安装不必要的包,可以使用 pydantic-ai-slim 包。例如,仅使用 OpenAIModel 时,您将执行以下操作:
pip install "pydantic-ai-slim[openai]"
uv add "pydantic-ai-slim[openai]"
pydantic-ai-slim 包含以下可选分组:
logfire— 安装logfirePyPI(点击安装)evals— 安装pydantic-evalsPyPI(点击安装)openai— 安装openaiPyPI(点击安装)vertexai— 安装google-authPyPI ↗ 和requestsPyPI ↗(此处为初始翻译,已尽量保持原意,但根据中文习惯进行了调整)anthropic— 安装anthropicPyPI(点击安装)groq— 安装groqPyPI(点击安装)mistral— 安装mistralaiPyPI(点击安装)cohere- 安装依赖coherePyPI ↗duckduckgo- 安装依赖duckduckgo-searchPyPI ↗tavily- 安装依赖tavily-pythonPyPI ↗
请参阅模型文档,以获取有关每个模型所需可选依赖项的详细信息。
您可以为多种模型和场景安装依赖项,例如:
pip install "pydantic-ai-slim[openai,vertexai,logfire]"
uv add "pydantic-ai-slim[openai,vertexai,logfire]"
获取帮助
如果您需要帮助入门 PydanticAI 或进行高级操作,以下资源可能对您有所帮助。
Slack
加入 Pydantic Slack 的 [#pydantic-ai](https://logfire.pydantic.dev/docs/join-slack/) 频道,您可以在那里提问、寻求帮助,并与其他人交流 PydanticAI 相关的话题。同时,该平台还设有 Pydantic、Logfire 和 FastUI 的专属频道。
如果您使用的是 Logfire Pro 计划,您还可以获得一个专属的私有 Slack 协作频道。这样可以让沟通更加高效和私密。
GitHub 问题
PydanticAI 的 GitHub 仓库问题区是一个极佳的提问和反馈平台。
贡献
我们热切期待您的贡献,为 PydanticAI 添砖加瓦!
安装与配置
克隆您的分支后,请切换到仓库目录下
git clone git@github.com:<your username>/pydantic-ai.git
cd pydantic-ai
安装 uv (版本 0.4.30 或更新版本)及 pre-commit
我们在这里使用 pipx,如需了解其他选项,请参阅:
要了解 pipx 的具体内容,请参考以下文档
pipx install uv pre-commit
安装所有依赖项和 pre-commit 钩子( pydantic-ai )
运行测试等相关操作
我们使用 make 来管理您需要执行的大多数命令。
查看可用命令的详细信息,请执行以下命令:
运行代码格式化、代码检查、静态类型检查和测试,并生成覆盖率报告,请按照以下步骤操作:
文档修改
在本地运行文档页面,请按照以下步骤操作:
添加新模型到 PydanticAI 的规则说明
为了避免给 PydanticAI 的维护者带来过大的工作压力,我们无法接受所有模型的贡献。因此,我们制定了以下规则,用于明确何时接纳新模型,何时不予接纳。这样做有望降低失望和无效工作的风险。
- 添加新模型并引入额外依赖项时,该依赖项需在 PyPI 上连续 3 个月每月下载量超过 50 万次
- 添加一个新模型,该模型内部采用其他模型的逻辑,且不依赖额外库,其 GitHub 组织需拥有超过 20k 的总星标数
- 对于任何其他模型,我们乐意添加一段描述,并提供包含链接和使用说明的自定义 URL 及 API 密钥即可
- 对于需要更多逻辑的其他模型,我们建议您发布自己的 Python 包。该包应依赖于
pydantic-ai-slim并实现一个继承自我们提供的ModelABC 的模型。
如果您不确定是否添加模型,请提交一个相关的问题。
故障排除指南
以下是一些关于如何解决您在使用 PydanticAI 时可能遇到的一些常见问题的建议。如果您遇到的问题未在此列出或文档中未提及,欢迎在 Pydantic Slack上咨询或直接在 GitHub上提交问题。
Jupyter Notebook 错误问题
RuntimeError: This event loop is already running
该错误是由于 Jupyter 笔记本的事件循环与 PydanticAI 存在冲突造成的。解决这一冲突的方法之一是使用 nest-asyncio 。具体来说,在运行任何代理之前,请先执行以下步骤:
import nest_asyncio

nest_asyncio.apply()
注意:此修复同样适用于 Google Colab。
API 密钥配置
UserError: API key must be provided or set in the [MODEL]_API_KEY environment variable
如果您在设置模型 API 密钥时遇到问题,请访问“模型”页面,学习如何设置环境变量或传递参数的详细步骤。
监控 HTTPX 请求情况
您可以在模型中使用自定义客户端来在运行时访问特定的请求、响应和头部信息,这样表达更为自然易懂。
使用 logfire 的 HTTPX 集成来监控上述内容特别有用。
文档
代理(Agents)
简介
代理是 PydanticAI 与 LLMs 交互的核心途径。
在某些情况下,一个代理可以控制整个应用程序或组件,而多个代理之间的交互则可以体现更为复杂的流程,使描述更加自然易懂。
Agent 类提供了完整的 API 文档,从本质上讲,您可以将代理视为一个用于容纳的容器:
| 组件 | 描述 |
|---|---|
| 系统提示信息System prompt(s) | 开发者为LLM编写的指令集,内容如下: |
| 函数工具Function tool(s) | LLM 在生成响应过程中可能调用的函数,用于获取相关信息。 |
| 结构化结果类型Structured result type | 结构化数据类型,LLM必须在运行结束时返回(如果已指定)。 |
| 依赖类型约束Dependency type constraint | 系统提示功能、工具以及结果验证器在执行时可能会调用依赖库。这样的表述更加自然,易于理解。 |
| LLM 模型LLM model | 可选默认值 LLM 与代理关联的模型。运行代理时也可指定。 |
| 模型配置Model Settings | 可选的默认模型设置,有助于优化请求。运行代理时也可指定。 |
在类型中,代理在依赖和结果类型上具有通用性,例如,一个需要类型 Foobar 的依赖和返回类型 list[str] 的结果的代理将具有类型 Agent[Foobar, list[str]] 。实际上,你无需过多关注这一点,这仅仅意味着你的 IDE 能够告诉你何时使用了正确的类型,并且如果你选择使用静态类型检查,它应该能够与 PydanticAI 良好地协同工作。
这里是一个模拟轮盘赌的代理的示例:
roulette_wheel.py
from pydantic_ai import Agent, RunContext

roulette_agent = Agent(
    'openai:gpt-4o',
    deps_type=int,
    result_type=bool,
    system_prompt=(
        'Use the `roulette_wheel` function to see if the '
        'customer has won based on the number they provide.'
    ),
)


@roulette_agent.tool
async def roulette_wheel(ctx: RunContext[int], square: int) -> str:
    """check if the square is a winner"""
    return 'winner' if square == ctx.deps else 'loser'


# Run the agent
success_number = 18
result = roulette_agent.run_sync('Put my money on square eighteen', deps=success_number)
print(result.data)
#> True

result = roulette_agent.run_sync('I bet five is the winner', deps=success_number)
print(result.data)
#> False
代理设计旨在实现重用,类似于 FastAPI 应用
代理对象旨在一次性创建(通常作为模块的全局变量)并在整个应用程序中重复使用,这就像一个小型的 FastAPI 应用或 APIRouter 一样。
运行中的代理
运行代理有四种方法:
agent.run()— 一个返回包含完成响应的RunResult的协程。 (更自然地表达)agent.run_sync()— 这是一个返回包含完成响应的RunResult的普通同步函数(实际上内部只是调用了loop.run_until_complete(self.run()))。agent.run_stream()— 这是一个协程,返回一个StreamedRunResult,其中包含用于将响应作为异步可迭代对象流式传输的方法。agent.iter()— 这是一个上下文管理器,用于返回一个AgentRun对象,该对象是一个异步可迭代器,可以遍历代理底层的Graph节点。
这里是一个展示前三个简单例子的例子:
run_agent.py
from pydantic_ai import Agent

agent = Agent('openai:gpt-4o')

result_sync = agent.run_sync('What is the capital of Italy?')
print(result_sync.data)
#> Rome


async def main():
    result = await agent.run('What is the capital of France?')
    print(result.data)
    #> Paris

    async with agent.run_stream('What is the capital of the UK?') as response:
        print(await response.get_data())
        #> London
(本示例完整,可直接运行——运行时需添加 asyncio.run(main()) 才能执行 main )
您可以将之前运行的消息传递过来,以继续对话或提供上下文。具体信息请参考“消息和聊天历史”部分。
遍历代理的图
在 PydanticAI 中,每个 Agent 都利用 pydantic-graph 来管理其执行流程。pydantic-graph 是一个通用的、以类型为核心的库,用于在 Python 中构建和运行有限状态机。它并不直接依赖于 PydanticAI——您可以独立于 GenAI 使用它来处理与工作流程无关的任务——但 PydanticAI 利用它来协调模型请求和响应的处理过程,使代理的运行更加高效。
在许多情况下,您根本无需关心 pydantic-graph;直接调用 agent.run(...) 即可从始至终遍历底层图。然而,如果您需要更深入的洞察或控制——比如记录每个工具的调用,或在特定阶段加入自己的逻辑——PydanticAI 通过 Agent.iter 提供了底层的迭代过程。该方法返回一个 AgentRun ,您可以异步迭代,或者通过 next 方法逐节点手动遍历。一旦代理的图返回 End ,您将得到最终结果,以及所有步骤的详细历史记录。
async for 迭代
这里是一个使用 async for 和 iter 记录代理执行每个节点的例子:
agent_iter_async_for.py
from pydantic_ai import Agent

agent = Agent('openai:gpt-4o')


async def main():
    nodes = []
    # Begin an AgentRun, which is an async-iterable over the nodes of the agent's graph
    async with agent.iter('What is the capital of France?') as agent_run:
        async for node in agent_run:
            # Each node represents a step in the agent's execution
            nodes.append(node)
    print(nodes)
    """
    [
        ModelRequestNode(
            request=ModelRequest(
                parts=[
                    UserPromptPart(
                        content='What is the capital of France?',
                        timestamp=datetime.datetime(...),
                        part_kind='user-prompt',
                    )
                ],
                kind='request',
            )
        ),
        CallToolsNode(
            model_response=ModelResponse(
                parts=[TextPart(content='Paris', part_kind='text')],
                model_name='gpt-4o',
                timestamp=datetime.datetime(...),
                kind='response',
            )
        ),
        End(data=FinalResult(data='Paris', tool_name=None, tool_call_id=None)),
    ]
    """
    print(agent_run.result.data)
    #> Paris
- “
AgentRun是一个异步迭代器,它会逐个输出流程中的每个节点(BaseNode或End)。这样的表述更加自然和易于理解。” - 运行结束时,会返回一个
End节点。
使用 .next(...) 手动进行操作
您可以通过将您希望运行的下一个节点传递给 AgentRun.next(...) 方法来手动控制迭代过程。这样,您可以在节点执行前对其进行检查或修改,根据您自己的逻辑跳过某些节点,并且更容易地捕捉到错误:
agent_iter_next.py
from pydantic_ai import Agent
from pydantic_graph import End

agent = Agent('openai:gpt-4o')


async def main():
    async with agent.iter('What is the capital of France?') as agent_run:
        node = agent_run.next_node

        all_nodes = [node]

        # Drive the iteration manually:
        while not isinstance(node, End):
            node = await agent_run.next(node)
            all_nodes.append(node)

        print(all_nodes)
        """
        [
            UserPromptNode(
                user_prompt='What is the capital of France?',
                system_prompts=(),
                system_prompt_functions=[],
                system_prompt_dynamic_functions={},
            ),
            ModelRequestNode(
                request=ModelRequest(
                    parts=[
                        UserPromptPart(
                            content='What is the capital of France?',
                            timestamp=datetime.datetime(...),
                            part_kind='user-prompt',
                        )
                    ],
                    kind='request',
                )
            ),
            CallToolsNode(
                model_response=ModelResponse(
                    parts=[TextPart(content='Paris', part_kind='text')],
                    model_name='gpt-4o',
                    timestamp=datetime.datetime(...),
                    kind='response',
                )
            ),
            End(data=FinalResult(data='Paris', tool_name=None, tool_call_id=None)),
        ]
        """
查看使用情况和最终结果
您可以随时通过 AgentRun 对象和 agent_run.usage() 获取使用统计信息(如令牌、请求等)。该方法将返回一个包含使用数据的 Usage 对象。
运行结束后, agent_run.final_result 将变为一个包含最终输出及相关元数据的 AgentRunResult 对象。
流媒体
这里是一个示例,展示了如何结合迭代 0#进行代理运行的流式传输
streaming.py
import asyncio
from dataclasses import dataclass
from datetime import date

from pydantic_ai import Agent
from pydantic_ai.messages import (
    FinalResultEvent,
    FunctionToolCallEvent,
    FunctionToolResultEvent,
    PartDeltaEvent,
    PartStartEvent,
    TextPartDelta,
    ToolCallPartDelta,
)
from pydantic_ai.tools import RunContext


@dataclass
class WeatherService:
    async def get_forecast(self, location: str, forecast_date: date) -> str:
        # In real code: call weather API, DB queries, etc.
        return f'The forecast in {location} on {forecast_date} is 24°C and sunny.'

    async def get_historic_weather(self, location: str, forecast_date: date) -> str:
        # In real code: call a historical weather API or DB
        return (
            f'The weather in {location} on {forecast_date} was 18°C and partly cloudy.'
        )


weather_agent = Agent[WeatherService, str](
    'openai:gpt-4o',
    deps_type=WeatherService,
    result_type=str,  # We'll produce a final answer as plain text
    system_prompt='Providing a weather forecast at the locations the user provides.',
)


@weather_agent.tool
async def weather_forecast(
    ctx: RunContext[WeatherService],
    location: str,
    forecast_date: date,
) -> str:
    if forecast_date >= date.today():
        return await ctx.deps.get_forecast(location, forecast_date)
    else:
        return await ctx.deps.get_historic_weather(location, forecast_date)


output_messages: list[str] = []


async def main():
    user_prompt = 'What will the weather be like in Paris on Tuesday?'

    # Begin a node-by-node, streaming iteration
    async with weather_agent.iter(user_prompt, deps=WeatherService()) as run:
        async for node in run:
            if Agent.is_user_prompt_node(node):
                # A user prompt node => The user has provided input
                output_messages.append(f'=== UserPromptNode: {node.user_prompt} ===')
            elif Agent.is_model_request_node(node):
                # A model request node => We can stream tokens from the model's request
                output_messages.append(
                    '=== ModelRequestNode: streaming partial request tokens ==='
                )
                async with node.stream(run.ctx) as request_stream:
                    async for event in request_stream:
                        if isinstance(event, PartStartEvent):
                            output_messages.append(
                                f'[Request] Starting part {event.index}: {event.part!r}'
                            )
                        elif isinstance(event, PartDeltaEvent):
                            if isinstance(event.delta, TextPartDelta):
                                output_messages.append(
                                    f'[Request] Part {event.index} text delta: {event.delta.content_delta!r}'
                                )
                            elif isinstance(event.delta, ToolCallPartDelta):
                                output_messages.append(
                                    f'[Request] Part {event.index} args_delta={event.delta.args_delta}'
                                )
                        elif isinstance(event, FinalResultEvent):
                            output_messages.append(
                                f'[Result] The model produced a final result (tool_name={event.tool_name})'
                            )
            elif Agent.is_call_tools_node(node):
                # A handle-response node => The model returned some data, potentially calls a tool
                output_messages.append(
                    '=== CallToolsNode: streaming partial response & tool usage ==='
                )
                async with node.stream(run.ctx) as handle_stream:
                    async for event in handle_stream:
                        if isinstance(event, FunctionToolCallEvent):
                            output_messages.append(
                                f'[Tools] The LLM calls tool={event.part.tool_name!r} with args={event.part.args} (tool_call_id={event.part.tool_call_id!r})'
                            )
                        elif isinstance(event, FunctionToolResultEvent):
                            output_messages.append(
                                f'[Tools] Tool call {event.tool_call_id!r} returned => {event.result.content}'
                            )
            elif Agent.is_end_node(node):
                assert run.result.data == node.data.data
                # Once an End node is reached, the agent run is complete
                output_messages.append(f'=== Final Agent Output: {run.result.data} ===')


if __name__ == '__main__':
    asyncio.run(main())

    print(output_messages)
    """
    [
        '=== ModelRequestNode: streaming partial request tokens ===',
        '[Request] Starting part 0: ToolCallPart(tool_name=\'weather_forecast\', args=\'{"location":"Pa\', tool_call_id=\'0001\', part_kind=\'tool-call\')',
        '[Request] Part 0 args_delta=ris","forecast_',
        '[Request] Part 0 args_delta=date":"2030-01-',
        '[Request] Part 0 args_delta=01"}',
        '=== CallToolsNode: streaming partial response & tool usage ===',
        '[Tools] The LLM calls tool=\'weather_forecast\' with args={"location":"Paris","forecast_date":"2030-01-01"} (tool_call_id=\'0001\')',
        "[Tools] Tool call '0001' returned => The forecast in Paris on 2030-01-01 is 24°C and sunny.",
        '=== ModelRequestNode: streaming partial request tokens ===',
        "[Request] Starting part 0: TextPart(content='It will be ', part_kind='text')",
        '[Result] The model produced a final result (tool_name=None)',
        "[Request] Part 0 text delta: 'warm and sunny '",
        "[Request] Part 0 text delta: 'in Paris on '",
        "[Request] Part 0 text delta: 'Tuesday.'",
        '=== CallToolsNode: streaming partial response & tool usage ===',
        '=== Final Agent Output: It will be warm and sunny in Paris on Tuesday. ===',
    ]
    """
额外配置
使用限制说明
PydanticAI 提供了一种 UsageLimits 结构,以便帮助您在模型运行过程中限制令牌和/或请求的使用,使表述更加自然易懂。
您可以通过传入 usage_limits 参数给 run{_sync,_stream} 函数来应用这些设置,表达更为自然。
考虑以下示例,我们在这里限制了响应令牌的数量:
from pydantic_ai import Agent
from pydantic_ai.exceptions import UsageLimitExceeded
from pydantic_ai.usage import UsageLimits

agent = Agent('anthropic:claude-3-5-sonnet-latest')

result_sync = agent.run_sync(
    'What is the capital of Italy? Answer with just the city.',
    usage_limits=UsageLimits(response_tokens_limit=10),
)
print(result_sync.data)
#> Rome
print(result_sync.usage())
"""
Usage(requests=1, request_tokens=62, response_tokens=1, total_tokens=63, details=None)
"""

try:
    result_sync = agent.run_sync(
        'What is the capital of Italy? Answer with a paragraph.',
        usage_limits=UsageLimits(response_tokens_limit=10),
    )
except UsageLimitExceeded as e:
    print(e)
    #> Exceeded the response_tokens_limit of 10 (response_tokens=32)
限制请求数量有助于防止无限循环或过度调用工具,这样做很有用。
from typing_extensions import TypedDict

from pydantic_ai import Agent, ModelRetry
from pydantic_ai.exceptions import UsageLimitExceeded
from pydantic_ai.usage import UsageLimits


class NeverResultType(TypedDict):
    """
    Never ever coerce data to this type.
    """

    never_use_this: str


agent = Agent(
    'anthropic:claude-3-5-sonnet-latest',
    retries=3,
    result_type=NeverResultType,
    system_prompt='Any time you get a response, call the `infinite_retry_tool` to produce another response.',
)


@agent.tool_plain(retries=5)
def infinite_retry_tool() -> int:
    raise ModelRetry('Please try again.')


try:
    result_sync = agent.run_sync(
        'Begin infinite retry loop!', usage_limits=UsageLimits(request_limit=3)
    )
except UsageLimitExceeded as e:
    print(e)
    #> The next request would exceed the request_limit of 3
备注
尤其是在您注册了众多工具时,使用 request_limit 可以防止模型过度循环调用这些工具。
模型(运行)设置
PydanticAI 提供了一种结构化的 settings.ModelSettings 请求方式,帮助您调整请求细节。通过这种方式,您可以配置诸如 temperature , max_tokens , timeout 等影响模型行为的常用参数,从而实现更精细的模型控制。
有两种方法来应用这些设置:1. 通过 run{_sync,_stream} 函数的 model_settings 参数传递。这允许根据每个请求进行细致调整。2. 在 Agent 初始化过程中通过 model_settings 参数设置。这些设置将默认应用于所有后续使用该代理的运行调用。然而,在特定运行调用期间提供的 model_settings 将覆盖代理的默认配置。
例如,如果您希望将 temperature 的设置调整为 0.0 以减少随机性,可以按照以下步骤进行操作:
from pydantic_ai import Agent

agent = Agent('openai:gpt-4o')

result_sync = agent.run_sync(
    'What is the capital of Italy?', model_settings={'temperature': 0.0}
)
print(result_sync.data)
#> Rome
Model specific settings
If you wish to further customize model behavior, you can use a subclass of ModelSettings, like GeminiModelSettings, associated with your model of choice.
For example:
from pydantic_ai import Agent, UnexpectedModelBehavior
from pydantic_ai.models.gemini import GeminiModelSettings

agent = Agent('google-gla:gemini-1.5-flash')

try:
    result = agent.run_sync(
        'Write a list of 5 very rude things that I might say to the universe after stubbing my toe in the dark:',
        model_settings=GeminiModelSettings(
            temperature=0.0,  # general model settings can also be specified
            gemini_safety_settings=[
                {
                    'category': 'HARM_CATEGORY_HARASSMENT',
                    'threshold': 'BLOCK_LOW_AND_ABOVE',
                },
                {
                    'category': 'HARM_CATEGORY_HATE_SPEECH',
                    'threshold': 'BLOCK_LOW_AND_ABOVE',
                },
            ],
        ),
    )
except UnexpectedModelBehavior as e:
    print(e)
    """
    Safety settings triggered, body:
    <safety settings details>
    """
Runs vs. Conversations
An agent run might represent an entire conversation — there's no limit to how many messages can be exchanged in a single run. However, a conversation might also be composed of multiple runs, especially if you need to maintain state between separate interactions or API calls.
Here's an example of a conversation comprised of multiple runs:
conversation_example.py
from pydantic_ai import Agent

agent = Agent('openai:gpt-4o')

# First run
result1 = agent.run_sync('Who was Albert Einstein?')
print(result1.data)
#> Albert Einstein was a German-born theoretical physicist.

# Second run, passing previous messages
result2 = agent.run_sync(
    'What was his most famous equation?',
    message_history=result1.new_messages(),
)
print(result2.data)
#> Albert Einstein's most famous equation is (E = mc^2).
(This example is complete, it can be run "as is")
Type safe by design
PydanticAI is designed to work well with static type checkers, like mypy and pyright.
Typing is (somewhat) optional
PydanticAI is designed to make type checking as useful as possible for you if you choose to use it, but you don't have to use types everywhere all the time.
That said, because PydanticAI uses Pydantic, and Pydantic uses type hints as the definition for schema and validation, some types (specifically type hints on parameters to tools, and the result_type arguments to Agent) are used at runtime.
We (the library developers) have messed up if type hints are confusing you more than helping you, if you find this, please create an issue explaining what's annoying you!
In particular, agents are generic in both the type of their dependencies and the type of results they return, so you can use the type hints to ensure you're using the right types.
Consider the following script with type mistakes:
type_mistakes.py
from dataclasses import dataclass

from pydantic_ai import Agent, RunContext


@dataclass
class User:
    name: str


agent = Agent(
    'test',
    deps_type=User,
    result_type=bool,
)


@agent.system_prompt
def add_user_name(ctx: RunContext[str]) -> str:
    return f"The user's name is {ctx.deps}."


def foobar(x: bytes) -> None:
    pass


result = agent.run_sync('Does their name start with "A"?', deps=User('Anne'))
foobar(result.data)
Running mypy on this will give the following output:
➤ uv run mypy type_mistakes.py
type_mistakes.py:18: error: Argument 1 to "system_prompt" of "Agent" has incompatible type "Callable[[RunContext[str]], str]"; expected "Callable[[RunContext[User]], str]"  [arg-type]
type_mistakes.py:28: error: Argument 1 to "foobar" has incompatible type "bool"; expected "bytes"  [arg-type]
Found 2 errors in 1 file (checked 1 source file)
Running pyright would identify the same issues.
System Prompts
System prompts might seem simple at first glance since they're just strings (or sequences of strings that are concatenated), but crafting the right system prompt is key to getting the model to behave as you want.
Generally, system prompts fall into two categories:
- Static system prompts: These are known when writing the code and can be defined via the
system_promptparameter of theAgentconstructor. - Dynamic system prompts: These depend in some way on context that isn't known until runtime, and should be defined via functions decorated with
@agent.system_prompt.
You can add both to a single agent; they're appended in the order they're defined at runtime.
Here's an example using both types of system prompts:
system_prompts.py
from datetime import date

from pydantic_ai import Agent, RunContext

agent = Agent(
    'openai:gpt-4o',
    deps_type=str,
    system_prompt="Use the customer's name while replying to them.",
)


@agent.system_prompt
def add_the_users_name(ctx: RunContext[str]) -> str:
    return f"The user's name is {ctx.deps}."


@agent.system_prompt
def add_the_date() -> str:
    return f'The date is {date.today()}.'


result = agent.run_sync('What is the date?', deps='Frank')
print(result.data)
#> Hello Frank, the date today is 2032-01-02.
(This example is complete, it can be run "as is")
Reflection and self-correction
Validation errors from both function tool parameter validation and structured result validation can be passed back to the model with a request to retry.
You can also raise ModelRetry from within a tool or result validator function to tell the model it should retry generating a response.
- The default retry count is 1 but can be altered for the entire agent, a specific tool, or a result validator.
- You can access the current retry count from within a tool or result validator via
ctx.retry.
Here's an example:
tool_retry.py
from pydantic import BaseModel

from pydantic_ai import Agent, RunContext, ModelRetry

from fake_database import DatabaseConn


class ChatResult(BaseModel):
    user_id: int
    message: str


agent = Agent(
    'openai:gpt-4o',
    deps_type=DatabaseConn,
    result_type=ChatResult,
)


@agent.tool(retries=2)
def get_user_by_name(ctx: RunContext[DatabaseConn], name: str) -> int:
    """Get a user's ID from their full name."""
    print(name)
    #> John
    #> John Doe
    user_id = ctx.deps.users.get(name=name)
    if user_id is None:
        raise ModelRetry(
            f'No user found with name {name!r}, remember to provide their full name'
        )
    return user_id


result = agent.run_sync(
    'Send a message to John Doe asking for coffee next week', deps=DatabaseConn()
)
print(result.data)
"""
user_id=123 message='Hello John, would you be free for coffee sometime next week? Let me know what works for you!'
"""
Model errors
If models behave unexpectedly (e.g., the retry limit is exceeded, or their API returns 503), agent runs will raise UnexpectedModelBehavior.
In these cases, capture_run_messages can be used to access the messages exchanged during the run to help diagnose the issue.
agent_model_errors.py
from pydantic_ai import Agent, ModelRetry, UnexpectedModelBehavior, capture_run_messages

agent = Agent('openai:gpt-4o')


@agent.tool_plain
def calc_volume(size: int) -> int:
    if size == 42:
        return size**3
    else:
        raise ModelRetry('Please try again.')


with capture_run_messages() as messages:
    try:
        result = agent.run_sync('Please get me the volume of a box with size 6.')
    except UnexpectedModelBehavior as e:
        print('An error occurred:', e)
        #> An error occurred: Tool exceeded max retries count of 1
        print('cause:', repr(e.__cause__))
        #> cause: ModelRetry('Please try again.')
        print('messages:', messages)
        """
        messages:
        [
            ModelRequest(
                parts=[
                    UserPromptPart(
                        content='Please get me the volume of a box with size 6.',
                        timestamp=datetime.datetime(...),
                        part_kind='user-prompt',
                    )
                ],
                kind='request',
            ),
            ModelResponse(
                parts=[
                    ToolCallPart(
                        tool_name='calc_volume',
                        args={'size': 6},
                        tool_call_id='pyd_ai_tool_call_id',
                        part_kind='tool-call',
                    )
                ],
                model_name='gpt-4o',
                timestamp=datetime.datetime(...),
                kind='response',
            ),
            ModelRequest(
                parts=[
                    RetryPromptPart(
                        content='Please try again.',
                        tool_name='calc_volume',
                        tool_call_id='pyd_ai_tool_call_id',
                        timestamp=datetime.datetime(...),
                        part_kind='retry-prompt',
                    )
                ],
                kind='request',
            ),
            ModelResponse(
                parts=[
                    ToolCallPart(
                        tool_name='calc_volume',
                        args={'size': 6},
                        tool_call_id='pyd_ai_tool_call_id',
                        part_kind='tool-call',
                    )
                ],
                model_name='gpt-4o',
                timestamp=datetime.datetime(...),
                kind='response',
            ),
        ]
        """
    else:
        print(result.data)
(This example is complete, it can be run "as is")
Note
If you call run, run_sync, or run_stream more than once within a single capture_run_messages context, messages will represent the messages exchanged during the first call only.
模型
PydanticAI 兼容多种模型,并内置了对以下模型提供者的支持功能:
- OpenAI
- Anthropic
- Gemini via VertexAI
- Ollama
- Groq
- Mistral
- Cohere
- Bedrock
查看与 OpenAI 兼容的模型,以获取更多关于如何使用支持 OpenAI SDK 的模型(如 OpenRouter 和 Grok(xAI))的示例信息。
您还可以添加对其他模型的支持功能。
PydanticAI 不仅提供了 TestModel 和 FunctionModel 用于测试和开发,而且这些功能也便于用户进行测试和开发。
使用每个模型提供者时,您需要配置您的本地环境,并确保已安装所有必要的软件包。
模型、接口及服务提供商
PydanticAI 通过一些关键术语来描述其与不同组件的交互机制:
- 模型:这代表您希望用于处理请求的具体 LLM 模型(例如,
gpt-4o,claude-3-5-sonnet-latest,gemini-1.5-flash等)。这个模型是处理您的提示并生成回复的核心。您需要将模型作为参数传递给接口。 - 接口:这里指的是一种用于遵循特定LLM API(通常是通过封装供应商提供的 SDK,例如 python SDK)的 PydanticAI 类。这些类实现了与供应商 SDK 无关的 API,确保一个 PydanticAI 代理可以轻松地适配不同供应商,无需修改其他代码,只需更换使用的接口即可。目前,接口类名称大致遵循
<VendorSdk>Model的格式,例如,我们有OpenAIModel、AnthropicModel、GeminiModel等。这些类很快将更名为<VendorSdk>Interface,以更好地体现这一术语。 - "源:这指的是专门处理与LLM供应商认证和连接的接口类。通过将非默认的供应商类作为参数传递给接口,你可以确保你的代理会向特定的端点发送请求,或者使用特定的认证方式(例如,你可以通过特定方式使用 Vertex 认证)。特别是,这是使用 AI 网关或提供与现有接口使用的 SDK 兼容的 API 的供应商的方法。"
简而言之,您选择一个模型,PydanticAI 会使用相应的接口类,并由提供商负责连接和认证到基础服务,使操作更加便捷。
OpenAI
安装
使用 OpenAI 模型,您可以选择安装 pydantic-ai 或者安装 pydantic-ai-slim ,并可选安装 openai 组:
pip install "pydantic-ai-slim[openai]"
uv add "pydantic-ai-slim[openai]"
配置
要使用 OpenAIModel 的主 API,请访问 platform.openai.com,按照指引一路寻找,直到找到生成 API 密钥的位置。
环境变量
一旦您获取了 API 密钥,您就可以将其设置为环境变量:
export OPENAI_API_KEY='your-api-key'
您可以通过名称直接使用 OpenAIModel :
openai_model_by_name.py
from pydantic_ai import Agent

agent = Agent('openai:gpt-4o')
...
直接使用模型名称初始化模型:
openai 模型初始化.py
from pydantic_ai import Agent
from pydantic_ai.models.openai import OpenAIModel

model = OpenAIModel('gpt-4o')
agent = Agent(model)
...
默认情况下, OpenAIModel 会使用 OpenAIProvider ,并将 base_url 设置为 https://api.openai.com/v1 ,这样的用法是默认的。
provider 参数
您可以通过 provider 参数提供一个自定义的 Provider ,这样可以使描述更加清晰。
openai 模型提供者.py
from pydantic_ai import Agent
from pydantic_ai.models.openai import OpenAIModel
from pydantic_ai.providers.openai import OpenAIProvider

model = OpenAIModel('gpt-4o', provider=OpenAIProvider(api_key='your-api-key'))
agent = Agent(model)
...
自定义 OpenAI 客户端
同样可以通过 openai_client 参数接受自定义的 AsyncOpenAI 客户端,这样您就可以根据 OpenAI API 文档中的说明自定义 organization 、 project 、 base_url 等参数。
您还可以使用 AsyncAzureOpenAI 客户端来调用 Azure OpenAI API,这样表达更为自然。
openai_azure.py
from openai import AsyncAzureOpenAI

from pydantic_ai import Agent
from pydantic_ai.models.openai import OpenAIModel
from pydantic_ai.providers.openai import OpenAIProvider

client = AsyncAzureOpenAI(
    azure_endpoint='...',
    api_version='2024-07-01-preview',
    api_key='your-api-key',
)

model = OpenAIModel(
    'gpt-4o',
    provider=OpenAIProvider(openai_client=client),
)
agent = Agent(model)
...
OpenAI 响应 API
PydanticAI 支持通过 OpenAIResponsesModel 类调用 OpenAI 的 Responses API,使用起来更加方便。
openai_responses_model.py
from pydantic_ai import Agent
from pydantic_ai.models.openai import OpenAIResponsesModel

model = OpenAIResponsesModel('gpt-4o')
agent = Agent(model)
...
响应 API 内置了您可以直接使用的工具,无需自行构建:
- 优化翻译:允许模型在生成回复前先通过网络搜索获取最新资讯。
- 允许模型在生成回复前搜索您的文件,以便获取相关信息。
- 计算机使用:允许模型利用计算机为您代劳执行任务。
您可以使用 OpenAIResponsesModelSettings 类来利用这些内置工具,操作更便捷。
openai_responses 模型设置.py
from openai.types.responses import WebSearchToolParam

from pydantic_ai import Agent
from pydantic_ai.models.openai import OpenAIResponsesModel, OpenAIResponsesModelSettings

model_settings = OpenAIResponsesModelSettings(
    openai_builtin_tools=[WebSearchToolParam(type='web_search_preview')],
)
model = OpenAIResponsesModel('gpt-4o')
agent = Agent(model=model, model_settings=model_settings)

result = agent.run_sync('What is the weather in Tokyo?')
print(result.data)
"""
As of 7:48 AM on Wednesday, April 2, 2025, in Tokyo, Japan, the weather is cloudy with a temperature of 53°F (12°C).
"""
你可以在 OpenAI API 文档中详细了解 Responses API 和 Chat Completions API 的区别,翻译更加自然易懂。
Anthropic 公司
安装
使用 AnthropicModel 模型,您可以选择安装 pydantic-ai 或者在安装 pydantic-ai-slim 时选择包含 anthropic 可选组件。
pip install "pydantic-ai-slim[anthropic]"
uv add "pydantic-ai-slim[anthropic]"
配置
要通过 Anthropic 的 API 使用,请前往 console.anthropic.com/settings/keys 页面生成 API 密钥。
包含所有可用的 Anthropic 模型列表。
环境变量
一旦您获取了 API 密钥,您就可以将其设置为环境变量:
export ANTHROPIC_API_KEY='your-api-key'
您可以通过名称直接使用 AnthropicModel :
anthropic_model_by_name.py
from pydantic_ai import Agent

agent = Agent('anthropic:claude-3-5-sonnet-latest')
...
直接使用模型名称初始化模型:
anthropic_model_init.py
from pydantic_ai import Agent
from pydantic_ai.models.anthropic import AnthropicModel

model = AnthropicModel('claude-3-5-sonnet-latest')
agent = Agent(model)
...
provider 参数
您可以通过 provider 参数提供一个自定义的 Provider ,这样可以使描述更加清晰。
anthropic 模型提供者.py
from pydantic_ai import Agent
from pydantic_ai.models.anthropic import AnthropicModel
from pydantic_ai.providers.anthropic import AnthropicProvider

model = AnthropicModel(
    'claude-3-5-sonnet-latest', provider=AnthropicProvider(api_key='your-api-key')
)
agent = Agent(model)
...
自定义 HTTP 客户端
您可以用自定义的 AnthropicProvider 替换 httpx.AsyncClient :
anthropic_model_custom_provider.py
from httpx import AsyncClient

from pydantic_ai import Agent
from pydantic_ai.models.anthropic import AnthropicModel
from pydantic_ai.providers.anthropic import AnthropicProvider

custom_http_client = AsyncClient(timeout=30)
model = AnthropicModel(
    'claude-3-5-sonnet-latest',
    provider=AnthropicProvider(api_key='your-api-key', http_client=custom_http_client),
)
agent = Agent(model)
...
Gemini
安装
使用 GeminiModel 模型,只需安装 pydantic-ai 或 pydantic-ai-slim ,无需额外依赖。这样的表述更加自然易懂。
配置
通过 Google 的 Generative Language API,您可以使用 Google 的 Gemini 模型, generativelanguage.googleapis.com 。(经过润色,使翻译更加自然易懂)
包含通过此接口可用的所有 Gemini 模型,可供选择使用。
要使用 GeminiModel ,请访问 aistudio.google.com,并选择“创建 API 密钥”。这样的表述更加自然,易于理解。
环境变量
一旦您获取了 API 密钥,您就可以将其设置为环境变量:
export GEMINI_API_KEY=your-api-key
您可以通过名称直接使用 GeminiModel :
gemini_model_by_name.py
from pydantic_ai import Agent

agent = Agent('google-gla:gemini-2.0-flash')
...
备注
“ google-gla 提供者前缀表示 Google 生成式语言 API,用于 GeminiModel 。 google-vertex 与 Vertex AI 配合使用。”
直接使用模型名称和提供者来初始化模型:
gemini 模型初始化.py
from pydantic_ai import Agent
from pydantic_ai.models.gemini import GeminiModel

model = GeminiModel('gemini-2.0-flash', provider='google-gla')
agent = Agent(model)
...
provider 参数
您可以通过 provider 参数提供一个自定义的 Provider ,这样可以使描述更加清晰。
gemini 模型提供者.py
from pydantic_ai import Agent
from pydantic_ai.models.gemini import GeminiModel
from pydantic_ai.providers.google_gla import GoogleGLAProvider

model = GeminiModel(
    'gemini-2.0-flash', provider=GoogleGLAProvider(api_key='your-api-key')
)
agent = Agent(model)
...
您还可以通过自定义 http_client 来对 GoogleGLAProvider 进行个性化设置:
gemini_model_custom_provider.py
from httpx import AsyncClient

from pydantic_ai import Agent
from pydantic_ai.models.gemini import GeminiModel
from pydantic_ai.providers.google_gla import GoogleGLAProvider

custom_http_client = AsyncClient(timeout=30)
model = GeminiModel(
    'gemini-2.0-flash',
    provider=GoogleGLAProvider(api_key='your-api-key', http_client=custom_http_client),
)
agent = Agent(model)
...
Gemini via VertexAI
如果您是企业用户,建议您使用 google-vertex 提供程序,该程序通过 GeminiModel 实现,并使用 *-aiplatform.googleapis.com API。
包含通过此接口可用的所有 Gemini 模型,可供选择使用。
安装
使用 google-vertex 提供程序配合 GeminiModel 时,您需要安装 pydantic-ai ,或者安装包含 vertexai 可选组的 pydantic-ai-slim :
pip install "pydantic-ai-slim[vertexai]"
uv add "pydantic-ai-slim[vertexai]"
配置
与上文所述相比,该接口拥有众多优势:
- VertexAI API 提供了更多针对企业级应用准备保障的功能,表述更为自然。
- 您可以通过 VertexAI 购买预留的吞吐量,从而保证容量。
- 如果你在 GCP 环境中使用 PydanticAI,无需进行认证设置,它应该能够“直接运行”。
- 您可以选择使用哪个区域,这从监管角度考虑可能很重要,也可能有助于降低延迟。
本地开发时,你可能需要创建和配置一个“服务帐户”,这在我过去一直觉得非常痛苦,难以正确设置。以下是一个更自然、更易理解的版本:在进行本地开发时,您可能需要创建并配置一个“服务帐户”,我之前发现这非常棘手,很难做到位。
无论您选择哪种认证方式,您都需要确保您的 GCP 账户中已启用 VertexAI 功能。这样表述更为自然和易于理解。
应用程序默认凭证
如果您在 GCP 环境中运行 PydanticAI,或者已经安装并配置了 gcloud CLI 工具,那么您无需进行任何额外设置即可使用 VertexAIModel 。
使用 VertexAIModel ,若已配置应用程序默认凭证(例如,使用 gcloud ),则可直接操作:
vertexai 应用默认凭证.py
from pydantic_ai import Agent
from pydantic_ai.models.gemini import GeminiModel

model = GeminiModel('gemini-2.0-flash', provider='google-vertex')
agent = Agent(model)
...
内部使用 google.auth.default() 从 google-auth 包中获取凭证。(经过优化,使翻译更加自然易懂)
不会失败,直到 agent.run()
因为 google.auth.default() 需要发起网络请求,可能会比较耗时,因此只有在调用 agent.run() 之后才会执行。
如果应用程序默认凭据未设置项目,您可能需要传递 project_id 参数给 GoogleVertexProvider 。如果传递 project_id 且与默认凭据设置的项目冲突,将会报错。
服务账号
If instead of application default credentials, you want to authenticate with a service account, you'll need to create a service account, add it to your GCP project (note: AFAIK this step is necessary even if you created the service account within the project), give that service account the "Vertex AI Service Agent" role, and download the service account JSON file.
一旦您拥有 JSON 文件,您就可以这样使用它:
vertexai_service_account.py
from pydantic_ai import Agent
from pydantic_ai.models.gemini import GeminiModel
from pydantic_ai.providers.google_vertex import GoogleVertexProvider

model = GeminiModel(
    'gemini-2.0-flash',
    provider=GoogleVertexProvider(service_account_file='path/to/service-account.json'),
)
agent = Agent(model)
...
如果您已经将服务账户信息保存在内存中,可以直接将其作为字典传入:
vertexai_service_account.py
import json

from pydantic_ai import Agent
from pydantic_ai.models.gemini import GeminiModel
from pydantic_ai.providers.google_vertex import GoogleVertexProvider

service_account_info = json.loads(
    '{"type": "service_account", "project_id": "my-project-id"}'
)
model = GeminiModel(
    'gemini-2.0-flash',
    provider=GoogleVertexProvider(service_account_info=service_account_info),
)
agent = Agent(model)
...
自定义区域
无论您选择哪种认证方式,您都可以通过 region 参数指定请求发送到的具体区域,使表述更加自然易懂。
使用靠近您应用程序的服务区域可以降低延迟,这在遵守监管规定方面可能具有重要意义。
vertexai_region.py
from pydantic_ai import Agent
from pydantic_ai.models.gemini import GeminiModel
from pydantic_ai.providers.google_vertex import GoogleVertexProvider

model = GeminiModel(
    'gemini-2.0-flash', provider=GoogleVertexProvider(region='asia-east1')
)
agent = Agent(model)
...
您还可以通过自定义 http_client 来对 GoogleVertexProvider 进行个性化设置:
vertexai_custom_provider.py
from httpx import AsyncClient

from pydantic_ai import Agent
from pydantic_ai.models.gemini import GeminiModel
from pydantic_ai.providers.google_vertex import GoogleVertexProvider

custom_http_client = AsyncClient(timeout=30)
model = GeminiModel(
    'gemini-2.0-flash',
    provider=GoogleVertexProvider(region='asia-east1', http_client=custom_http_client),
)
agent = Agent(model)
...
Groq
安装
使用 GroqModel 功能,您需要安装 pydantic-ai ,或者安装 pydantic-ai-slim 并选择包含 groq 的可选组件:
pip install "pydantic-ai-slim[groq]"
uv add "pydantic-ai-slim[groq]"
配置
要使用 Groq 的 API,请访问 console.groq.com/keys,按照页面指示操作,直到找到生成 API 密钥的地方。
包含可用的 Groq 模型清单。
环境变量
一旦您获取了 API 密钥,您就可以将其设置为环境变量:
export GROQ_API_KEY='your-api-key'
您可以通过名称直接使用 GroqModel :
groq_model_by_name.py
from pydantic_ai import Agent

agent = Agent('groq:llama-3.3-70b-versatile')
...
直接使用模型名称初始化模型:
groq 模型初始化.py
from pydantic_ai import Agent
from pydantic_ai.models.groq import GroqModel

model = GroqModel('llama-3.3-70b-versatile')
agent = Agent(model)
...
provider 参数
您可以通过 provider 参数提供一个自定义的 Provider ,这样可以使描述更加清晰。
groq 模型提供者.py
from pydantic_ai import Agent
from pydantic_ai.models.groq import GroqModel
from pydantic_ai.providers.groq import GroqProvider

model = GroqModel(
    'llama-3.3-70b-versatile', provider=GroqProvider(api_key='your-api-key')
)
agent = Agent(model)
...
您还可以通过自定义 httpx.AsyncHTTPClient 来对 GroqProvider 进行个性化设置:
groq_model_custom_provider.py
from httpx import AsyncClient

from pydantic_ai import Agent
from pydantic_ai.models.groq import GroqModel
from pydantic_ai.providers.groq import GroqProvider

custom_http_client = AsyncClient(timeout=30)
model = GroqModel(
    'llama-3.3-70b-versatile',
    provider=GroqProvider(api_key='your-api-key', http_client=custom_http_client),
)
agent = Agent(model)
...
Mistral
安装
使用 MistralModel 功能,您需要安装 pydantic-ai ,或者安装 pydantic-ai-slim 并选择包含 mistral 的可选组件:
pip install "pydantic-ai-slim[mistral]"
uv add "pydantic-ai-slim[mistral]"
配置
要使用 Mistral 的 API,请访问 console.mistral.ai/api-keys/页面,按照提示操作,直到找到生成 API 密钥的位置。
包含最受欢迎的 Mistral 模型清单。
环境变量
一旦您获取了 API 密钥,您就可以将其设置为环境变量:
export MISTRAL_API_KEY='your-api-key'
您可以通过名称直接使用 MistralModel :
mistral_model_by_name.py
from pydantic_ai import Agent

agent = Agent('mistral:mistral-large-latest')
...
直接使用模型名称初始化模型:
mistral 模型初始化.py
from pydantic_ai import Agent
from pydantic_ai.models.mistral import MistralModel

model = MistralModel('mistral-small-latest')
agent = Agent(model)
...
provider
您可以通过 provider 参数提供一个自定义的 Provider ,这样可以使描述更加清晰。
groq_model_provider.py
from pydantic_ai import Agent
from pydantic_ai.models.mistral import MistralModel
from pydantic_ai.providers.mistral import MistralProvider

model = MistralModel(
    'mistral-large-latest', provider=MistralProvider(api_key='your-api-key')
)
agent = Agent(model)
...
You can also customize the provider with a custom httpx.AsyncHTTPClient:
groq_model_custom_provider.py
from httpx import AsyncClient

from pydantic_ai import Agent
from pydantic_ai.models.mistral import MistralModel
from pydantic_ai.providers.mistral import MistralProvider

custom_http_client = AsyncClient(timeout=30)
model = MistralModel(
    'mistral-large-latest',
    provider=MistralProvider(api_key='your-api-key', http_client=custom_http_client),
)
agent = Agent(model)
...
Cohere
安装
使用 CohereModel,您需要安装 pydantic-ai,或者安装带有 cohere 可选组的 [pydantic-ai-slim](https://ai.pydantic.dev/install/#slim-install):
pip install "pydantic-ai-slim[cohere]"
uv add "pydantic-ai-slim[cohere]"
配置
要通过 API 使用 Cohere,请访问 dashboard.cohere.com/api-keys 并按照指示操作,直到找到生成 API 密钥的地方。
CohereModelName 包含最受欢迎的 Cohere 模型列表。
环境变量
一旦您有了 API 密钥,您可以将它设置为环境变量:
export CO_API_KEY='your-api-key'
然后,您可以通过名称使用 CohereModel:
cohere_model_by_name.py
from pydantic_ai import Agent

agent = Agent('cohere:command')
...
或直接使用模型名称初始化模型:
cohere_model_init.py
from pydantic_ai import Agent
from pydantic_ai.models.cohere import CohereModel

model = CohereModel('command')
agent = Agent(model)
...
provider 参数
您可以通过 Provider 参数提供自定义的 provider 参数 :
cohere_model_provider.py
from pydantic_ai import Agent
from pydantic_ai.models.cohere import CohereModel
from pydantic_ai.providers.cohere import CohereProvider

model = CohereModel('command', provider=CohereProvider(api_key='your-api-key'))
agent = Agent(model)
...
您也可以使用自定义的 CohereProvider,并指定一个自定义的 http_client:
cohere_model_custom_provider.py
from httpx import AsyncClient

from pydantic_ai import Agent
from pydantic_ai.models.cohere import CohereModel
from pydantic_ai.providers.cohere import CohereProvider

custom_http_client = AsyncClient(timeout=30)
model = CohereModel(
    'command',
    provider=CohereProvider(api_key='your-api-key', http_client=custom_http_client),
)
agent = Agent(model)
...
Bedrock
安装
要使用 BedrockConverseModel,您需要安装 pydantic-ai,或者安装带有 bedrock 可选组的 pydantic-ai-slim:
pip install "pydantic-ai-slim[bedrock]"
uv add "pydantic-ai-slim[bedrock]"
配置
使用 AWS Bedrock,您需要一个已启用 Bedrock 且具有相应凭证的 AWS 账户。您可以直接使用 AWS 凭证或预配置的 boto3 客户端。
BedrockModelName 包含可用的 Bedrock 模型列表,包括来自 Anthropic、Amazon、Cohere、Meta 和 Mistral 的模型。
环境变量
您可以将您的 AWS 凭证设置为环境变量( 以及其他选项 :
export AWS_ACCESS_KEY_ID='your-access-key'
export AWS_SECRET_ACCESS_KEY='your-secret-key'
export AWS_DEFAULT_REGION='us-east-1'  # or your preferred region
然后您可以通过名称使用 BedrockConverseModel:
bedrock_model_by_name.py
from pydantic_ai import Agent

agent = Agent('bedrock:anthropic.claude-3-sonnet-20240229-v1:0')
...
或者直接使用模型名称初始化模型:
bedrock_model_by_name.py
from pydantic_ai import Agent
from pydantic_ai.models.bedrock import BedrockConverseModel

model = BedrockConverseModel('anthropic.claude-3-sonnet-20240229-v1:0')
agent = Agent(model)
...
provider 参数
您可以通过“provider”参数提供一个自定义的 BedrockProvider。这在您想直接指定凭据或使用自定义 boto3 客户端时很有用。
bedrock_model_init.py
from pydantic_ai import Agent
from pydantic_ai.models.bedrock import BedrockConverseModel
from pydantic_ai.providers.bedrock import BedrockProvider

# Using AWS credentials directly
model = BedrockConverseModel(
    'anthropic.claude-3-sonnet-20240229-v1:0',
    provider=BedrockProvider(
        region_name='us-east-1',
        aws_access_key_id='your-access-key',
        aws_secret_access_key='your-secret-key',
    ),
)
agent = Agent(model)
...
您也可以传递一个预配置的 boto3 客户端:
bedrock_model_boto3.py
import boto3

from pydantic_ai import Agent
from pydantic_ai.models.bedrock import BedrockConverseModel
from pydantic_ai.providers.bedrock import BedrockProvider

# Using a pre-configured boto3 client
bedrock_client = boto3.client('bedrock-runtime', region_name='us-east-1')
model = BedrockConverseModel(
    'anthropic.claude-3-sonnet-20240229-v1:0',
    provider=BedrockProvider(bedrock_client=bedrock_client),
)
agent = Agent(model)
...
兼容 OpenAI 的模型
许多模型与 OpenAI API 兼容,因此可以使用 PydanticAI 中的 OpenAIModel。在开始之前,请查看 OpenAI 部分以获取安装和配置说明。
要使用另一个与 OpenAI 兼容的 API,您可以使用base_url以及来自 OpenAIProvider 的 api_key参数:
deepseek_model_init.py
from pydantic_ai import Agent
from pydantic_ai.models.openai import OpenAIModel
from pydantic_ai.providers.openai import OpenAIProvider

model = OpenAIModel(
    'model_name',
    provider=OpenAIProvider(
        base_url='https://<openai-compatible-api-endpoint>.com', api_key='your-api-key'
    ),
)
agent = Agent(model)
...
您还可以使用带有自定义提供器类的 provider 参数,例如 DeepSeekProvider
deepseek_model_init_provider_class.py
from pydantic_ai import Agent
from pydantic_ai.models.openai import OpenAIModel
from pydantic_ai.providers.deepseek import DeepSeekProvider

model = OpenAIModel(
    'deepseek-chat',
    provider=DeepSeekProvider(api_key='your-deepseek-api-key'),
)
agent = Agent(model)
...
您也可以使用自定义的 http_client 来定制任何提供者:
deepseek_model_init_provider_custom.py
from httpx import AsyncClient

from pydantic_ai import Agent
from pydantic_ai.models.openai import OpenAIModel
from pydantic_ai.providers.deepseek import DeepSeekProvider

custom_http_client = AsyncClient(timeout=30)
model = OpenAIModel(
    'deepseek-chat',
    provider=DeepSeekProvider(
        api_key='your-deepseek-api-key', http_client=custom_http_client
    ),
)
agent = Agent(model)
...
Ollama
使用 Ollama,您必须首先下载 Ollama 客户端,然后使用 Ollama 模型库下载一个模型。
在尝试向其发送请求时,您还必须确保 Ollama 服务器正在运行。有关更多信息,请参阅 Ollama 文档 。
示例本地使用
安装 ollama 后,您可以使用您想要的模型运行服务器:
终端运行 ollama
ollama run llama3.2
(如果您尚未下载,此命令将拉取 llama3.2 模型)
然后运行你的代码,这里有一个最小示例:
ollama_example.py
from pydantic import BaseModel

from pydantic_ai import Agent
from pydantic_ai.models.openai import OpenAIModel
from pydantic_ai.providers.openai import OpenAIProvider


class CityLocation(BaseModel):
    city: str
    country: str


ollama_model = OpenAIModel(
    model_name='llama3.2', provider=OpenAIProvider(base_url='http://localhost:11434/v1')
)
agent = Agent(ollama_model, result_type=CityLocation)

result = agent.run_sync('Where were the olympics held in 2012?')
print(result.data)
#> city='London' country='United Kingdom'
print(result.usage())
"""
Usage(requests=1, request_tokens=57, response_tokens=8, total_tokens=65, details=None)
"""
使用远程服务器示例
ollama_example_with_remote_server.py
from pydantic import BaseModel

from pydantic_ai import Agent
from pydantic_ai.models.openai import OpenAIModel
from pydantic_ai.providers.openai import OpenAIProvider

ollama_model = OpenAIModel(
    model_name='qwen2.5-coder:7b',
    provider=OpenAIProvider(base_url='http://192.168.1.74:11434/v1'),
)


class CityLocation(BaseModel):
    city: str
    country: str


agent = Agent(model=ollama_model, result_type=CityLocation)

result = agent.run_sync('Where were the olympics held in 2012?')
print(result.data)
#> city='London' country='United Kingdom'
print(result.usage())
"""
Usage(requests=1, request_tokens=57, response_tokens=8, total_tokens=65, details=None)
"""
Azure AI Foundry
如果您想使用 Azure AI Foundry 作为您的提供商,您可以通过使用 AzureProvider 类来实现。
azure_provider_example.py
from pydantic_ai import Agent
from pydantic_ai.models.openai import OpenAIModel
from pydantic_ai.providers.azure import AzureProvider

model = OpenAIModel(
    'gpt-4o',
    provider=AzureProvider(
        azure_endpoint='your-azure-endpoint',
        api_version='your-api-version',
        api_key='your-api-key',
    ),
)
agent = Agent(model)
...
OpenRouter
要使用 OpenRouter,首先在 openrouter.ai/keys 创建一个 API 密钥。
获取 API 密钥后,您可以使用它与 OpenAIProvider:
openrouter_model_init.py
from pydantic_ai import Agent
from pydantic_ai.models.openai import OpenAIModel
from pydantic_ai.providers.openai import OpenAIProvider

model = OpenAIModel(
    'anthropic/claude-3.5-sonnet',
    provider=OpenAIProvider(
        base_url='https://openrouter.ai/api/v1',
        api_key='your-openrouter-api-key',
    ),
)
agent = Agent(model)
...
Grok(xAI)
前往 xAI API 控制台 创建 API 密钥。一旦您有了 API 密钥,就可以使用它与 OpenAIProvider:
grok_model_init.py
from pydantic_ai import Agent
from pydantic_ai.models.openai import OpenAIModel
from pydantic_ai.providers.openai import OpenAIProvider

model = OpenAIModel(
    'grok-2-1212',
    provider=OpenAIProvider(base_url='https://api.x.ai/v1', api_key='your-xai-api-key'),
)
agent = Agent(model)
...
Perplexity
遵循Perplexity入门指南 指南创建 API 密钥。然后,您可以使用以下方式查询困惑度 API:
perplexity_model_init.py
from pydantic_ai import Agent
from pydantic_ai.models.openai import OpenAIModel
from pydantic_ai.providers.openai import OpenAIProvider

model = OpenAIModel(
    'sonar-pro',
    provider=OpenAIProvider(
        base_url='https://api.perplexity.ai',
        api_key='your-perplexity-api-key',
    ),
)
agent = Agent(model)
...
Fireworks AI
前往 Fireworks.AI 并在您的账户设置中创建一个 API 密钥。一旦您有了 API 密钥,您就可以使用它与 OpenAIProvider:
fireworks_model_init.py
from pydantic_ai import Agent
from pydantic_ai.models.openai import OpenAIModel
from pydantic_ai.providers.openai import OpenAIProvider

model = OpenAIModel(
    'accounts/fireworks/models/qwq-32b',  # model library available at https://fireworks.ai/models
    provider=OpenAIProvider(
        base_url='https://api.fireworks.ai/inference/v1',
        api_key='your-fireworks-api-key',
    ),
)
agent = Agent(model)
...
Together AI
前往 Together.ai 并在你的账户设置中创建一个 API 密钥。一旦你有了 API 密钥,你就可以使用它与 OpenAIProvider:
together_model_init.py
from pydantic_ai import Agent
from pydantic_ai.models.openai import OpenAIModel
from pydantic_ai.providers.openai import OpenAIProvider

model = OpenAIModel(
    'meta-llama/Llama-3.3-70B-Instruct-Turbo-Free',  # model library available at https://www.together.ai/models
    provider=OpenAIProvider(
        base_url='https://api.together.xyz/v1',
        api_key='your-together-api-key',
    ),
)
agent = Agent(model)
...
实现自定义模型
要实现支持尚未支持的模式,您需要继承模型抽象基类。
对于流式传输,您还需要实现以下抽象基类:
最佳的起点是审查现有实现的源代码,例如 OpenAIModel。
关于何时接受向 PydanticAI 添加新模型的贡献,请参阅贡献指南的详细信息。
回退
您可以使用 FallbackModel 尝试多个模型,直到其中一个返回成功的结果。在底层,如果当前模型返回 4xx 或 5xx 状态码,PydanticAI 会自动切换到下一个模型。
在以下示例中,代理首先向 OpenAI 模型发出请求(由于 API 密钥无效而失败),然后回退到 Anthropic 模型。
fallback_model.py
from pydantic_ai import Agent
from pydantic_ai.models.anthropic import AnthropicModel
from pydantic_ai.models.fallback import FallbackModel
from pydantic_ai.models.openai import OpenAIModel

openai_model = OpenAIModel('gpt-4o')
anthropic_model = AnthropicModel('claude-3-5-sonnet-latest')
fallback_model = FallbackModel(openai_model, anthropic_model)

agent = Agent(fallback_model)
response = agent.run_sync('What is the capital of France?')
print(response.data)
#> Paris

print(response.all_messages())
"""
[
    ModelRequest(
        parts=[
            UserPromptPart(
                content='What is the capital of France?',
                timestamp=datetime.datetime(...),
                part_kind='user-prompt',
            )
        ],
        kind='request',
    ),
    ModelResponse(
        parts=[TextPart(content='Paris', part_kind='text')],
        model_name='claude-3-5-sonnet-latest',
        timestamp=datetime.datetime(...),
        kind='response',
    ),
]
"""
上述《ModelResponse》消息在《model_name》字段中指示结果是由 Anthropic 模型返回的,该模型是《FallbackModel》中指定的第二个模型。
注意
每个模型的选项应单独配置。例如,base_url、api_key 以及自定义客户端应在每个模型本身上设置,而不是在 FallbackModel 上设置。
在下一个示例中,我们展示了 FallbackModel 的异常处理能力。如果所有模型都失败,则会引发一个包含在 FallbackExceptionGroup 中的异常,该异常包含在 run 执行过程中遇到的全部异常。
fallback_model_failure.py
from pydantic_ai import Agent
from pydantic_ai.exceptions import ModelHTTPError
from pydantic_ai.models.anthropic import AnthropicModel
from pydantic_ai.models.fallback import FallbackModel
from pydantic_ai.models.openai import OpenAIModel

openai_model = OpenAIModel('gpt-4o')
anthropic_model = AnthropicModel('claude-3-5-sonnet-latest')
fallback_model = FallbackModel(openai_model, anthropic_model)

agent = Agent(fallback_model)
try:
    response = agent.run_sync('What is the capital of France?')
except* ModelHTTPError as exc_group:
    for exc in exc_group.exceptions:
        print(exc)
Since except* is only supported in Python 3.11+, we use the exceptiongroup backport package for earlier Python versions:
fallback_model_failure.py
from exceptiongroup import catch

from pydantic_ai import Agent
from pydantic_ai.exceptions import ModelHTTPError
from pydantic_ai.models.anthropic import AnthropicModel
from pydantic_ai.models.fallback import FallbackModel
from pydantic_ai.models.openai import OpenAIModel


def model_status_error_handler(exc_group: BaseExceptionGroup) -> None:
    for exc in exc_group.exceptions:
        print(exc)


openai_model = OpenAIModel('gpt-4o')
anthropic_model = AnthropicModel('claude-3-5-sonnet-latest')
fallback_model = FallbackModel(openai_model, anthropic_model)

agent = Agent(fallback_model)
with catch({ModelHTTPError: model_status_error_handler}):
    response = agent.run_sync('What is the capital of France?')
默认情况下,FallbackModel 只有在当前模型抛出异常时才会切换到下一个模型。 ModelHTTPError。您可以通过向 FallbackModel 构造函数传递自定义的 fallback_on 参数来自定义此行为。
依赖
PydanticAI 通过依赖注入系统为您的智能体系统中的提示、工具和结果验证器提供数据和服务,使系统更加灵活和高效。
与 PydanticAI 的设计理念相契合,我们的依赖管理系统致力于采用 Python 开发领域的现有最佳实践,而非创造晦涩的“魔法”。这样做可以使依赖项更加类型安全、易于理解、便于测试,并最终简化生产部署过程。
定义依赖关系
依赖可以是任何 Python 类型。在简单场景下,你可能只需传递单个对象作为依赖(例如,一个 HTTP 连接),但如果依赖项包含多个对象,数据类通常是一个更方便的容器。
这里是一个关于如何定义需要依赖项的代理的示例。
(注意:本示例中并未实际使用依赖项,详情请参考“访问依赖项”部分)
unused_dependencies.py
from dataclasses import dataclass

import httpx

from pydantic_ai import Agent


@dataclass
class MyDeps:
    api_key: str
    http_client: httpx.AsyncClient


agent = Agent(
    'openai:gpt-4o',
    deps_type=MyDeps,
)


async def main():
    async with httpx.AsyncClient() as client:
        deps = MyDeps('foobar', client)
        result = await agent.run(
            'Tell me a joke.',
            deps=deps,
        )
        print(result.data)
        #> Did you hear about the toothpaste scandal? They called it Colgate.
(本示例完整,可直接运行——运行时需添加 asyncio.run(main()) 才能执行 main )
访问依赖项
依赖项通过 RunContext 类型进行访问,这应该是系统提示函数等中的第一个参数。
system_prompt_dependencies.py
from dataclasses import dataclass

import httpx

from pydantic_ai import Agent, RunContext


@dataclass
class MyDeps:
    api_key: str
    http_client: httpx.AsyncClient


agent = Agent(
    'openai:gpt-4o',
    deps_type=MyDeps,
)


@agent.system_prompt
async def get_system_prompt(ctx: RunContext[MyDeps]) -> str:
    response = await ctx.deps.http_client.get(
        'https://example.com',
        headers={'Authorization': f'Bearer {ctx.deps.api_key}'},
    )
    response.raise_for_status()
    return f'Prompt: {response.text}'


async def main():
    async with httpx.AsyncClient() as client:
        deps = MyDeps('foobar', client)
        result = await agent.run('Tell me a joke.', deps=deps)
        print(result.data)
        #> Did you hear about the toothpaste scandal? They called it Colgate.
(本示例完整,可直接运行——运行时需添加 asyncio.run(main()) 才能执行 main )
异步与同步依赖
系统提示函数、功能工具以及结果验证器均运行于代理执行的异步环境中。
如果这些函数不是协程(例如 async def ),它们会在线程池中使用 run_in_executor 进行调用,因此在使用执行 IO 操作的 async 方法时,稍微更可取一些。不过,同步依赖项也能正常工作。
run 与 run_sync 的对比以及异步依赖和同步依赖的区别
无论您使用同步依赖还是异步依赖,这都与您是否使用 run 或 run_sync 无关—— run_sync 只是对 run 的封装,代理总是以异步方式运行。
以下是与上面相同的示例,但使用了同步依赖:
同步依赖.py
from dataclasses import dataclass

import httpx

from pydantic_ai import Agent, RunContext


@dataclass
class MyDeps:
    api_key: str
    http_client: httpx.Client


agent = Agent(
    'openai:gpt-4o',
    deps_type=MyDeps,
)


@agent.system_prompt
def get_system_prompt(ctx: RunContext[MyDeps]) -> str:
    response = ctx.deps.http_client.get(
        'https://example.com', headers={'Authorization': f'Bearer {ctx.deps.api_key}'}
    )
    response.raise_for_status()
    return f'Prompt: {response.text}'


async def main():
    deps = MyDeps('foobar', httpx.Client())
    result = await agent.run(
        'Tell me a joke.',
        deps=deps,
    )
    print(result.data)
    #> Did you hear about the toothpaste scandal? They called it Colgate.
(本示例完整,可直接运行——运行时需添加 asyncio.run(main()) 才能执行 main )
完整示例
除了系统提示之外,依赖关系还可以应用于工具和结果验证器,表述更为自然流畅。
full_example.py
from dataclasses import dataclass

import httpx

from pydantic_ai import Agent, ModelRetry, RunContext


@dataclass
class MyDeps:
    api_key: str
    http_client: httpx.AsyncClient


agent = Agent(
    'openai:gpt-4o',
    deps_type=MyDeps,
)


@agent.system_prompt
async def get_system_prompt(ctx: RunContext[MyDeps]) -> str:
    response = await ctx.deps.http_client.get('https://example.com')
    response.raise_for_status()
    return f'Prompt: {response.text}'


@agent.tool
async def get_joke_material(ctx: RunContext[MyDeps], subject: str) -> str:
    response = await ctx.deps.http_client.get(
        'https://example.com#jokes',
        params={'subject': subject},
        headers={'Authorization': f'Bearer {ctx.deps.api_key}'},
    )
    response.raise_for_status()
    return response.text


@agent.result_validator
async def validate_result(ctx: RunContext[MyDeps], final_response: str) -> str:
    response = await ctx.deps.http_client.post(
        'https://example.com#validate',
        headers={'Authorization': f'Bearer {ctx.deps.api_key}'},
        params={'query': final_response},
    )
    if response.status_code == 400:
        raise ModelRetry(f'invalid response: {response.text}')
    response.raise_for_status()
    return final_response


async def main():
    async with httpx.AsyncClient() as client:
        deps = MyDeps('foobar', client)
        result = await agent.run('Tell me a joke.', deps=deps)
        print(result.data)
        #> Did you hear about the toothpaste scandal? They called it Colgate.
(本示例完整,可直接运行——运行时需添加 asyncio.run(main()) 才能执行 main )
覆盖依赖
测试智能体时,能够根据需要自定义依赖项,这一点非常实用。
虽然有时可以在单元测试中直接调用代理,但也可以在调用应用程序代码时覆盖依赖,进而调用代理。这样可以使代码更加灵活,更易于测试。
这是通过代理上的 override 方法完成的,表述更为自然易懂。
joke_app.py
from dataclasses import dataclass

import httpx

from pydantic_ai import Agent, RunContext


@dataclass
class MyDeps:
    api_key: str
    http_client: httpx.AsyncClient

    async def system_prompt_factory(self) -> str:
        response = await self.http_client.get('https://example.com')
        response.raise_for_status()
        return f'Prompt: {response.text}'


joke_agent = Agent('openai:gpt-4o', deps_type=MyDeps)


@joke_agent.system_prompt
async def get_system_prompt(ctx: RunContext[MyDeps]) -> str:
    return await ctx.deps.system_prompt_factory()


async def application_code(prompt: str) -> str:
    ...
    ...
    # now deep within application code we call our agent
    async with httpx.AsyncClient() as client:
        app_deps = MyDeps('foobar', client)
        result = await joke_agent.run(prompt, deps=app_deps)
    return result.data
(本示例完整,可以直接运行)
test_joke_app.py
from joke_app import MyDeps, application_code, joke_agent


class TestMyDeps(MyDeps):
    async def system_prompt_factory(self) -> str:
        return 'test prompt'


async def test_application_code():
    test_deps = TestMyDeps('test_key', None)
    with joke_agent.override(deps=test_deps):
        joke = await application_code('Tell me a joke.')
    assert joke.startswith('Did you hear about the toothpaste scandal?')
示例
以下示例展示了如何在 PydanticAI 中使用依赖项:
功能工具
函数工具提供了一种机制,让模型能够获取额外信息,从而辅助生成响应。这样的翻译更加自然、易懂。
当无法将所有必要的上下文信息输入到系统提示中,或者希望通过将生成响应的部分逻辑委托给其他(不一定是 AI)工具来提高代理行为的确定性和可靠性时,这些工具非常有用。
函数工具与 RAG 的对比分析
函数工具是 RAG(检索增强生成)的核心,它们通过让模型请求额外信息来增强模型的能力,使翻译更加自然易懂。
PydanticAI 工具与 RAG 的主要区别在于,RAG 通常指的是向量搜索,而 PydanticAI 工具则具有更广泛的通用性。(请注意,我们未来可能会加入对向量搜索的支持,特别是生成嵌入的 API。详见 #58)
将工具注册到代理中,有多种途径可供选择:
- 通过
@agent.tool装饰器 —— 适用于需要访问代理上下文的工具 - 通过
@agent.tool_plain装饰器 —— 适用于无需访问代理上下文的工具 - 通过
Agent的tools关键字参数,可以传入普通函数或Tool的实例
@agent.tool 被视为默认装饰器,因为在大多数情况下,工具都需要访问代理的上下文信息。
这里是一个同时使用两个示例的例子:
dice_game.py
import random

from pydantic_ai import Agent, RunContext

agent = Agent(
    'google-gla:gemini-1.5-flash',
    deps_type=str,
    system_prompt=(
        "You're a dice game, you should roll the die and see if the number "
        "you get back matches the user's guess. If so, tell them they're a winner. "
        "Use the player's name in the response."
    ),
)


@agent.tool_plain
def roll_die() -> str:
    """Roll a six-sided die and return the result."""
    return str(random.randint(1, 6))


@agent.tool
def get_player_name(ctx: RunContext[str]) -> str:
    """Get the player's name."""
    return ctx.deps


dice_result = agent.run_sync('My guess is 4', deps='Anne')
print(dice_result.data)
#> Congratulations Anne, you guessed correctly! You're a winner!
(本示例完整,可以直接运行)
让我们从那款游戏的消息中打印出来,看看具体发生了什么情况:
dice_game_messages.py
from dice_game import dice_result

print(dice_result.all_messages())
"""
[
    ModelRequest(
        parts=[
            SystemPromptPart(
                content="You're a dice game, you should roll the die and see if the number you get back matches the user's guess. If so, tell them they're a winner. Use the player's name in the response.",
                timestamp=datetime.datetime(...),
                dynamic_ref=None,
                part_kind='system-prompt',
            ),
            UserPromptPart(
                content='My guess is 4',
                timestamp=datetime.datetime(...),
                part_kind='user-prompt',
            ),
        ],
        kind='request',
    ),
    ModelResponse(
        parts=[
            ToolCallPart(
                tool_name='roll_die',
                args={},
                tool_call_id='pyd_ai_tool_call_id',
                part_kind='tool-call',
            )
        ],
        model_name='gemini-1.5-flash',
        timestamp=datetime.datetime(...),
        kind='response',
    ),
    ModelRequest(
        parts=[
            ToolReturnPart(
                tool_name='roll_die',
                content='4',
                tool_call_id='pyd_ai_tool_call_id',
                timestamp=datetime.datetime(...),
                part_kind='tool-return',
            )
        ],
        kind='request',
    ),
    ModelResponse(
        parts=[
            ToolCallPart(
                tool_name='get_player_name',
                args={},
                tool_call_id='pyd_ai_tool_call_id',
                part_kind='tool-call',
            )
        ],
        model_name='gemini-1.5-flash',
        timestamp=datetime.datetime(...),
        kind='response',
    ),
    ModelRequest(
        parts=[
            ToolReturnPart(
                tool_name='get_player_name',
                content='Anne',
                tool_call_id='pyd_ai_tool_call_id',
                timestamp=datetime.datetime(...),
                part_kind='tool-return',
            )
        ],
        kind='request',
    ),
    ModelResponse(
        parts=[
            TextPart(
                content="Congratulations Anne, you guessed correctly! You're a winner!",
                part_kind='text',
            )
        ],
        model_name='gemini-1.5-flash',
        timestamp=datetime.datetime(...),
        kind='response',
    ),
]
"""
我们可以用图表来展示这一点,更直观易懂。
通过关键字参数注册函数工具
除了使用装饰器外,我们还可以通过构造函数的 tools 参数来注册工具。这样做可以方便地重用工具,并且能够对工具进行更精细的控制。
dice_game_tool_kwarg.py
import random

from pydantic_ai import Agent, RunContext, Tool

system_prompt = """\
You're a dice game, you should roll the die and see if the number
you get back matches the user's guess. If so, tell them they're a winner.
Use the player's name in the response.
"""


def roll_die() -> str:
    """Roll a six-sided die and return the result."""
    return str(random.randint(1, 6))


def get_player_name(ctx: RunContext[str]) -> str:
    """Get the player's name."""
    return ctx.deps


agent_a = Agent(
    'google-gla:gemini-1.5-flash',
    deps_type=str,
    tools=[roll_die, get_player_name],
    system_prompt=system_prompt,
)
agent_b = Agent(
    'google-gla:gemini-1.5-flash',
    deps_type=str,
    tools=[
        Tool(roll_die, takes_ctx=False),
        Tool(get_player_name, takes_ctx=True),
    ],
    system_prompt=system_prompt,
)

dice_result = {}
dice_result['a'] = agent_a.run_sync('My guess is 6', deps='Yashar')
dice_result['b'] = agent_b.run_sync('My guess is 4', deps='Anne')
print(dice_result['a'].data)
#> Tough luck, Yashar, you rolled a 4. Better luck next time.
print(dice_result['b'].data)
#> Congratulations Anne, you guessed correctly! You're a winner!
(本示例完整,可以直接运行)
函数工具与结构化结果对比分析
正如其名称所暗示的,功能工具通过使用模型的“工具”或“函数”API 来告知模型可以调用哪些功能。工具或函数还用于定义结构化响应的格式,因此一个模型可能能够访问多个工具,其中一些工具会调用功能工具,而另一些则会在执行完毕后返回结果。
函数工具与模式
函数参数是从函数签名中提取的,除了 RunContext 之外的所有参数都用于构建该工具调用的模式。这样的描述更加自然,易于理解。
更好的是,PydanticAI 不仅从函数中提取文档字符串,还利用 griffe 从文档字符串中提取参数描述,并将其加入到模式中,使功能更加强大。
Griffe 支持从 google 、 numpy 和 sphinx 风格的文档字符串中提取参数描述。PydanticAI 会根据文档字符串自动推断使用格式,但您也可以通过 docstring_format 来明确指定。同时,您还可以通过设置 require_parameter_descriptions=True 来强制参数要求。如果缺少参数描述,将会抛出 UserError 异常。
为了展示工具的架构,这里我们使用 FunctionModel 来打印模型接收到的架构信息:
tool_schema.py
from pydantic_ai import Agent
from pydantic_ai.messages import ModelMessage, ModelResponse, TextPart
from pydantic_ai.models.function import AgentInfo, FunctionModel

agent = Agent()


@agent.tool_plain(docstring_format='google', require_parameter_descriptions=True)
def foobar(a: int, b: str, c: dict[str, list[float]]) -> str:
    """Get me foobar.

    Args:
        a: apple pie
        b: banana cake
        c: carrot smoothie
    """
    return f'{a} {b} {c}'


def print_schema(messages: list[ModelMessage], info: AgentInfo) -> ModelResponse:
    tool = info.function_tools[0]
    print(tool.description)
    #> Get me foobar.
    print(tool.parameters_json_schema)
    """
    {
        'additionalProperties': False,
        'properties': {
            'a': {'description': 'apple pie', 'type': 'integer'},
            'b': {'description': 'banana cake', 'type': 'string'},
            'c': {
                'additionalProperties': {'items': {'type': 'number'}, 'type': 'array'},
                'description': 'carrot smoothie',
                'type': 'object',
            },
        },
        'required': ['a', 'b', 'c'],
        'type': 'object',
    }
    """
    return ModelResponse(parts=[TextPart('foobar')])


agent.run_sync('hello', model=FunctionModel(print_schema))
(本示例完整,可以直接运行)
工具的返回类型可以是 Pydantic 能够序列化为 JSON 的任何类型。例如,一些模型(如 Gemini)支持半结构化返回值,而另一些则期望文本输入(如 OpenAI)。即使模型期望字符串,返回的 Python 对象也会被序列化为 JSON。这样的设计使得工具能够灵活地处理不同类型的返回值,同时确保数据的一致性和可序列化性。
如果一个工具的单个参数可以用 JSON 模式(例如 dataclass、TypedDict、pydantic 模型)表示,则该工具的模式将简化为仅包含该对象。
这里是一个示例,我们使用 TestModel.last_model_request_parameters 来检查将要传递给模型的工具模式,翻译更加自然和易于理解。
single_parameter_tool.py
from pydantic import BaseModel

from pydantic_ai import Agent
from pydantic_ai.models.test import TestModel

agent = Agent()


class Foobar(BaseModel):
    """This is a Foobar"""

    x: int
    y: str
    z: float = 3.14


@agent.tool_plain
def foobar(f: Foobar) -> str:
    return str(f)


test_model = TestModel()
result = agent.run_sync('hello', model=test_model)
print(result.data)
#> {"foobar":"x=0 y='a' z=3.14"}
print(test_model.last_model_request_parameters.function_tools)
"""
[
    ToolDefinition(
        name='foobar',
        description='This is a Foobar',
        parameters_json_schema={
            'properties': {
                'x': {'type': 'integer'},
                'y': {'type': 'string'},
                'z': {'default': 3.14, 'type': 'number'},
            },
            'required': ['x', 'y'],
            'title': 'Foobar',
            'type': 'object',
        },
        outer_typed_dict_key=None,
    )
]
"""
(本示例完整,可以直接运行)
动态函数工具
工具可以可选地通过另一个函数定义: prepare ,在运行过程中的每个步骤调用,用于自定义传递给模型的工具定义,或者在该步骤中完全省略工具。这样的翻译更加自然,易于理解。
可以通过 prepare 参数将方法注册到任何工具注册机制中:
@agent.tool装饰器(更自然的翻译)@agent.tool_plain装饰器(更自然的翻译)Tool数据类
“ prepare 方法,应属于 ToolPrepareFunc 类型,一个接受 RunContext 和预构建的 ToolDefinition 的函数,应返回该 ToolDefinition 并可能修改它,或返回新的 ToolDefinition ,或者返回 None 以表示该工具不应为此步骤进行注册。”
这里介绍了一个简单的方法,只有当依赖项的值为 42 时,才会包含该工具。
与前一个示例相同,我们通过使用 TestModel 来展示功能,而不实际调用模型。
tool_only_if_42.py
from typing import Union

from pydantic_ai import Agent, RunContext
from pydantic_ai.tools import ToolDefinition

agent = Agent('test')


async def only_if_42(
    ctx: RunContext[int], tool_def: ToolDefinition
) -> Union[ToolDefinition, None]:
    if ctx.deps == 42:
        return tool_def


@agent.tool(prepare=only_if_42)
def hitchhiker(ctx: RunContext[int], answer: str) -> str:
    return f'{ctx.deps} {answer}'


result = agent.run_sync('testing...', deps=41)
print(result.data)
#> success (no tool calls)
result = agent.run_sync('testing...', deps=42)
print(result.data)
#> {"hitchhiker":"42 a"}
(本示例完整,可以直接运行)
这里有一个更复杂的例子,我们将根据 deps 的值来调整 name 参数的描述,使其更加自然易懂。
为了增加多样性,我们采用 Tool 数据类来创建这个工具,使翻译更加自然易懂。
customize_name.py
from __future__ import annotations

from typing import Literal

from pydantic_ai import Agent, RunContext
from pydantic_ai.models.test import TestModel
from pydantic_ai.tools import Tool, ToolDefinition


def greet(name: str) -> str:
    return f'hello {name}'


async def prepare_greet(
    ctx: RunContext[Literal['human', 'machine']], tool_def: ToolDefinition
) -> ToolDefinition | None:
    d = f'Name of the {ctx.deps} to greet.'
    tool_def.parameters_json_schema['properties']['name']['description'] = d
    return tool_def


greet_tool = Tool(greet, prepare=prepare_greet)
test_model = TestModel()
agent = Agent(test_model, tools=[greet_tool], deps_type=Literal['human', 'machine'])

result = agent.run_sync('testing...', deps='human')
print(result.data)
#> {"greet":"hello a"}
print(test_model.last_model_request_parameters.function_tools)
"""
[
    ToolDefinition(
        name='greet',
        description='',
        parameters_json_schema={
            'additionalProperties': False,
            'properties': {
                'name': {'type': 'string', 'description': 'Name of the human to greet.'}
            },
            'required': ['name'],
            'type': 'object',
        },
        outer_typed_dict_key=None,
    )
]
"""
(本示例完整,可以直接运行)
常用工具
PydanticAI 内置了多种工具,这些工具可以帮助您提升智能体的能力。
DuckDuckGo 搜索工具
DuckDuckGo 搜索工具让您能够在网络上查找信息,该工具是基于 DuckDuckGo API 开发的,翻译更加自然流畅。
安装指南
使用 duckduckgo_search_tool 功能,您需要安装 pydantic-ai-slim 并选择包含 duckduckgo 的可选组:
pip install "pydantic-ai-slim[duckduckgo]"
uv add "pydantic-ai-slim[duckduckgo]"
使用示例
这里是一个如何使用 DuckDuckGo 搜索工具与代理一起使用的示例:
main.py
from pydantic_ai import Agent
from pydantic_ai.common_tools.duckduckgo import duckduckgo_search_tool

agent = Agent(
    'openai:o3-mini',
    tools=[duckduckgo_search_tool()],
    system_prompt='Search DuckDuckGo for the given query and return the results.',
)

result = agent.run_sync(
    'Can you list the top five highest-grossing animated films of 2025?'
)
print(result.data)
"""
I looked into several sources on animated box‐office performance in 2025, and while detailed
rankings can shift as more money is tallied, multiple independent reports have already
highlighted a couple of record‐breaking shows. For example:

• Ne Zha 2 – News outlets (Variety, Wikipedia's "List of animated feature films of 2025", and others)
    have reported that this Chinese title not only became the highest‑grossing animated film of 2025
    but also broke records as the highest‑grossing non‑English animated film ever. One article noted
    its run exceeded US$1.7 billion.
• Inside Out 2 – According to data shared on Statista and in industry news, this Pixar sequel has been
    on pace to set new records (with some sources even noting it as the highest‑grossing animated film
    ever, as of January 2025).

Beyond those two, some entertainment trade sites (for example, a Just Jared article titled
"Top 10 Highest-Earning Animated Films at the Box Office Revealed") have begun listing a broader
top‑10. Although full consolidated figures can sometimes differ by source and are updated daily during
a box‑office run, many of the industry trackers have begun to single out five films as the biggest
earners so far in 2025.

Unfortunately, although multiple articles discuss the "top animated films" of 2025, there isn't yet a
single, universally accepted list with final numbers that names the complete top five. (Box‑office
rankings, especially mid‑year, can be fluid as films continue to add to their totals.)

Based on what several sources note so far, the two undisputed leaders are:
1. Ne Zha 2
2. Inside Out 2

The remaining top spots (3–5) are reported by some outlets in their "Top‑10 Animated Films"
lists for 2025 but the titles and order can vary depending on the source and the exact cut‑off
date of the data. For the most up‑to‑date and detailed ranking (including the 3rd, 4th, and 5th
highest‑grossing films), I recommend checking resources like:
• Wikipedia's "List of animated feature films of 2025" page
• Box‑office tracking sites (such as Box Office Mojo or The Numbers)
• Trade articles like the one on Just Jared

To summarize with what is clear from the current reporting:
1. Ne Zha 2
2. Inside Out 2
3–5. Other animated films (yet to be definitively finalized across all reporting outlets)

If you're looking for a final, consensus list of the top five, it may be best to wait until
the 2025 year‑end box‑office tallies are in or to consult a regularly updated entertainment industry source.

Would you like help finding a current source or additional details on where to look for the complete updated list?
"""
Tavily 搜索工具
信息
Tavily 是一个付费服务,不过他们提供了免费额度,让您可以体验他们的产品。
您需要注册一个账户并获取 API 密钥,以便使用 Tavily 搜索工具。
Tavily 搜索工具让您能够在网络上查找信息,该工具基于 Tavily API 构建,翻译更加自然流畅。
安装指南
使用 tavily_search_tool 功能,您需要安装 pydantic-ai-slim 并选择包含 tavily 的可选组:
pip install "pydantic-ai-slim[tavily]"
uv add "pydantic-ai-slim[tavily]"
Usage
Here's an example of how you can use the Tavily search tool with an agent:
main.py
import os

from pydantic_ai.agent import Agent
from pydantic_ai.common_tools.tavily import tavily_search_tool

api_key = os.getenv('TAVILY_API_KEY')
assert api_key is not None


agent = Agent(
    'openai:o3-mini',
    tools=[tavily_search_tool(api_key)],
    system_prompt='Search Tavily for the given query and return the results.',
)

result = agent.run_sync('Tell me the top news in the GenAI world, give me links.')
print(result.data)
"""
Here are some of the top recent news articles related to GenAI:

1. How CLEAR users can improve risk analysis with GenAI – Thomson Reuters
   Read more: https://legal.thomsonreuters.com/blog/how-clear-users-can-improve-risk-analysis-with-genai/
   (This article discusses how CLEAR's new GenAI-powered tool streamlines risk analysis by quickly summarizing key information from various public data sources.)

2. TELUS Digital Survey Reveals Enterprise Employees Are Entering Sensitive Data Into AI Assistants More Than You Think – FT.com
   Read more: https://markets.ft.com/data/announce/detail?dockey=600-202502260645BIZWIRE_USPRX____20250226_BW490609-1
   (This news piece highlights findings from a TELUS Digital survey showing that many enterprise employees use public GenAI tools and sometimes even enter sensitive data.)

3. The Essential Guide to Generative AI – Virtualization Review
   Read more: https://virtualizationreview.com/Whitepapers/2025/02/SNOWFLAKE-The-Essential-Guide-to-Generative-AI.aspx
   (This guide provides insights into how GenAI is revolutionizing enterprise strategies and productivity, with input from industry leaders.)

Feel free to click on the links to dive deeper into each story!
"""
结果
运行代理后返回的最终值被称为结果。这些结果值被特殊标记 AgentRunResult 和 StreamedRunResult ,这样您就可以访问其他相关信息,比如运行的详细情况和消息记录
RunResult 和 StreamedRunResult 在封装的数据上都是通用的,因此能够保留关于代理返回数据类型的信息。
olympics.py
from pydantic import BaseModel

from pydantic_ai import Agent


class CityLocation(BaseModel):
    city: str
    country: str


agent = Agent('google-gla:gemini-1.5-flash', result_type=CityLocation)
result = agent.run_sync('Where were the olympics held in 2012?')
print(result.data)
#> city='London' country='United Kingdom'
print(result.usage())
"""
Usage(requests=1, request_tokens=57, response_tokens=8, total_tokens=65, details=None)
"""
(本示例完整,可以直接运行)
运行结束的条件是接收到纯文本响应或模型调用与结构化结果类型之一关联的工具。我们将设置运行时间限制,防止无限期运行,详见 #70。
结果数据
当结果类型为 str 或包含 str 的联合类型时,模型将激活纯文本响应功能,并将模型的原始文本响应作为响应数据使用。
如果结果类型是包含多个成员的联合(去除成员中的 str 后),则每个成员都会作为一个独立工具与模型进行注册,这样做可以简化工具模式的复杂性,并提高模型正确响应的概率。
如果结果类型模式不属于类型 "object" ,则结果类型会被封装在一个单独的元素对象中,因此所有与模型注册的工具都使用对象模式作为其模式。
结构化结果(如工具)利用 Pydantic 构建工具的 JSON 模式,并对模型返回的数据进行验证。
欢迎 PEP-747 的到来
在 PEP-747 "注解类型形式"规范正式实施之前,Python 中不能将联合类型用作 type s。
在创建代理时,我们需要对参数进行 # type: ignore 处理,并添加类型提示,以便类型检查器能够识别代理的类型。
这里是一个关于返回文本或结构化值的示例
box_or_error.py
from typing import Union

from pydantic import BaseModel

from pydantic_ai import Agent


class Box(BaseModel):
    width: int
    height: int
    depth: int
    units: str


agent: Agent[None, Union[Box, str]] = Agent(
    'openai:gpt-4o-mini',
    result_type=Union[Box, str],  # type: ignore
    system_prompt=(
        "Extract me the dimensions of a box, "
        "if you can't extract all data, ask the user to try again."
    ),
)

result = agent.run_sync('The box is 10x20x30')
print(result.data)
#> Please provide the units for the dimensions (e.g., cm, in, m).

result = agent.run_sync('The box is 10x20x30 cm')
print(result.data)
#> width=10 height=20 depth=30 units='cm'
(本示例完整,可以直接运行)
这里是一个使用联合返回类型的示例,该类型注册了多个工具,并将非对象模式封装在对象内部:
colors_or_sizes.py
from typing import Union

from pydantic_ai import Agent

agent: Agent[None, Union[list[str], list[int]]] = Agent(
    'openai:gpt-4o-mini',
    result_type=Union[list[str], list[int]],  # type: ignore
    system_prompt='Extract either colors or sizes from the shapes provided.',
)

result = agent.run_sync('red square, blue circle, green triangle')
print(result.data)
#> ['red', 'blue', 'green']

result = agent.run_sync('square size 10, circle size 20, triangle size 30')
print(result.data)
#> [10, 20, 30]
(本示例完整,可以直接运行)
结果验证函数
在 Pydantic 验证器中,有些验证操作不方便或根本无法执行,尤其是在需要执行 IO 操作或异步验证的情况下。PydanticAI 允许我们通过使用 agent.result_validator 装饰器来添加自定义验证函数,从而解决了这一问题。
这里是 SQL 生成示例的简化版本:
sql 生成.py
from typing import Union

from fake_database import DatabaseConn, QueryError
from pydantic import BaseModel

from pydantic_ai import Agent, RunContext, ModelRetry


class Success(BaseModel):
    sql_query: str


class InvalidRequest(BaseModel):
    error_message: str


Response = Union[Success, InvalidRequest]
agent: Agent[DatabaseConn, Response] = Agent(
    'google-gla:gemini-1.5-flash',
    result_type=Response,  # type: ignore
    deps_type=DatabaseConn,
    system_prompt='Generate PostgreSQL flavored SQL queries based on user input.',
)


@agent.result_validator
async def validate_result(ctx: RunContext[DatabaseConn], result: Response) -> Response:
    if isinstance(result, InvalidRequest):
        return result
    try:
        await ctx.deps.execute(f'EXPLAIN {result.sql_query}')
    except QueryError as e:
        raise ModelRetry(f'Invalid query: {e}') from e
    else:
        return result


result = agent.run_sync(
    'get me users who were last active yesterday.', deps=DatabaseConn()
)
print(result.data)
#> sql_query='SELECT * FROM users WHERE last_active::date = today() - interval 1 day'
(本示例完整,可以直接运行)
流式结果
流式结果面临两大主要挑战:
- 在响应完成前对结构化响应进行验证,这是通过最近在 Pydantic 中新增的“部分验证”功能实现的,详情请见 pydantic/pydantic#10748。
- 当收到响应时,我们无法确定它是否是最终响应,除非开始流式传输并预览内容。PydanticAI 会流式传输响应的一部分以判断是否为工具调用或结果,然后完整流式传输整个响应并调用工具,或者直接返回流式内容作为
StreamedRunResult。
流媒体文本
流式文本结果示例:
streamed_hello_world.py
from pydantic_ai import Agent

agent = Agent('google-gla:gemini-1.5-flash')


async def main():
    async with agent.run_stream('Where does "hello world" come from?') as result:
        async for message in result.stream_text():
            print(message)
            #> The first known
            #> The first known use of "hello,
            #> The first known use of "hello, world" was in
            #> The first known use of "hello, world" was in a 1974 textbook
            #> The first known use of "hello, world" was in a 1974 textbook about the C
            #> The first known use of "hello, world" was in a 1974 textbook about the C programming language.
(本示例完整,可直接运行——运行时需添加 asyncio.run(main()) 才能执行 main )
我们可以将文本以增量流的形式传输,而不是在每个项目中传输整个文本:
streamed_delta_hello_world.py
from pydantic_ai import Agent

agent = Agent('google-gla:gemini-1.5-flash')


async def main():
    async with agent.run_stream('Where does "hello world" come from?') as result:
        async for message in result.stream_text(delta=True):
            print(message)
            #> The first known
            #> use of "hello,
            #> world" was in
            #> a 1974 textbook
            #> about the C
            #> programming language.
(本示例完整,可直接运行——运行时需添加 asyncio.run(main()) 才能执行 main )
结果消息未包含在引用编号 messages 中,翻译更加自然和易于理解
最终结果消息将不会添加到结果消息中。如果您使用了 .stream_text(delta=True) ,请参考消息和聊天记录获取详细信息,这样翻译更为自然和易懂。
流式结构化响应
在 Pydantic 中,并非所有类型都支持部分验证,请参阅 pydantic/pydantic#10748。一般来说,对于类似模型的结构,目前最佳做法是使用 TypeDict 。
这里是一个展示用户配置文件构建过程的流式传输示例:
streamed_user_profile.py
from datetime import date

from typing_extensions import TypedDict

from pydantic_ai import Agent


class UserProfile(TypedDict, total=False):
    name: str
    dob: date
    bio: str


agent = Agent(
    'openai:gpt-4o',
    result_type=UserProfile,
    system_prompt='Extract a user profile from the input',
)


async def main():
    user_input = 'My name is Ben, I was born on January 28th 1990, I like the chain the dog and the pyramid.'
    async with agent.run_stream(user_input) as result:
        async for profile in result.stream():
            print(profile)
            #> {'name': 'Ben'}
            #> {'name': 'Ben'}
            #> {'name': 'Ben', 'dob': date(1990, 1, 28), 'bio': 'Likes'}
            #> {'name': 'Ben', 'dob': date(1990, 1, 28), 'bio': 'Likes the chain the '}
            #> {'name': 'Ben', 'dob': date(1990, 1, 28), 'bio': 'Likes the chain the dog and the pyr'}
            #> {'name': 'Ben', 'dob': date(1990, 1, 28), 'bio': 'Likes the chain the dog and the pyramid'}
            #> {'name': 'Ben', 'dob': date(1990, 1, 28), 'bio': 'Likes the chain the dog and the pyramid'}
(本示例完整,可直接运行——运行时需添加 asyncio.run(main()) 才能执行 main )
如果您希望对验证进行精细控制,特别是要捕捉到验证错误,可以采用以下模式:
streamed_user_profile.py
from datetime import date

from pydantic import ValidationError
from typing_extensions import TypedDict

from pydantic_ai import Agent


class UserProfile(TypedDict, total=False):
    name: str
    dob: date
    bio: str


agent = Agent('openai:gpt-4o', result_type=UserProfile)


async def main():
    user_input = 'My name is Ben, I was born on January 28th 1990, I like the chain the dog and the pyramid.'
    async with agent.run_stream(user_input) as result:
        async for message, last in result.stream_structured(debounce_by=0.01):
            try:
                profile = await result.validate_structured_result(
                    message,
                    allow_partial=not last,
                )
            except ValidationError:
                continue
            print(profile)
            #> {'name': 'Ben'}
            #> {'name': 'Ben'}
            #> {'name': 'Ben', 'dob': date(1990, 1, 28), 'bio': 'Likes'}
            #> {'name': 'Ben', 'dob': date(1990, 1, 28), 'bio': 'Likes the chain the '}
            #> {'name': 'Ben', 'dob': date(1990, 1, 28), 'bio': 'Likes the chain the dog and the pyr'}
            #> {'name': 'Ben', 'dob': date(1990, 1, 28), 'bio': 'Likes the chain the dog and the pyramid'}
            #> {'name': 'Ben', 'dob': date(1990, 1, 28), 'bio': 'Likes the chain the dog and the pyramid'}
(本示例完整,可直接运行——运行时需添加 asyncio.run(main()) 才能执行 main )
示例
以下示例展示了如何在 PydanticAI 中使用流式响应:
消息与聊天历史记录
PydanticAI 提供了访问代理运行期间交换的消息的功能。这些消息不仅可以帮助继续进行连贯的对话,还能帮助我们了解代理的表现情况。
从结果中获取消息
运行代理后,您可以通过 result 对象查看运行期间的消息交流内容。
"两者 RunResult (由 Agent.run 和 Agent.run_sync 返回)以及 StreamedRunResult (由 Agent.run_stream 返回)都具有以下方法:"
all_messages(): 返回所有消息,包括之前运行的消息记录。另外还有一个版本可以返回 JSON 格式的字节流,all_messages_json()。new_messages()仅返回本次运行的消息。另外还有一个变体可以返回 JSON 格式的字节数据,new_messages_json()。
示例:如何访问 RunResult 的方法
run_result_messages.py
from pydantic_ai import Agent

agent = Agent('openai:gpt-4o', system_prompt='Be a helpful assistant.')

result = agent.run_sync('Tell me a joke.')
print(result.data)
#> Did you hear about the toothpaste scandal? They called it Colgate.

# all messages from the run
print(result.all_messages())
"""
[
    ModelRequest(
        parts=[
            SystemPromptPart(
                content='Be a helpful assistant.',
                timestamp=datetime.datetime(...),
                dynamic_ref=None,
                part_kind='system-prompt',
            ),
            UserPromptPart(
                content='Tell me a joke.',
                timestamp=datetime.datetime(...),
                part_kind='user-prompt',
            ),
        ],
        kind='request',
    ),
    ModelResponse(
        parts=[
            TextPart(
                content='Did you hear about the toothpaste scandal? They called it Colgate.',
                part_kind='text',
            )
        ],
        model_name='gpt-4o',
        timestamp=datetime.datetime(...),
        kind='response',
    ),
]
"""
(本示例完整,可以直接运行)
示例:如何访问 StreamedRunResult 的方法
streamed_run_result_messages.py
from pydantic_ai import Agent

agent = Agent('openai:gpt-4o', system_prompt='Be a helpful assistant.')


async def main():
    async with agent.run_stream('Tell me a joke.') as result:
        # incomplete messages before the stream finishes
        print(result.all_messages())
        """
        [
            ModelRequest(
                parts=[
                    SystemPromptPart(
                        content='Be a helpful assistant.',
                        timestamp=datetime.datetime(...),
                        dynamic_ref=None,
                        part_kind='system-prompt',
                    ),
                    UserPromptPart(
                        content='Tell me a joke.',
                        timestamp=datetime.datetime(...),
                        part_kind='user-prompt',
                    ),
                ],
                kind='request',
            )
        ]
        """

        async for text in result.stream_text():
            print(text)
            #> Did you hear
            #> Did you hear about the toothpaste
            #> Did you hear about the toothpaste scandal? They called
            #> Did you hear about the toothpaste scandal? They called it Colgate.

        # complete messages once the stream finishes
        print(result.all_messages())
        """
        [
            ModelRequest(
                parts=[
                    SystemPromptPart(
                        content='Be a helpful assistant.',
                        timestamp=datetime.datetime(...),
                        dynamic_ref=None,
                        part_kind='system-prompt',
                    ),
                    UserPromptPart(
                        content='Tell me a joke.',
                        timestamp=datetime.datetime(...),
                        part_kind='user-prompt',
                    ),
                ],
                kind='request',
            ),
            ModelResponse(
                parts=[
                    TextPart(
                        content='Did you hear about the toothpaste scandal? They called it Colgate.',
                        part_kind='text',
                    )
                ],
                model_name='gpt-4o',
                timestamp=datetime.datetime(...),
                kind='response',
            ),
        ]
        """
(本示例完整,可直接运行——运行时需添加 asyncio.run(main()) 才能执行 main )
使用消息作为进一步运行代理的输入(经过优化,使翻译更加自然易懂)
PydanticAI 中,消息历史的主要作用是保持多个代理运行间的上下文连续性,使其更加自然易懂。
要使用运行中的现有消息,请将它们传递给相应的 message_history 参数( Agent.run 、 Agent.run_sync 或 Agent.run_stream )。
如果 message_history 被设置且不为空,则不会生成新的系统提示——我们假定现有消息历史中已经包含了系统提示。
在对话中复用消息
from pydantic_ai import Agent

agent = Agent('openai:gpt-4o', system_prompt='Be a helpful assistant.')

result1 = agent.run_sync('Tell me a joke.')
print(result1.data)
#> Did you hear about the toothpaste scandal? They called it Colgate.

result2 = agent.run_sync('Explain?', message_history=result1.new_messages())
print(result2.data)
#> This is an excellent joke invented by Samuel Colvin, it needs no explanation.

print(result2.all_messages())
"""
[
    ModelRequest(
        parts=[
            SystemPromptPart(
                content='Be a helpful assistant.',
                timestamp=datetime.datetime(...),
                dynamic_ref=None,
                part_kind='system-prompt',
            ),
            UserPromptPart(
                content='Tell me a joke.',
                timestamp=datetime.datetime(...),
                part_kind='user-prompt',
            ),
        ],
        kind='request',
    ),
    ModelResponse(
        parts=[
            TextPart(
                content='Did you hear about the toothpaste scandal? They called it Colgate.',
                part_kind='text',
            )
        ],
        model_name='gpt-4o',
        timestamp=datetime.datetime(...),
        kind='response',
    ),
    ModelRequest(
        parts=[
            UserPromptPart(
                content='Explain?',
                timestamp=datetime.datetime(...),
                part_kind='user-prompt',
            )
        ],
        kind='request',
    ),
    ModelResponse(
        parts=[
            TextPart(
                content='This is an excellent joke invented by Samuel Colvin, it needs no explanation.',
                part_kind='text',
            )
        ],
        model_name='gpt-4o',
        timestamp=datetime.datetime(...),
        kind='response',
    ),
]
"""
(本示例完整,可以直接运行)
存储和加载消息(至 JSON)
在许多应用中,仅维护内存中的会话状态就足够了。但通常情况下,您可能希望将代理的聊天历史记录保存在磁盘或数据库中,这可能用于评估、在 Python 和 JavaScript/TypeScript 之间共享数据,或者适用于其他多种场景。
做这件事的推荐方法是使用一个 TypeAdapter 。
我们提供 ModelMessagesTypeAdapter 供您使用,或者您也可以自行创建。
这里有一个示例,展示了如何:这是一个展示方法的例子。
将消息序列化为 JSON
from pydantic_core import to_jsonable_python

from pydantic_ai import Agent
from pydantic_ai.messages import ModelMessagesTypeAdapter

agent = Agent('openai:gpt-4o', system_prompt='Be a helpful assistant.')

result1 = agent.run_sync('Tell me a joke.')
history_step_1 = result1.all_messages()
as_python_objects = to_jsonable_python(history_step_1)
same_history_as_step_1 = ModelMessagesTypeAdapter.validate_python(as_python_objects)

result2 = agent.run_sync(
    'Tell me a different joke.', message_history=same_history_as_step_1
)
(本示例完整,可以直接运行)
其他使用消息的方法
由于消息由简单的数据类定义,您可以手动创建和操作,例如用于测试。这样的描述更加自然,易于理解。
消息格式与所使用的模型无关,这意味着您可以在不同的代理之间使用相同的消息,或者在同一代理中使用不同的模型。
在下面的示例中,我们首先使用 openai:gpt-4o 模型在第一次代理运行中发送了一条消息,然后在第二次代理运行中使用 google-gla:gemini-1.5-pro 模型重复了这条消息。
使用不同模型重用消息
from pydantic_ai import Agent

agent = Agent('openai:gpt-4o', system_prompt='Be a helpful assistant.')

result1 = agent.run_sync('Tell me a joke.')
print(result1.data)
#> Did you hear about the toothpaste scandal? They called it Colgate.

result2 = agent.run_sync(
    'Explain?',
    model='google-gla:gemini-1.5-pro',
    message_history=result1.new_messages(),
)
print(result2.data)
#> This is an excellent joke invented by Samuel Colvin, it needs no explanation.

print(result2.all_messages())
"""
[
    ModelRequest(
        parts=[
            SystemPromptPart(
                content='Be a helpful assistant.',
                timestamp=datetime.datetime(...),
                dynamic_ref=None,
                part_kind='system-prompt',
            ),
            UserPromptPart(
                content='Tell me a joke.',
                timestamp=datetime.datetime(...),
                part_kind='user-prompt',
            ),
        ],
        kind='request',
    ),
    ModelResponse(
        parts=[
            TextPart(
                content='Did you hear about the toothpaste scandal? They called it Colgate.',
                part_kind='text',
            )
        ],
        model_name='gpt-4o',
        timestamp=datetime.datetime(...),
        kind='response',
    ),
    ModelRequest(
        parts=[
            UserPromptPart(
                content='Explain?',
                timestamp=datetime.datetime(...),
                part_kind='user-prompt',
            )
        ],
        kind='request',
    ),
    ModelResponse(
        parts=[
            TextPart(
                content='This is an excellent joke invented by Samuel Colvin, it needs no explanation.',
                part_kind='text',
            )
        ],
        model_name='gemini-1.5-pro',
        timestamp=datetime.datetime(...),
        kind='response',
    ),
]
"""
示例
为了更全面地了解如何在对话中使用消息,请参考聊天应用示例。
单元测试
为 PydanticAI 代码编写单元测试,其过程与编写其他 Python 代码的单元测试并无二致。
因为这些内容大部分并非创新,我们已经有相当成熟的工具和模式来编写和执行这类测试,所以表述更为自然易懂。
如果您不确定自己是否真的比常规方法更懂行,那么您可能还是应该遵循以下大致策略:
- 使用
pytest作为您的测试环境 - 如果您发现自己经常输入冗长的断言,建议使用内联快照功能,这样可以使代码更简洁明了
- 同样,可以使用 dirty-equals 来比较大型数据结构,这样的做法很有用
- 使用
TestModel或FunctionModel替换您的实际模型,避免使用真实 LLM 调用的使用、延迟和变化 - 使用
Agent.override在您的应用程序逻辑中替换模型 - 将
ALLOW_MODEL_REQUESTS=False全局设置为防止意外向非测试模型发送请求
使用 TestModel 进行单元测试
使用 TestModel 是测试应用代码最简单快捷的方式,默认情况下,它会调用代理中的所有工具,然后根据代理的返回类型返回纯文本或结构化响应。这样的翻译更加自然,易于理解。
“ TestModel 并非魔法”
“聪明”(但不要太聪明)之处在于,它会尝试根据已注册工具的架构生成适用于函数工具和结果类型的有效结构化数据。
在 TestModel 中并没有机器学习或人工智能,它只是一段旨在生成符合工具 JSON 模式数据的传统 Python 过程代码。
结果数据可能不够美观或相关,但通常能通过 Pydantic 的验证。若需更复杂的数据,请使用 FunctionModel 并自行编写数据生成逻辑,这样可以使生成的数据更符合需求。
让我们来为以下应用程序代码编写单元测试:
weather_app.py
import asyncio
from datetime import date

from pydantic_ai import Agent, RunContext

from fake_database import DatabaseConn
from weather_service import WeatherService

weather_agent = Agent(
    'openai:gpt-4o',
    deps_type=WeatherService,
    system_prompt='Providing a weather forecast at the locations the user provides.',
)


@weather_agent.tool
def weather_forecast(
    ctx: RunContext[WeatherService], location: str, forecast_date: date
) -> str:
    if forecast_date < date.today():
        return ctx.deps.get_historic_weather(location, forecast_date)
    else:
        return ctx.deps.get_forecast(location, forecast_date)


async def run_weather_forecast(
    user_prompts: list[tuple[str, int]], conn: DatabaseConn
):
    """Run weather forecast for a list of user prompts and save."""
    async with WeatherService() as weather_service:

        async def run_forecast(prompt: str, user_id: int):
            result = await weather_agent.run(prompt, deps=weather_service)
            await conn.store_forecast(user_id, result.data)

        # run all prompts in parallel
        await asyncio.gather(
            *(run_forecast(prompt, user_id) for (prompt, user_id) in user_prompts)
        )
这里有一个函数,它接受一个包含元组的列表,每个元组代表一个提示,然后为每个提示获取天气预报,并将结果存储到数据库中。
我们希望测试这段代码,无需模拟特定对象或修改代码,以便能够传入测试对象。
这是使用 TestModel : 编写测试的示例
test_weather_app.py
from datetime import timezone
import pytest

from dirty_equals import IsNow, IsStr

from pydantic_ai import models, capture_run_messages
from pydantic_ai.models.test import TestModel
from pydantic_ai.messages import (
    ModelResponse,
    SystemPromptPart,
    TextPart,
    ToolCallPart,
    ToolReturnPart,
    UserPromptPart,
    ModelRequest,
)

from fake_database import DatabaseConn
from weather_app import run_weather_forecast, weather_agent

pytestmark = pytest.mark.anyio
models.ALLOW_MODEL_REQUESTS = False


async def test_forecast():
    conn = DatabaseConn()
    user_id = 1
    with capture_run_messages() as messages:
        with weather_agent.override(model=TestModel()):
            prompt = 'What will the weather be like in London on 2024-11-28?'
            await run_weather_forecast([(prompt, user_id)], conn)

    forecast = await conn.get_forecast(user_id)
    assert forecast == '{"weather_forecast":"Sunny with a chance of rain"}'

    assert messages == [
        ModelRequest(
            parts=[
                SystemPromptPart(
                    content='Providing a weather forecast at the locations the user provides.',
                    timestamp=IsNow(tz=timezone.utc),
                ),
                UserPromptPart(
                    content='What will the weather be like in London on 2024-11-28?',
                    timestamp=IsNow(tz=timezone.utc),
                ),
            ]
        ),
        ModelResponse(
            parts=[
                ToolCallPart(
                    tool_name='weather_forecast',
                    args={
                        'location': 'a',
                        'forecast_date': '2024-01-01',
                    },
                    tool_call_id=IsStr(),
                )
            ],
            model_name='test',
            timestamp=IsNow(tz=timezone.utc),
        ),
        ModelRequest(
            parts=[
                ToolReturnPart(
                    tool_name='weather_forecast',
                    content='Sunny with a chance of rain',
                    tool_call_id=IsStr(),
                    timestamp=IsNow(tz=timezone.utc),
                ),
            ],
        ),
        ModelResponse(
            parts=[
                TextPart(
                    content='{"weather_forecast":"Sunny with a chance of rain"}',
                )
            ],
            model_name='test',
            timestamp=IsNow(tz=timezone.utc),
        ),
    ]
使用 FunctionModel 进行单元测试
上述测试是一个很好的开始,但细心读者会发现,WeatherService.get_forecast 从未被调用,因为 TestModel 使用过去的日期调用了 weather_forecast。
要完全测试 weather_forecast,我们需要使用 FunctionModel 来自定义调用工具的方式。
下面是一个使用 FunctionModel 测试带有自定义输入的 weather_forecast 工具的示例。
test_weather_app2.py
import re

import pytest

from pydantic_ai import models
from pydantic_ai.messages import (
    ModelMessage,
    ModelResponse,
    TextPart,
    ToolCallPart,
)
from pydantic_ai.models.function import AgentInfo, FunctionModel

from fake_database import DatabaseConn
from weather_app import run_weather_forecast, weather_agent

pytestmark = pytest.mark.anyio
models.ALLOW_MODEL_REQUESTS = False


def call_weather_forecast(
    messages: list[ModelMessage], info: AgentInfo
) -> ModelResponse:
    if len(messages) == 1:
        # first call, call the weather forecast tool
        user_prompt = messages[0].parts[-1]
        m = re.search(r'\d{4}-\d{2}-\d{2}', user_prompt.content)
        assert m is not None
        args = {'location': 'London', 'forecast_date': m.group()}
        return ModelResponse(parts=[ToolCallPart('weather_forecast', args)])
    else:
        # second call, return the forecast
        msg = messages[-1].parts[0]
        assert msg.part_kind == 'tool-return'
        return ModelResponse(parts=[TextPart(f'The forecast is: {msg.content}')])


async def test_forecast_future():
    conn = DatabaseConn()
    user_id = 1
    with weather_agent.override(model=FunctionModel(call_weather_forecast)):
        prompt = 'What will the weather be like in London on 2032-01-01?'
        await run_weather_forecast([(prompt, user_id)], conn)

    forecast = await conn.get_forecast(user_id)
    assert forecast == 'The forecast is: Rainy with a chance of sun'
通过 pytest fixtures 重写模型
如果你正在编写大量需要覆盖模型的测试,你可以使用 pytest fixtures 以可重用的方式覆盖模型为 TestModel 或 FunctionModel。
下面是一个覆盖模型为 TestModel 的 fixture 示例:
tests.py
import pytest
from weather_app import weather_agent

from pydantic_ai.models.test import TestModel


@pytest.fixture
def override_weather_agent():
    with weather_agent.override(model=TestModel()):
        yield


async def test_forecast(override_weather_agent: None):
    ...
    # test code here
调试与监控
使用LLMs的应用程序面临一些众所周知且易于理解的挑战:这些应用运行速度慢、稳定性差且费用高昂。
这些应用程序也面临一些挑战,大多数开发者很少遇到:LLMs 的行为多变且不可预测。提示的微小变化可能会彻底改变模型的表现,而且没有查询可以让你了解其中的原因。
警告
从软件工程师的角度来看,LLMs堪称你听说过的最糟糕的数据库,简直令人难以置信。
如果没有LLMs这么有用,我们根本不会去碰它们。
要构建成功的应用程序,我们需要新的工具来理解模型的性能以及依赖这些模型的程序的行为,使翻译更加自然和易于理解。
可观测性工具如果仅仅能让你了解模型的表现,那它们就是无用的:调用 API 很简单,但将其整合到应用程序中却是一项挑战。
Pydantic 日志引擎
Pydantic Logfire 是由 Pydantic 和 PydanticAI 的创建者和维护团队开发的可观测性平台。它旨在帮助您全面了解您的应用程序,包括生成式 AI、经典预测式 AI、HTTP 流量、数据库查询等现代应用程序所需的所有功能。
Pydantic Logfire 是一款商业化的产品
Logfire 是一个提供商业支持、可托管的平台,拥有非常慷慨且不限时间的免费服务。只需几分钟,您就可以注册并开始使用 Logfire。
PydanticAI 内置了对 Logfire 的支持(可选)。这意味着一旦安装并配置了 logfire 包,并开启了代理仪表化,代理运行的详细信息就会发送到 Logfire。如果没有这些设置,几乎不会产生任何额外负担,也不会发送任何数据。
这里是一个示例,展示了如何在 Logfire 中运行天气代理的详细信息:

使用 Logfire
使用 logfire,您需要注册一个 logfire 账户,并确保已安装 logfire 软件:
pip install "pydantic-ai[logfire]"
uv add "pydantic-ai[logfire]"
使用 logfire 验证您的本地环境
配置一个项目,以便发送数据:
uv run logfire projects new
(或使用现有的项目编号 logfire projects use )
然后在您的代码中加入 logfire 模块:
adding_logfire.py
import logfire

logfire.configure()
启用您的代理的监控功能:
instrument_agent.py
from pydantic_ai import Agent

agent = Agent('openai:gpt-4o', instrument=True)
# or instrument all agents to avoid needing to add `instrument=True` to each agent:
Agent.instrument_all()
日志防火文档详细介绍了如何使用日志防火,包括如何对 Pydantic、HTTPX 和 FastAPI 等库进行配置。以下是对该内容的更自然和易于理解的翻译: 日志防火文档中详细介绍了如何使用日志防火,其中包含了如何对 Pydantic、HTTPX 和 FastAPI 等库进行配置的详细信息。
由于 Logfire 是基于 OpenTelemetry 构建的,因此您可以使用 Logfire Python SDK 将数据发送到任何 OpenTelemetry 收集器。这样的表述更加自然,易于理解。
一旦您配置好 logfire,它主要有两种方式帮助您理解您的应用程序:
- 调试 — 通过实时视图实时查看应用程序中的情况。
- 监控 — 通过 SQL 和仪表板来观察应用程序的运行状态,Logfire 本质上是一个专门存储应用程序运行信息的 SQL 数据库。
调试
为了展示 Logfire 如何让您直观地看到 PydanticAI 的运行流程,以下是运行聊天应用示例时在 Logfire 中看到的视图:
监控性能指标
我们可以在 Logfire 中使用 SQL 进行数据查询,以监控应用程序的性能。这里有一个使用 Logfire 监控 Logfire 内部 PydanticAI 运行的实际情况示例:
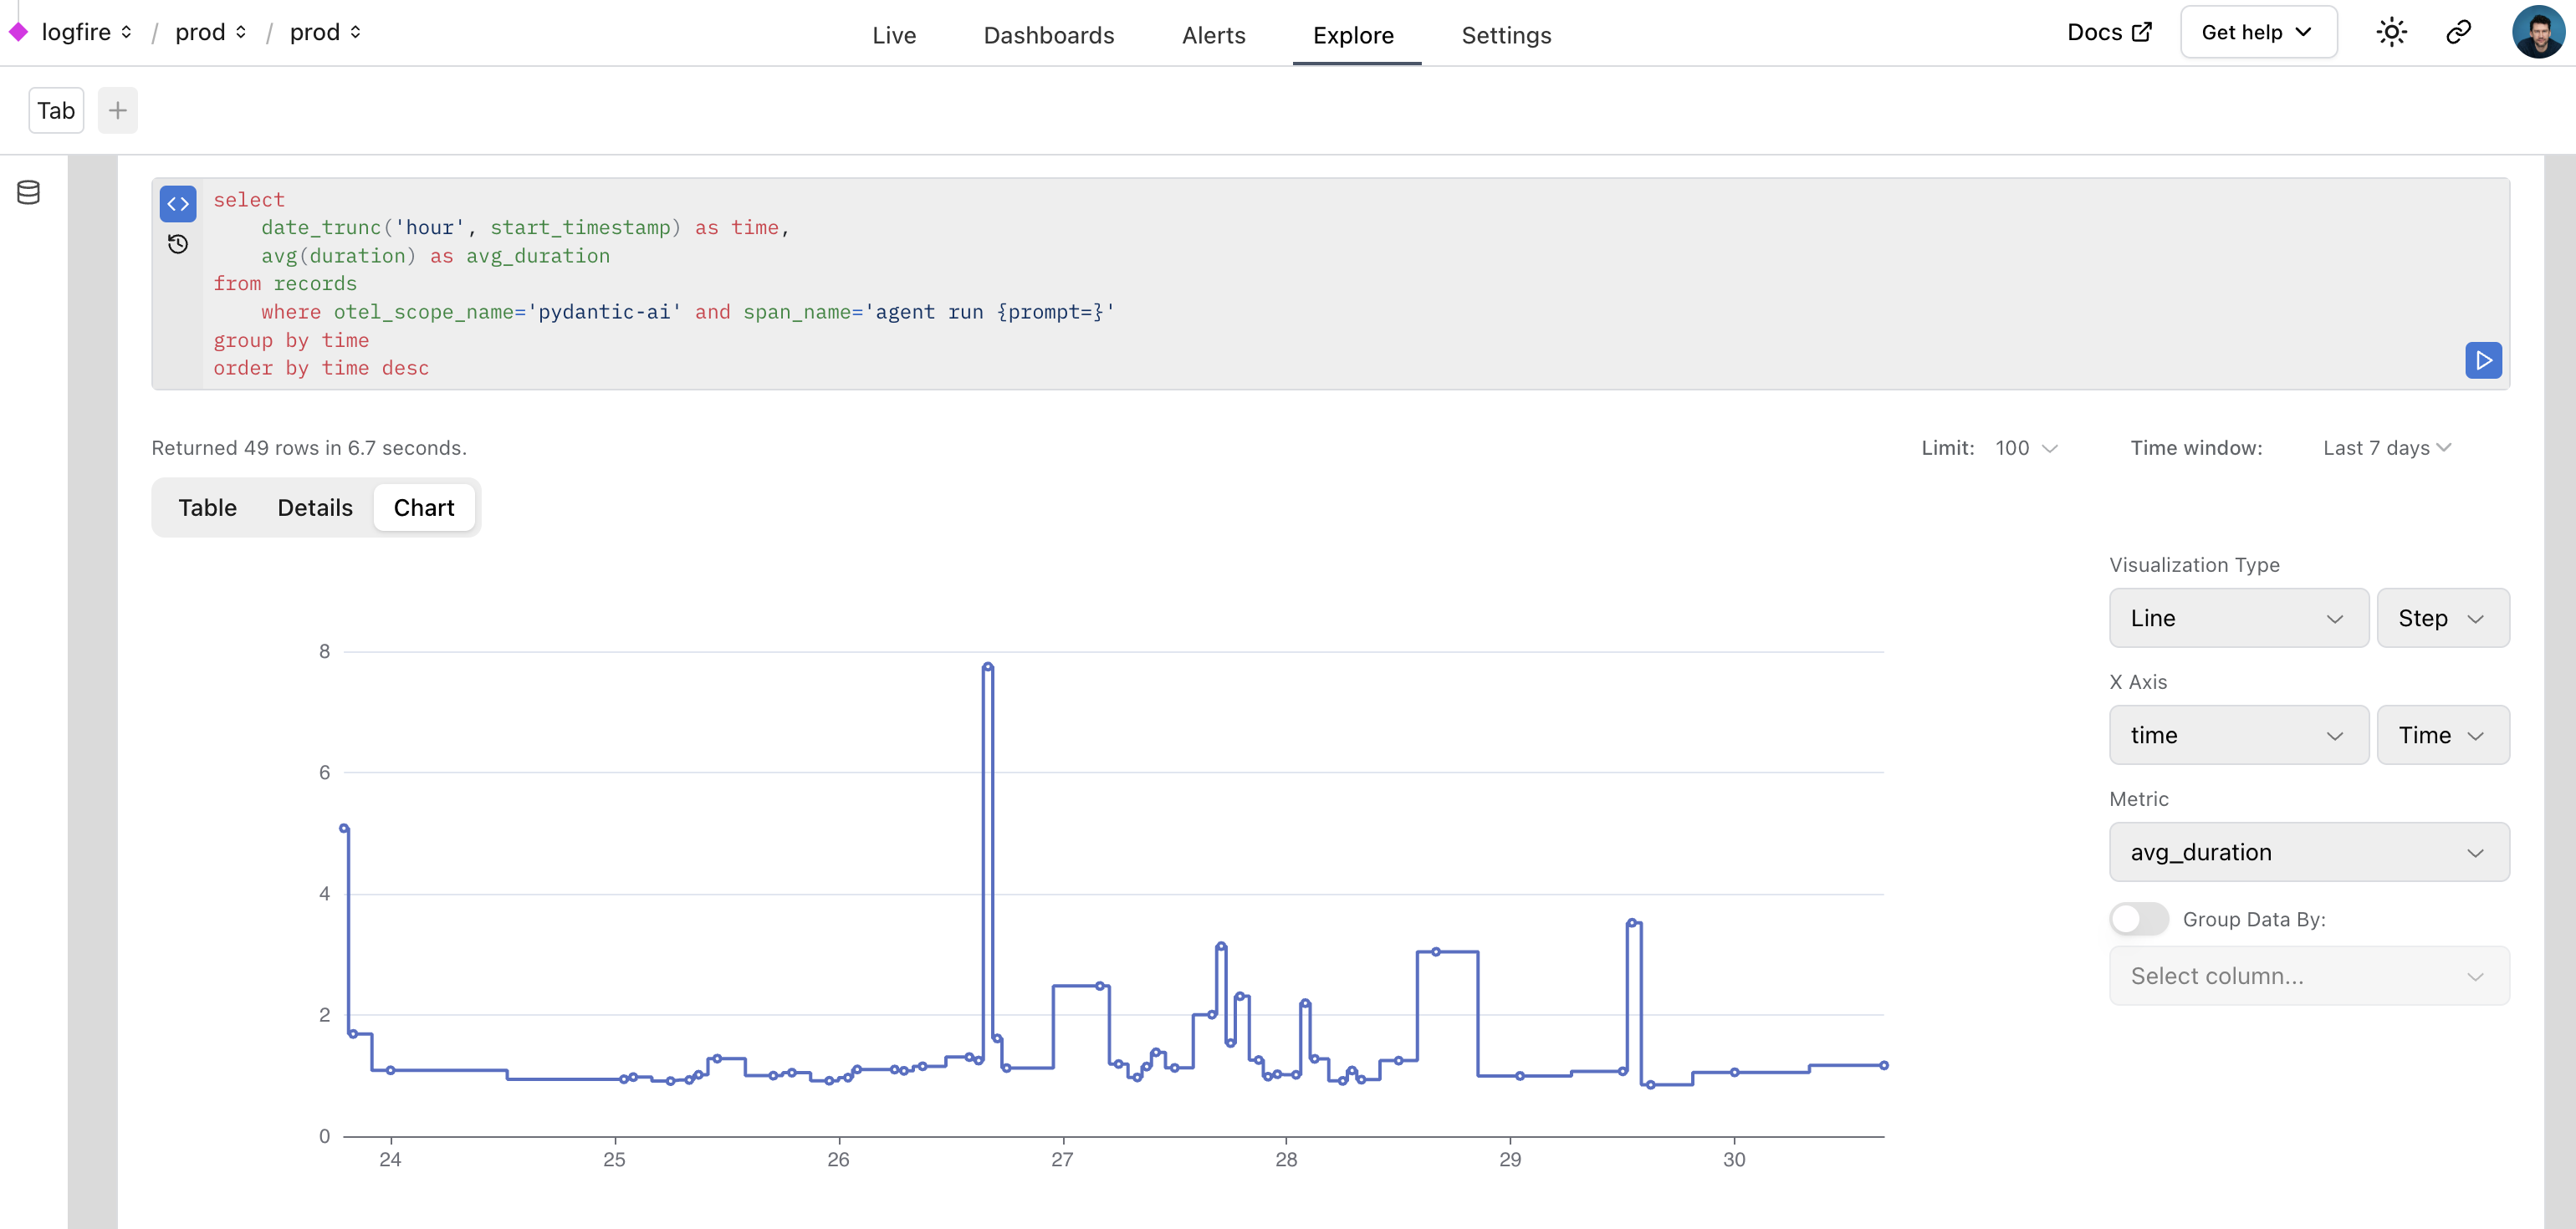
监控 HTTPX 请求情况
为了监控模型发出的 HTTPX 请求,你可以利用 logfire 提供的 HTTPX 集成功能。
只需添加以下三条语句,即可轻松将监控功能集成到您的应用程序中,使操作更加简便。
instrument_httpx.py
import logfire
logfire.configure()
logfire.instrument_httpx(capture_all=True)
尤其可以帮助您追踪特定的请求、响应和头部信息,这样可以使问题定位更加精确。
instrument_httpx_example.py
import logfire
from pydantic_ai import Agent

logfire.configure()
logfire.instrument_httpx(capture_all=True)

agent = Agent('openai:gpt-4o', instrument=True)
result = agent.run_sync('What is the capital of France?')
print(result.data)
# > The capital of France is Paris.
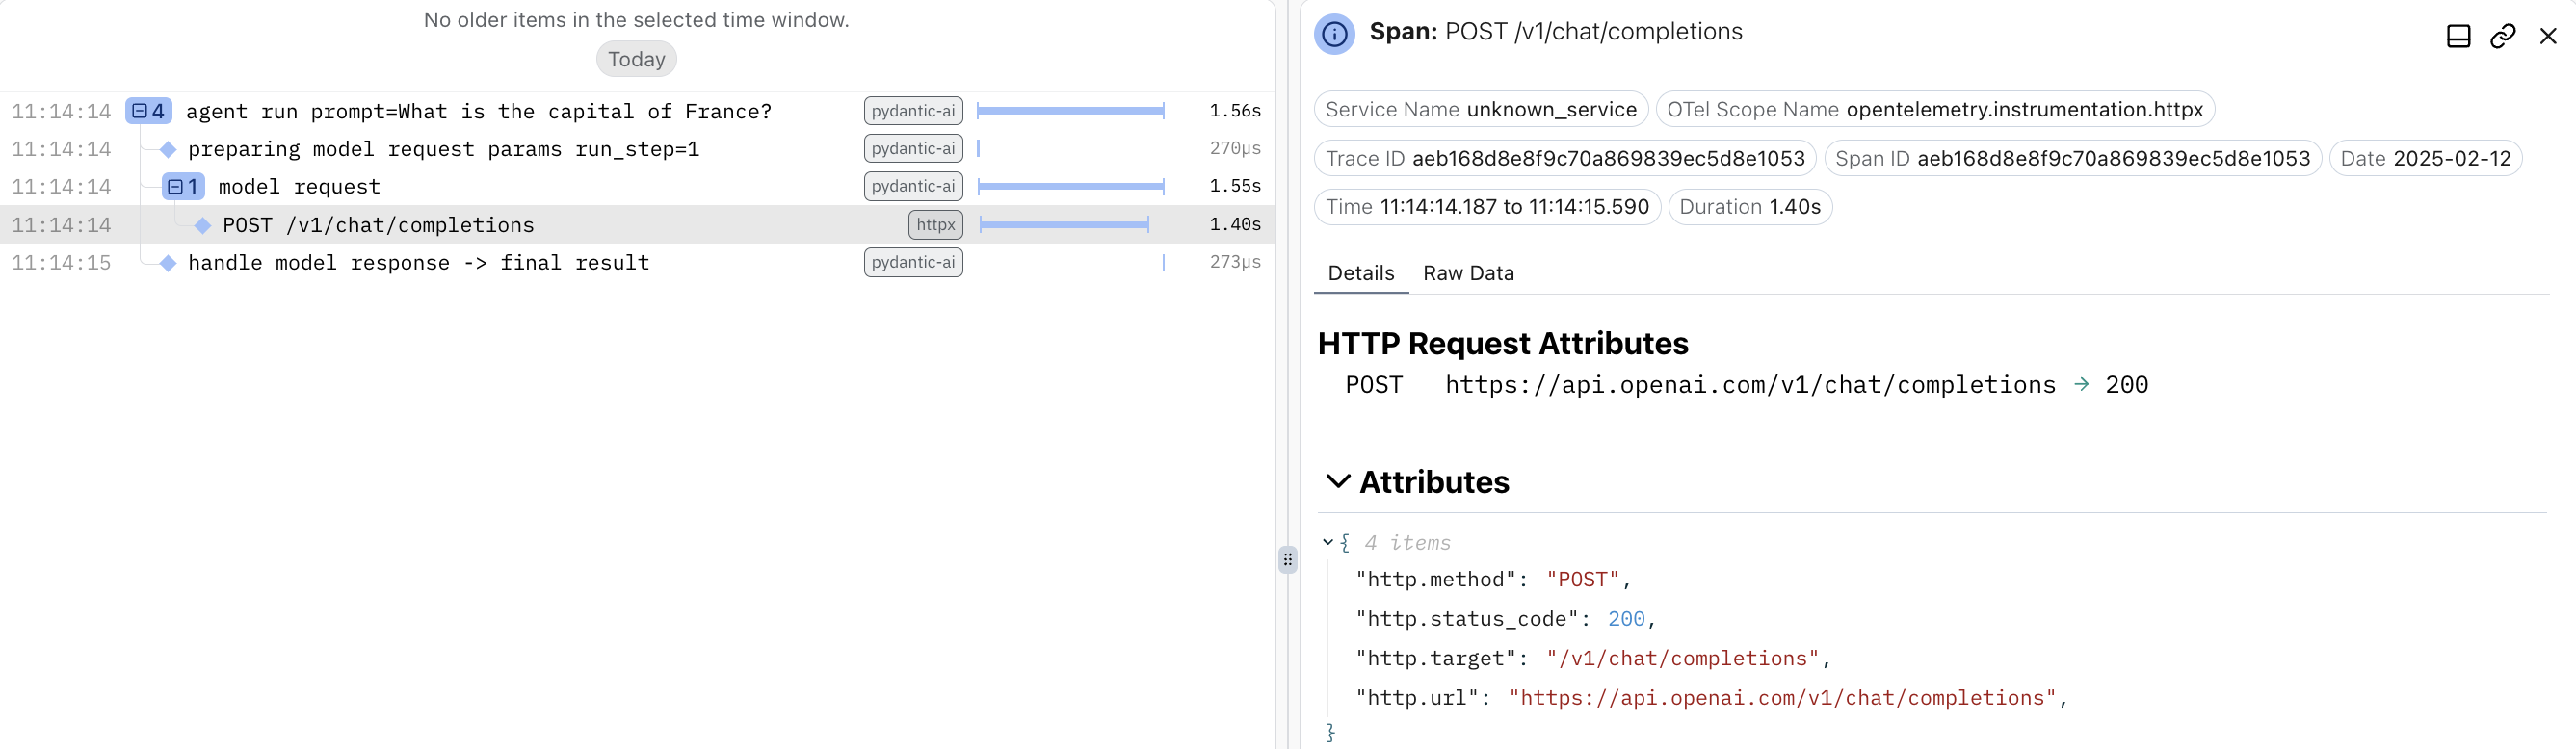

提示信息
如果你在模型中使用自定义客户端,那么监控可能特别有用,这样你可以更深入地了解你的自定义请求。
使用 OpenTelemetry
PydanticAI 的监控功能基于 OpenTelemetry,而 Logfire 正是基于此构建的。您可自由使用 Logfire SDK,并按照替代后端指南将数据发送至任何 OpenTelemetry 收集器,比如自建的 Jaeger 实例。当然,您也可以选择不使用 Logfire,直接通过 OpenTelemetry Python SDK 进行监控。
数据格式
PydanticAI 遵循 OpenTelemetry 的生成式 AI 系统语义约定,但有一个特殊之处。语义约定指出,消息应作为请求跨度(日志)的子事件进行捕获。然而,PydanticAI 默认将这些事件汇总成一个 JSON 数组,并将其作为名为 events 的单个大型属性附加到请求跨度上。若要更改此行为,请使用 InstrumentationSettings(event_mode='logs') 。
instrumentation_settings_event_mode.py
from pydantic_ai import Agent
from pydantic_ai.agent import InstrumentationSettings

instrumentation_settings = InstrumentationSettings(event_mode='logs')

agent = Agent('openai:gpt-4o', instrument=instrumentation_settings)
# or instrument all agents:
Agent.instrument_all(instrumentation_settings)
目前在 Logfire UI 中显示效果可能不佳,我们正在努力优化中。
如果您的对话很长, events 的 span 属性可能会被截断,使用 event_mode='logs' 可以避免这种情况,使翻译更加流畅。
注意,OpenTelemetry 语义约定目前仍处于实验阶段,可能会发生变化。请知晓这一点,因为它们可能会在未来进行调整。
设置 OpenTelemetry SDK 提供程序
默认情况下,系统会自动使用全局的 TracerProvider 和 EventLoggerProvider ,这些由 logfire.configure() 自动设置。同时,您也可以通过 OpenTelemetry Python SDK 中的 set_tracer_provider 和 set_event_logger_provider 函数来设置它们。此外,您还可以使用 InstrumentationSettings 来指定自定义的提供者。
instrumentation_settings_providers.py
from opentelemetry.sdk._events import EventLoggerProvider
from opentelemetry.sdk.trace import TracerProvider

from pydantic_ai.agent import InstrumentationSettings

instrumentation_settings = InstrumentationSettings(
    tracer_provider=TracerProvider(),
    event_logger_provider=EventLoggerProvider(),
)
仪器化特定功能 Model
仪器化模型示例.py
from pydantic_ai import Agent
from pydantic_ai.models.instrumented import InstrumentationSettings, InstrumentedModel

settings = InstrumentationSettings()
model = InstrumentedModel('gpt-4o', settings)
agent = Agent(model)
多智能体应用
使用 PydanticAI 构建应用程序时,大致存在四个复杂度层次,具体如下:
- 单个代理工作流程——这是大多数文档所涵盖的内容(经过优化,使翻译更加自然易懂)
- 代理委派 — 代理通过工具操控其他代理
- 程序化代理交接 — 一个代理执行完毕后,应用程序代码会调用另一个代理
- 基于图的流程控制——对于最为复杂的情形,我们可以采用基于图的有限状态机来控制多个代理的执行流程
当然可以,你可以在一个应用中整合多种策略,这样可以使应用更加灵活和强大。
代理委托
“代理委派”是指一个代理将任务委托给另一个代理执行,待被委托的代理(在工具内部调用的代理)完成任务后,再由原代理接管控制权。
由于代理是无状态的,且被设计为全局性的,所以您无需在代理依赖中包含代理自身。
通常,您需要将 ctx.usage 传递给代理代理运行的 usage 关键字参数,这样在该运行中的使用就会计入父代理运行的总体使用量中。
多种模型
代理委派无需每个代理都使用相同的模型。若在运行中选用不同模型,则无法从运行最终结果 result.usage() 中计算货币成本,但您仍可通过 UsageLimits 来规避意外费用。
agent_delegation_simple.py
from pydantic_ai import Agent, RunContext
from pydantic_ai.usage import UsageLimits

joke_selection_agent = Agent(
    'openai:gpt-4o',
    system_prompt=(
        'Use the `joke_factory` to generate some jokes, then choose the best. '
        'You must return just a single joke.'
    ),
)
joke_generation_agent = Agent(
    'google-gla:gemini-1.5-flash', result_type=list[str]
)


@joke_selection_agent.tool
async def joke_factory(ctx: RunContext[None], count: int) -> list[str]:
    r = await joke_generation_agent.run(
        f'Please generate {count} jokes.',
        usage=ctx.usage,
    )
    return r.data


result = joke_selection_agent.run_sync(
    'Tell me a joke.',
    usage_limits=UsageLimits(request_limit=5, total_tokens_limit=300),
)
print(result.data)
#> Did you hear about the toothpaste scandal? They called it Colgate.
print(result.usage())
"""
Usage(
    requests=3, request_tokens=204, response_tokens=24, total_tokens=228, details=None
)
"""
(本示例完整,可以直接运行)
这个示例的控制流程非常简单,可以概括为以下几点:
代理委派与依赖关系
通常,代理需要具备与调用代理相同的依赖项,或者具备调用代理依赖项的子集。
初始化依赖项
我们在上述内容中使用“通常”一词,因为通常没有阻止你在工具调用中初始化依赖项,因此可以在子代理中使用父代理上不可用的依赖项。但这种情况通常应避免,因为其速度可能显著低于从父代理重用连接等操作。
agent_delegation_deps.py
from dataclasses import dataclass

import httpx

from pydantic_ai import Agent, RunContext


@dataclass
class ClientAndKey:
    http_client: httpx.AsyncClient
    api_key: str


joke_selection_agent = Agent(
    'openai:gpt-4o',
    deps_type=ClientAndKey,
    system_prompt=(
        'Use the `joke_factory` tool to generate some jokes on the given subject, '
        'then choose the best. You must return just a single joke.'
    ),
)
joke_generation_agent = Agent(
    'gemini-1.5-flash',
    deps_type=ClientAndKey,
    result_type=list[str],
    system_prompt=(
        'Use the "get_jokes" tool to get some jokes on the given subject, '
        'then extract each joke into a list.'
    ),
)


@joke_selection_agent.tool
async def joke_factory(ctx: RunContext[ClientAndKey], count: int) -> list[str]:
    r = await joke_generation_agent.run(
        f'Please generate {count} jokes.',
        deps=ctx.deps,
        usage=ctx.usage,
    )
    return r.data


@joke_generation_agent.tool
async def get_jokes(ctx: RunContext[ClientAndKey], count: int) -> str:
    response = await ctx.deps.http_client.get(
        'https://example.com',
        params={'count': count},
        headers={'Authorization': f'Bearer {ctx.deps.api_key}'},
    )
    response.raise_for_status()
    return response.text


async def main():
    async with httpx.AsyncClient() as client:
        deps = ClientAndKey(client, 'foobar')
        result = await joke_selection_agent.run('Tell me a joke.', deps=deps)
        print(result.data)
        #> Did you hear about the toothpaste scandal? They called it Colgate.
        print(result.usage())
        """
        Usage(
            requests=4,
            request_tokens=309,
            response_tokens=32,
            total_tokens=341,
            details=None,
        )
        """
(本示例完整,可直接运行——运行时需添加 asyncio.run(main()) 才能执行 main )
这个例子展示了即便是一个相对简单的代理委托也能导致复杂的控制流程:
程序化代理交接
"程序化代理交接"是指多个代理依次被调用,其中应用代码和/或人类参与循环,负责决定下一个要调用的代理。
代理之间无需使用相同的依赖库。
我们展示了连续使用两个智能体,第一个用于查找航班,第二个用于提取用户的座位偏好。这样的描述更加自然易懂。
programmatic_handoff.py
from typing import Literal, Union

from pydantic import BaseModel, Field
from rich.prompt import Prompt

from pydantic_ai import Agent, RunContext
from pydantic_ai.messages import ModelMessage
from pydantic_ai.usage import Usage, UsageLimits


class FlightDetails(BaseModel):
    flight_number: str


class Failed(BaseModel):
    """Unable to find a satisfactory choice."""


flight_search_agent = Agent[None, Union[FlightDetails, Failed]](
    'openai:gpt-4o',
    result_type=Union[FlightDetails, Failed],  # type: ignore
    system_prompt=(
        'Use the "flight_search" tool to find a flight '
        'from the given origin to the given destination.'
    ),
)


@flight_search_agent.tool
async def flight_search(
    ctx: RunContext[None], origin: str, destination: str
) -> Union[FlightDetails, None]:
    # in reality, this would call a flight search API or
    # use a browser to scrape a flight search website
    return FlightDetails(flight_number='AK456')


usage_limits = UsageLimits(request_limit=15)


async def find_flight(usage: Usage) -> Union[FlightDetails, None]:
    message_history: Union[list[ModelMessage], None] = None
    for _ in range(3):
        prompt = Prompt.ask(
            'Where would you like to fly from and to?',
        )
        result = await flight_search_agent.run(
            prompt,
            message_history=message_history,
            usage=usage,
            usage_limits=usage_limits,
        )
        if isinstance(result.data, FlightDetails):
            return result.data
        else:
            message_history = result.all_messages(
                result_tool_return_content='Please try again.'
            )


class SeatPreference(BaseModel):
    row: int = Field(ge=1, le=30)
    seat: Literal['A', 'B', 'C', 'D', 'E', 'F']


# This agent is responsible for extracting the user's seat selection
seat_preference_agent = Agent[None, Union[SeatPreference, Failed]](
    'openai:gpt-4o',
    result_type=Union[SeatPreference, Failed],  # type: ignore
    system_prompt=(
        "Extract the user's seat preference. "
        'Seats A and F are window seats. '
        'Row 1 is the front row and has extra leg room. '
        'Rows 14, and 20 also have extra leg room. '
    ),
)


async def find_seat(usage: Usage) -> SeatPreference:
    message_history: Union[list[ModelMessage], None] = None
    while True:
        answer = Prompt.ask('What seat would you like?')

        result = await seat_preference_agent.run(
            answer,
            message_history=message_history,
            usage=usage,
            usage_limits=usage_limits,
        )
        if isinstance(result.data, SeatPreference):
            return result.data
        else:
            print('Could not understand seat preference. Please try again.')
            message_history = result.all_messages()


async def main():
    usage: Usage = Usage()

    opt_flight_details = await find_flight(usage)
    if opt_flight_details is not None:
        print(f'Flight found: {opt_flight_details.flight_number}')
        #> Flight found: AK456
        seat_preference = await find_seat(usage)
        print(f'Seat preference: {seat_preference}')
        #> Seat preference: row=1 seat='A'
(本示例完整,可直接运行——运行时需添加 asyncio.run(main()) 才能执行 main )
该示例的控制流程可以这样总结:
Pydantic 图
请参考图形文档,了解何时以及如何使用图形。该文档将帮助您更好地理解和使用图形。
示例
以下示例展示了如何在 PydanticAI 中使用依赖项:
图形
如果不需要使用射钉枪,就请勿使用射钉枪
如果 PydanticAI 智能体是一把锤子,多智能体工作流程是一把大锤,那么图就相当于一把钉枪:
- 当然,电钻看起来比锤子更酷炫一些
- 钢钉枪的设置比锤子要复杂得多,用起来也更麻烦
- 钢钉枪并不能让你成为一个更出色的建筑工人,它只会让你成为一个手持钢钉枪的建筑工人,这样的说法更为自然和易于理解。
- 最后,冒着过度比喻的风险,如果你是喜欢中世纪工具如槌子和无类型 Python 的爱好者,你可能不会喜欢射钉枪或我们处理图的方法。(但如果你对 Python 中的类型提示不感兴趣,你可能已经转向了其他玩具代理框架——祝你好运,当你意识到需要它时,随时可以借用我的锤子。)
简而言之,图是一种强大的工具,但并非所有任务都适合使用图。在继续之前,不妨考虑其他多智能体方法,这样可能更合适。
如果您对采用基于图的方法没有信心,那么这可能是多余的。
图和有限状态机(FSM)是强大的抽象,能够有效地用于建模、执行、控制和可视化复杂的流程。
在 PydanticAI 的基础上,我们开发了一个名为 pydantic-graph 的异步图和状态机库,该库使用类型提示来定义节点和边,适用于 Python。
虽然这个库是作为 PydanticAI 的一部分开发的,但它不依赖于 pydantic-ai ,可以独立使用,作为一个纯粹的基于图的有限状态机库。无论您是否使用 PydanticAI,甚至是使用 GenAI 进行构建,它都可能对您有所帮助。
" pydantic-graph 专为高级用户设计,大量运用了 Python 的泛型和类型提示。与 PydanticAI 相比,它并不那么适合初学者使用。"
安装指南
pydantic-graph 是 pydantic-ai 的必要依赖,也是 pydantic-ai-slim 的可选依赖,具体安装指南请参考安装说明。此外,您也可以直接进行安装:
pip install pydantic-graph
图的类型
由以下几个关键组件构成:
图运行上下文
GraphRunContext — 图运行上下文,类似于 PydanticAI 的 RunContext 。这里存储了图的状态和依赖信息,并在节点执行时传递给它们。
GraphRunContext 在它所应用的图的态类型中具有通用性, StateT 。
结束
End — 返回指示图形运行应终止的值。
在该图所使用的图返回类型中, End 是通用的,表达更为自然。
节点
BaseNode 的子类定义了图中执行的节点。
节点通常由 dataclass es 构成,一般包括:
- 调用节点时所需或可选的参数所包含的字段
- 执行节点的业务逻辑,位于
run方法中 - 返回
run方法的注释,这些注释由pydantic-graph读取,用于确定节点的出边
节点在以下方面具有通用性:
- 状态,必须与包含它们的图的相同类型,
StateT具有默认值None,所以如果您没有使用状态,可以省略这个通用参数。有关状态图的更多信息,请参阅相关说明。 - "依赖项必须与包含它们的图的依赖项类型相同,
DepsT的默认值为None。如果您不使用依赖项,可以省略此通用参数。有关依赖注入的更多信息,请参阅相关文档。" - 节点返回类型 - 仅当节点返回
End时适用。RunEndT的默认值为“永不”,所以如果节点不返回End,则可以省略此泛型参数;如果节点返回End,则必须包含此参数。
这里是一个图中的起始节点或中间节点示例——它不能结束运行,因为它不返回 End :(经过润色,使翻译更加自然和易于理解)
intermediate_node.py
from dataclasses import dataclass

from pydantic_graph import BaseNode, GraphRunContext


@dataclass
class MyNode(BaseNode[MyState]):
    foo: int

    async def run(
        self,
        ctx: GraphRunContext[MyState],
    ) -> AnotherNode:
        ...
        return AnotherNode()
我们可以将 MyNode 扩展为可选结束运行的条件,即当 foo 可以被 5 整除时:
intermediate_or_end_node.py
from dataclasses import dataclass

from pydantic_graph import BaseNode, End, GraphRunContext


@dataclass
class MyNode(BaseNode[MyState, None, int]):
    foo: int

    async def run(
        self,
        ctx: GraphRunContext[MyState],
    ) -> AnotherNode | End[int]:
        if self.foo % 5 == 0:
            return End(self.foo)
        else:
            return AnotherNode()
图(Graph)
Graph — 这代表执行图本身,由一系列节点类(即,BaseNode 的子类)构成。
在以下方面具有通用性:
- 说明图的状态类型,请标注,
StateT - 图的依赖类型,即
DepsT的类型 - 图的返回类型,即运行图时返回的类型,
RunEndT
这里是一个简单图的示例:
graph_example.py
from __future__ import annotations

from dataclasses import dataclass

from pydantic_graph import BaseNode, End, Graph, GraphRunContext


@dataclass
class DivisibleBy5(BaseNode[None, None, int]):
    foo: int

    async def run(
        self,
        ctx: GraphRunContext,
    ) -> Increment | End[int]:
        if self.foo % 5 == 0:
            return End(self.foo)
        else:
            return Increment(self.foo)


@dataclass
class Increment(BaseNode):
    foo: int

    async def run(self, ctx: GraphRunContext) -> DivisibleBy5:
        return DivisibleBy5(self.foo + 1)


fives_graph = Graph(nodes=[DivisibleBy5, Increment])
result = fives_graph.run_sync(DivisibleBy5(4))
print(result.output)
#> 5
(此示例完整,无需修改即可在 Python 3.10 及以上版本中运行)
使用以下代码即可生成该图的 mermaid 图表,表达更为自然流畅。
graph_example_diagram.py
from graph_example import DivisibleBy5, fives_graph

fives_graph.mermaid_code(start_node=DivisibleBy5)
In order to visualize a graph within a jupyter-notebook, IPython.display needs to be used:
jupyter_display_mermaid.py
from graph_example import DivisibleBy5, fives_graph
from IPython.display import Image, display

display(Image(fives_graph.mermaid_image(start_node=DivisibleBy5)))
有状态的图
在 pydantic-graph 中的 "状态" 概念提供了一种可选的方式,在图中的节点运行时访问和修改对象(通常是 dataclass 或 Pydantic 模型)。如果您将图视为一条生产线,那么您的状态就是沿着生产线传递并被每个节点构建的引擎。
未来,我们打算扩展 pydantic-graph 以提供状态持久化,在每个节点运行后记录状态,请参阅 #695。
下面是一个表示自动售货机的图的例子,用户可以投入硬币并选择要购买的产品。
vending_machine.py
from __future__ import annotations

from dataclasses import dataclass

from rich.prompt import Prompt

from pydantic_graph import BaseNode, End, Graph, GraphRunContext


@dataclass
class MachineState:
    user_balance: float = 0.0
    product: str | None = None


@dataclass
class InsertCoin(BaseNode[MachineState]):
    async def run(self, ctx: GraphRunContext[MachineState]) -> CoinsInserted:
        return CoinsInserted(float(Prompt.ask('Insert coins')))


@dataclass
class CoinsInserted(BaseNode[MachineState]):
    amount: float

    async def run(
        self, ctx: GraphRunContext[MachineState]
    ) -> SelectProduct | Purchase:
        ctx.state.user_balance += self.amount
        if ctx.state.product is not None:
            return Purchase(ctx.state.product)
        else:
            return SelectProduct()


@dataclass
class SelectProduct(BaseNode[MachineState]):
    async def run(self, ctx: GraphRunContext[MachineState]) -> Purchase:
        return Purchase(Prompt.ask('Select product'))


PRODUCT_PRICES = {
    'water': 1.25,
    'soda': 1.50,
    'crisps': 1.75,
    'chocolate': 2.00,
}


@dataclass
class Purchase(BaseNode[MachineState, None, None]):
    product: str

    async def run(
        self, ctx: GraphRunContext[MachineState]
    ) -> End | InsertCoin | SelectProduct:
        if price := PRODUCT_PRICES.get(self.product):
            ctx.state.product = self.product
            if ctx.state.user_balance >= price:
                ctx.state.user_balance -= price
                return End(None)
            else:
                diff = price - ctx.state.user_balance
                print(f'Not enough money for {self.product}, need {diff:0.2f} more')
                #> Not enough money for crisps, need 0.75 more
                return InsertCoin()
        else:
            print(f'No such product: {self.product}, try again')
            return SelectProduct()


vending_machine_graph = Graph(
    nodes=[InsertCoin, CoinsInserted, SelectProduct, Purchase]
)


async def main():
    state = MachineState()
    await vending_machine_graph.run(InsertCoin(), state=state)
    print(f'purchase successful item={state.product} change={state.user_balance:0.2f}')
    #> purchase successful item=crisps change=0.25
这个示例是完整的,可以直接使用 Python 3.10+运行——您需要添加 asyncio.run(main()) 来运行 main。
为此图生成一个 mermaid 流程图的代码如下:
vending_machine_diagram.py
from vending_machine import InsertCoin, vending_machine_graph

vending_machine_graph.mermaid_code(start_node=InsertCoin)
上述代码生成的流程图如下:
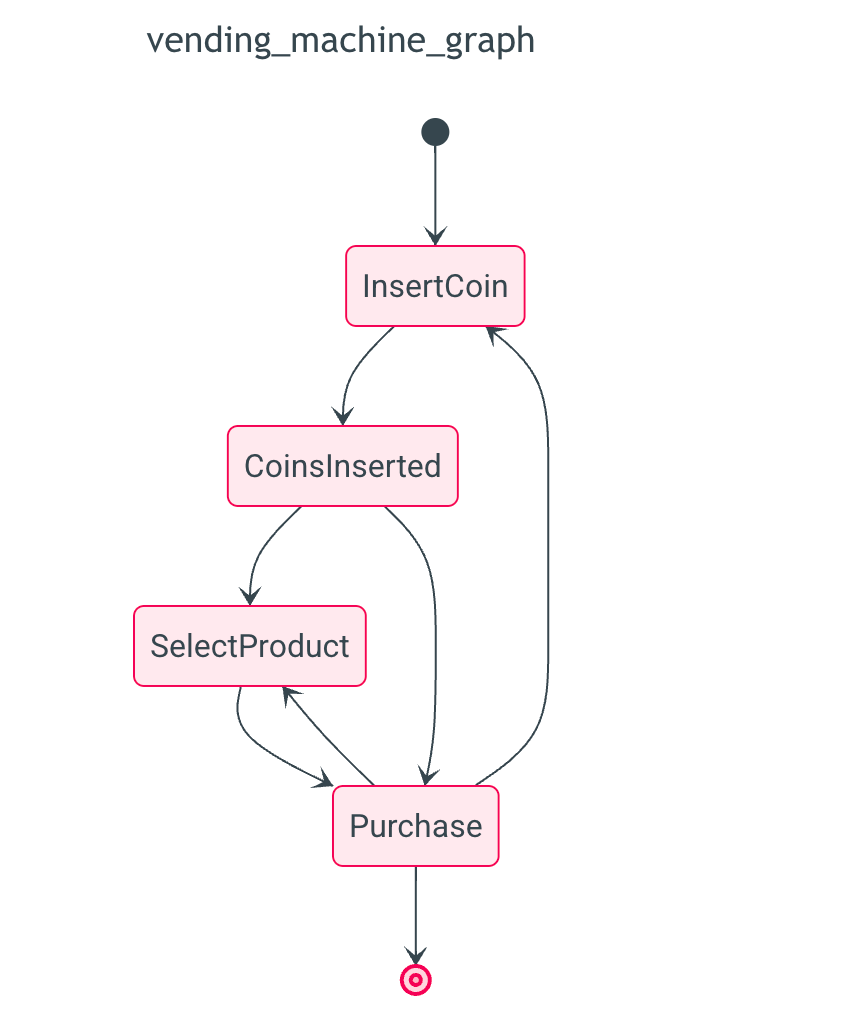
查看以下链接获取更多关于生成图表的信息: 以下 。
生成式 AI 示例
到目前为止,我们还没有展示一个真正使用 PydanticAI 或 GenAI 的 Graph 示例。
在这个例子中,一个智能体生成一封欢迎用户的电子邮件,另一个智能体则对这封电子邮件提供反馈。
这个图具有一个非常简单的结构:
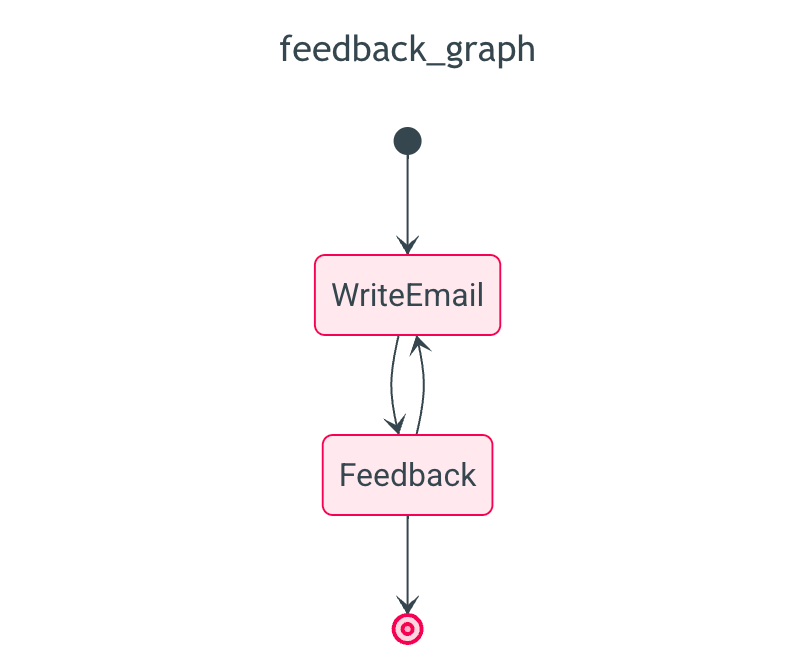
genai_email_feedback.py
from __future__ import annotations as _annotations

from dataclasses import dataclass, field

from pydantic import BaseModel, EmailStr

from pydantic_ai import Agent
from pydantic_ai.format_as_xml import format_as_xml
from pydantic_ai.messages import ModelMessage
from pydantic_graph import BaseNode, End, Graph, GraphRunContext


@dataclass
class User:
    name: str
    email: EmailStr
    interests: list[str]


@dataclass
class Email:
    subject: str
    body: str


@dataclass
class State:
    user: User
    write_agent_messages: list[ModelMessage] = field(default_factory=list)


email_writer_agent = Agent(
    'google-vertex:gemini-1.5-pro',
    result_type=Email,
    system_prompt='Write a welcome email to our tech blog.',
)


@dataclass
class WriteEmail(BaseNode[State]):
    email_feedback: str | None = None

    async def run(self, ctx: GraphRunContext[State]) -> Feedback:
        if self.email_feedback:
            prompt = (
                f'Rewrite the email for the user:\n'
                f'{format_as_xml(ctx.state.user)}\n'
                f'Feedback: {self.email_feedback}'
            )
        else:
            prompt = (
                f'Write a welcome email for the user:\n'
                f'{format_as_xml(ctx.state.user)}'
            )

        result = await email_writer_agent.run(
            prompt,
            message_history=ctx.state.write_agent_messages,
        )
        ctx.state.write_agent_messages += result.all_messages()
        return Feedback(result.data)


class EmailRequiresWrite(BaseModel):
    feedback: str


class EmailOk(BaseModel):
    pass


feedback_agent = Agent[None, EmailRequiresWrite | EmailOk](
    'openai:gpt-4o',
    result_type=EmailRequiresWrite | EmailOk,  # type: ignore
    system_prompt=(
        'Review the email and provide feedback, email must reference the users specific interests.'
    ),
)


@dataclass
class Feedback(BaseNode[State, None, Email]):
    email: Email

    async def run(
        self,
        ctx: GraphRunContext[State],
    ) -> WriteEmail | End[Email]:
        prompt = format_as_xml({'user': ctx.state.user, 'email': self.email})
        result = await feedback_agent.run(prompt)
        if isinstance(result.data, EmailRequiresWrite):
            return WriteEmail(email_feedback=result.data.feedback)
        else:
            return End(self.email)


async def main():
    user = User(
        name='John Doe',
        email='john.joe@example.com',
        interests=['Haskel', 'Lisp', 'Fortran'],
    )
    state = State(user)
    feedback_graph = Graph(nodes=(WriteEmail, Feedback))
    result = await feedback_graph.run(WriteEmail(), state=state)
    print(result.output)
    """
    Email(
        subject='Welcome to our tech blog!',
        body='Hello John, Welcome to our tech blog! ...',
    )
    """
这个示例是完整的,可以直接使用 Python 3.10+运行——您需要添加 asyncio.run(main()) 来运行 main。
遍历图
使用 Graph.iter 进行 async for 迭代
有时你希望在图执行过程中直接控制或了解每个节点。最简单的方法是使用 Graph.iter 方法,它返回一个 上下文管理器 ,该管理器生成一个 GraphRun 对象。GraphRun 是一个异步可迭代对象,遍历你的图中的节点,允许你在它们执行时记录或修改它们。
下面是一个例子:
count_down.py
from __future__ import annotations as _annotations

from dataclasses import dataclass
from pydantic_graph import Graph, BaseNode, End, GraphRunContext


@dataclass
class CountDownState:
    counter: int


@dataclass
class CountDown(BaseNode[CountDownState, None, int]):
    async def run(self, ctx: GraphRunContext[CountDownState]) -> CountDown | End[int]:
        if ctx.state.counter <= 0:
            return End(ctx.state.counter)
        ctx.state.counter -= 1
        return CountDown()


count_down_graph = Graph(nodes=[CountDown])


async def main():
    state = CountDownState(counter=3)
    async with count_down_graph.iter(CountDown(), state=state) as run:
        async for node in run:
            print('Node:', node)
            #> Node: CountDown()
            #> Node: CountDown()
            #> Node: CountDown()
            #> Node: End(data=0)
    print('Final result:', run.result.output)
    #> Final result: 0
使用 GraphRun.next(node) 手动
或者,您可以使用手动驱动迭代的 GraphRun.next 方法,该方法允许您传递想要运行的下一条节点。您可以通过这种方式修改或选择性跳过节点。
下面是一个虚构的例子,当计数器达到2时停止,忽略超过该值的任何节点运行:
count_down_next.py
from pydantic_graph import End, FullStatePersistence
from count_down import CountDown, CountDownState, count_down_graph


async def main():
    state = CountDownState(counter=5)
    persistence = FullStatePersistence()
    async with count_down_graph.iter(
        CountDown(), state=state, persistence=persistence
    ) as run:
        node = run.next_node
        while not isinstance(node, End):
            print('Node:', node)
            #> Node: CountDown()
            #> Node: CountDown()
            #> Node: CountDown()
            #> Node: CountDown()
            if state.counter == 2:
                break
            node = await run.next(node)

        print(run.result)
        #> None

        for step in persistence.history:
            print('History Step:', step.state, step.state)
            #> History Step: CountDownState(counter=5) CountDownState(counter=5)
            #> History Step: CountDownState(counter=4) CountDownState(counter=4)
            #> History Step: CountDownState(counter=3) CountDownState(counter=3)
            #> History Step: CountDownState(counter=2) CountDownState(counter=2)
状态持久化
有限状态机(FSM)图的最大好处之一是它们如何简化中断执行的处理。这可能会因为各种原因而发生:
- 状态机逻辑可能需要从根本上暂停——例如,电子商务订单的退货流程需要等待物品被寄送到退货中心,或者因为执行下一个节点需要用户的输入,所以需要等待新的 HTTP 请求,
- 执行时间过长,整个图无法在单个连续运行中可靠地执行——例如,可能需要数小时运行的深度研究智能体,
- 您希望在不同进程/硬件实例中并行运行多个图节点(注意:在
pydantic-graph中尚不支持并行节点执行,请参阅 #704)。
尝试使传统的控制流(即布尔逻辑和嵌套函数调用)的实现与这些使用场景兼容,通常会导致脆弱且过于复杂的意大利面代码,其中中断和恢复执行的逻辑主导了实现。
允许中断并恢复图运行,pydantic-graph 提供状态持久化——在运行每个节点之前和之后快照图运行状态,允许从图的任何位置恢复图运行。
pydantic-graph 包含三种状态持久化实现:
SimpleStatePersistence—— 简单的内存状态持久化,仅保存最新的快照。如果在运行图时未提供状态持久化实现,则默认使用此实现。FullStatePersistence—— 内存状态持久化,保存快照列表。FileStatePersistence— 基于文件的持久化状态,将快照保存到 JSON 文件中。
在生产应用中,开发者应该通过继承 BaseStatePersistence 抽象基类来实现自己的状态持久化,该基类可能将运行持久化到关系数据库,如 PostgreSQL。
从高层次来看,StatePersistence 实现的作用是存储和检索 NodeSnapshot 和 EndSnapshot 对象。
可以使用 graph.iter_from_persistence() 来根据持久化中存储的状态运行图。
我们可以运行上面的 count_down_graph,使用 graph.iter_from_persistence() 和 FileStatePersistence。
如您在这段代码中看到的那样,run_node 运行不需要外部应用程序状态(除了状态持久化),这意味着图可以很容易地通过分布式执行和队列系统来执行。
count_down_from_persistence.py
from pathlib import Path

from pydantic_graph import End
from pydantic_graph.persistence.file import FileStatePersistence

from count_down import CountDown, CountDownState, count_down_graph


async def main():
    run_id = 'run_abc123'
    persistence = FileStatePersistence(Path(f'count_down_{run_id}.json'))
    state = CountDownState(counter=5)
    await count_down_graph.initialize(
        CountDown(), state=state, persistence=persistence
    )

    done = False
    while not done:
        done = await run_node(run_id)


async def run_node(run_id: str) -> bool:
    persistence = FileStatePersistence(Path(f'count_down_{run_id}.json'))
    async with count_down_graph.iter_from_persistence(persistence) as run:
        node_or_end = await run.next()

    print('Node:', node_or_end)
    #> Node: CountDown()
    #> Node: CountDown()
    #> Node: CountDown()
    #> Node: CountDown()
    #> Node: CountDown()
    #> Node: End(data=0)
    return isinstance(node_or_end, End)
这个示例是完整的,可以直接使用 Python 3.10+运行——您需要添加 asyncio.run(main()) 来运行 main。
示例:人工介入
如上所述,状态持久化允许中断和恢复图。其中一个用例是允许用户输入继续。
在这个例子中,一个 AI 向用户提问,用户提供答案,AI 评估答案,如果用户答对了就结束,如果答错了就再问一个问题。
而不是在单个进程调用中运行整个图,我们通过重复运行进程来运行图,可选地以命令行参数的形式提供一个问题的答案。
ai_q_and_a_graph.py — question_graph definition
ai_q_and_a_graph.py
from __future__ import annotations as _annotations

from dataclasses import dataclass, field

from groq import BaseModel
from pydantic_graph import (
    BaseNode,
    End,
    Graph,
    GraphRunContext,
)

from pydantic_ai import Agent
from pydantic_ai.format_as_xml import format_as_xml
from pydantic_ai.messages import ModelMessage

ask_agent = Agent('openai:gpt-4o', result_type=str, instrument=True)


@dataclass
class QuestionState:
    question: str | None = None
    ask_agent_messages: list[ModelMessage] = field(default_factory=list)
    evaluate_agent_messages: list[ModelMessage] = field(default_factory=list)


@dataclass
class Ask(BaseNode[QuestionState]):
    async def run(self, ctx: GraphRunContext[QuestionState]) -> Answer:
        result = await ask_agent.run(
            'Ask a simple question with a single correct answer.',
            message_history=ctx.state.ask_agent_messages,
        )
        ctx.state.ask_agent_messages += result.all_messages()
        ctx.state.question = result.data
        return Answer(result.data)


@dataclass
class Answer(BaseNode[QuestionState]):
    question: str

    async def run(self, ctx: GraphRunContext[QuestionState]) -> Evaluate:
        answer = input(f'{self.question}: ')
        return Evaluate(answer)


class EvaluationResult(BaseModel, use_attribute_docstrings=True):
    correct: bool
    """Whether the answer is correct."""
    comment: str
    """Comment on the answer, reprimand the user if the answer is wrong."""


evaluate_agent = Agent(
    'openai:gpt-4o',
    result_type=EvaluationResult,
    system_prompt='Given a question and answer, evaluate if the answer is correct.',
)


@dataclass
class Evaluate(BaseNode[QuestionState, None, str]):
    answer: str

    async def run(
        self,
        ctx: GraphRunContext[QuestionState],
    ) -> End[str] | Reprimand:
        assert ctx.state.question is not None
        result = await evaluate_agent.run(
            format_as_xml({'question': ctx.state.question, 'answer': self.answer}),
            message_history=ctx.state.evaluate_agent_messages,
        )
        ctx.state.evaluate_agent_messages += result.all_messages()
        if result.data.correct:
            return End(result.data.comment)
        else:
            return Reprimand(result.data.comment)


@dataclass
class Reprimand(BaseNode[QuestionState]):
    comment: str

    async def run(self, ctx: GraphRunContext[QuestionState]) -> Ask:
        print(f'Comment: {self.comment}')
        ctx.state.question = None
        return Ask()


question_graph = Graph(
    nodes=(Ask, Answer, Evaluate, Reprimand), state_type=QuestionState
)
ai_q_and_a_run.py
import sys
from pathlib import Path

from pydantic_graph import End
from pydantic_graph.persistence.file import FileStatePersistence
from pydantic_ai.messages import ModelMessage  # noqa: F401

from ai_q_and_a_graph import Ask, question_graph, Evaluate, QuestionState, Answer


async def main():
    answer: str | None = sys.argv[1] if len(sys.argv) > 1 else None
    persistence = FileStatePersistence(Path('question_graph.json'))
    persistence.set_graph_types(question_graph)

    if snapshot := await persistence.load_next():
        state = snapshot.state
        assert answer is not None
        node = Evaluate(answer)
    else:
        state = QuestionState()
        node = Ask()

    async with question_graph.iter(node, state=state, persistence=persistence) as run:
        while True:
            node = await run.next()
            if isinstance(node, End):
                print('END:', node.data)
                history = await persistence.load_all()
                print([e.node for e in history])
                break
            elif isinstance(node, Answer):
                print(node.question)
                #> What is the capital of France?
                break
            # otherwise just continue
这个示例是完整的,可以直接使用 Python 3.10+运行——您需要添加 asyncio.run(main()) 来运行 main。
有关此图的完整示例,请参阅问题图示例 。
依赖注入
与 PydanticAI 一样,pydantic-graph 支持通过 Graph 和 BaseNode 上的泛型参数进行依赖注入,以及 GraphRunContext.deps 字段。
以下是一个依赖注入的示例,让我们修改上面的 DivisibleBy5 示例,使用 ProcessPoolExecutor 在单独的进程中运行计算负载(这是一个虚构的示例,ProcessPoolExecutor 实际上不会提高此示例的性能):
deps_example.py
from __future__ import annotations

import asyncio
from concurrent.futures import ProcessPoolExecutor
from dataclasses import dataclass

from pydantic_graph import BaseNode, End, Graph, GraphRunContext


@dataclass
class GraphDeps:
    executor: ProcessPoolExecutor


@dataclass
class DivisibleBy5(BaseNode[None, GraphDeps, int]):
    foo: int

    async def run(
        self,
        ctx: GraphRunContext[None, GraphDeps],
    ) -> Increment | End[int]:
        if self.foo % 5 == 0:
            return End(self.foo)
        else:
            return Increment(self.foo)


@dataclass
class Increment(BaseNode[None, GraphDeps]):
    foo: int

    async def run(self, ctx: GraphRunContext[None, GraphDeps]) -> DivisibleBy5:
        loop = asyncio.get_running_loop()
        compute_result = await loop.run_in_executor(
            ctx.deps.executor,
            self.compute,
        )
        return DivisibleBy5(compute_result)

    def compute(self) -> int:
        return self.foo + 1


fives_graph = Graph(nodes=[DivisibleBy5, Increment])


async def main():
    with ProcessPoolExecutor() as executor:
        deps = GraphDeps(executor)
        result = await fives_graph.run(DivisibleBy5(3), deps=deps)
    print(result.output)
    #> 5
    # the full history is quite verbose (see below), so we'll just print the summary
    print([item.data_snapshot() for item in result.history])
    """
    [
        DivisibleBy5(foo=3),
        Increment(foo=3),
        DivisibleBy5(foo=4),
        Increment(foo=4),
        DivisibleBy5(foo=5),
        End(data=5),
    ]
    """
这个示例是完整的,可以直接使用 Python 3.10+运行——您需要添加 asyncio.run(main()) 来运行 main。
Mermaid Diagrams
Pydantic 图可以生成如上所示的 mermaidstateDiagram-v2 图表。
这些图表可以使用以下方式生成:
Graph.mermaid_code用于生成图形的 mermaid 代码Graph.mermaid_image使用 mermaid.ink 生成图形的图像Graph.mermaid_save使用 mermaid.ink 生成图形的图像并将其保存到文件
上述图表之外,您还可以使用以下选项自定义 mermaid 图表:
边允许您为边应用标签BaseNode.docstring_notes和BaseNode.get_note允许您为节点添加备注highlighted_nodes参数允许您在图中突出显示特定的节点
将这些结合起来,我们可以将最后一个 ai_q_and_a_graph.py 示例进行编辑:
- 为一些边添加标签
- 为
询问节点添加备注 - 突出显示
答案节点 - 将图表保存为 PNG 图像到文件
ai_q_and_a_graph_extra.py
...
from typing import Annotated

from pydantic_graph import BaseNode, End, Graph, GraphRunContext, Edge

...

@dataclass
class Ask(BaseNode[QuestionState]):
    """Generate question using GPT-4o."""
    docstring_notes = True
    async def run(
        self, ctx: GraphRunContext[QuestionState]
    ) -> Annotated[Answer, Edge(label='Ask the question')]:
        ...

...

@dataclass
class Evaluate(BaseNode[QuestionState]):
    answer: str

    async def run(
            self,
            ctx: GraphRunContext[QuestionState],
    ) -> Annotated[End[str], Edge(label='success')] | Reprimand:
        ...

...

question_graph.mermaid_save('image.png', highlighted_nodes=[Answer])
(此示例不完整,无法直接运行)
这将生成一个看起来像这样的图像:
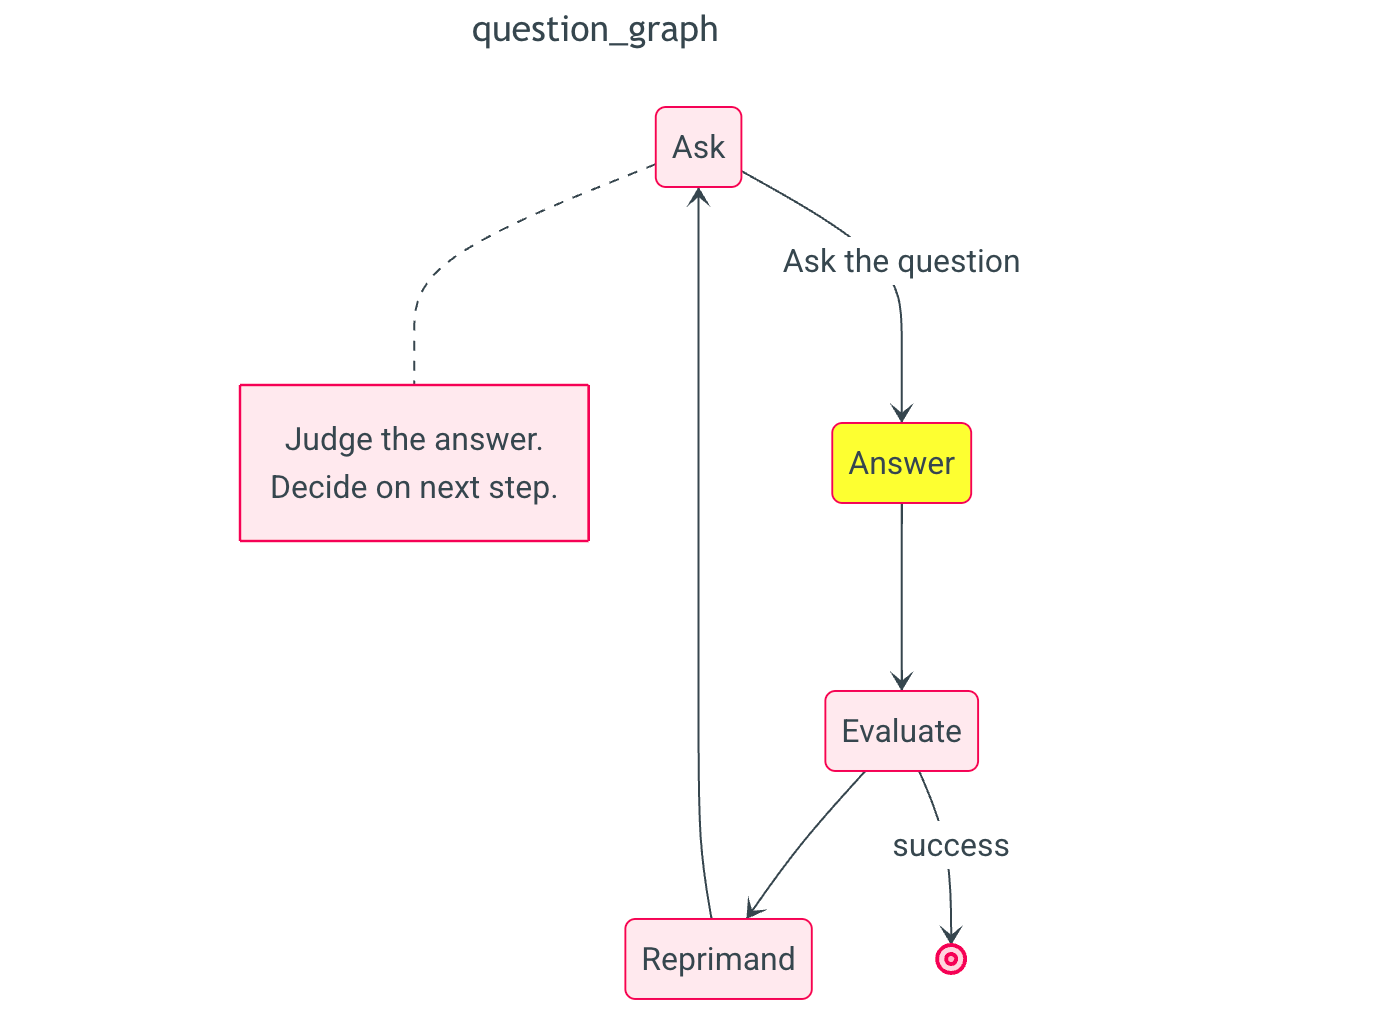
设置状态图的指向
您可以使用以下值之一指定状态图的流向:
'TB':从上到下,图从顶部垂直流向底部。'LR':从左到右,图从左向右水平流动。'RL':从右到左,图表水平地从右向左流动。'BT':从下到上,图表垂直流动,从下至上。
这里是一个使用“从左到右”(LR)而不是默认的“从上到下”(TB)的示例。
vending_machine_diagram.py
from vending_machine import InsertCoin, vending_machine_graph

vending_machine_graph.mermaid_code(start_node=InsertCoin, direction='LR')
评估
"Evals"是指评估模型在特定应用中的性能。
警告
与单元测试不同,评估是一门新兴的艺术与科学;那些声称确切知道你的评估应该如何定义的人,其说法可以不予理会。
Pydantic Evals 是一款功能强大的评估框架,旨在帮助您系统地测试和评估您所构建系统的性能和准确性,尤其是在与 LLMs 合作的情况下,使用起来尤为方便。
我们为 Pydantic Evals 设计了既实用又不过分主观的特性,因为我们(和所有人一样)仍在摸索最佳实践。我们期待您的宝贵意见,并了解我们如何对其进行改进。
正在测试中
Pydantic Evals 支持自 v0.0.47 版本开始引入,目前还在测试阶段。API 可能会有变动,相关文档尚不完善。
安装指南
安装 Pydantic Evals 包的步骤如下:运行以下命令
pip install pydantic-evals
pydantic-evals 不依赖于 pydantic-ai ,但如果您需要使用 OpenTelemetry 跟踪功能或向 logfire 发送评估结果,则可以选配 logfire 。
pip install 'pydantic-evals[logfire]'
uv add 'pydantic-evals[logfire]'
数据集与案例
在 Pydantic Evals 中,所有操作都始于 Dataset s 和 Case s:
Case: 对应 "task" 输入的单个测试场景。可包含名称、预期输出、元数据以及评估者(可选)。- 设计用于评估特定任务或功能的测试用例集合。这是一个为特定任务或功能评估而准备的测试用例集合。
simple_eval_dataset.py
from pydantic_evals import Case, Dataset

case1 = Case(
    name='simple_case',
    inputs='What is the capital of France?',
    expected_output='Paris',
    metadata={'difficulty': 'easy'},
)

dataset = Dataset(cases=[case1])
(本示例完整,可以直接运行)
评估人员
评估器是当您的任务与案例进行测试对比时,用于分析和评分结果的功能组件。
Pydantic Evals 提供了多个内置的评估器,同时支持您自定义评估器:
simple_eval_evaluator.py
from dataclasses import dataclass

from simple_eval_dataset import dataset

from pydantic_evals.evaluators import Evaluator, EvaluatorContext
from pydantic_evals.evaluators.common import IsInstance

dataset.add_evaluator(IsInstance(type_name='str'))


@dataclass
class MyEvaluator(Evaluator):
    async def evaluate(self, ctx: EvaluatorContext[str, str]) -> float:
        if ctx.output == ctx.expected_output:
            return 1.0
        elif (
            isinstance(ctx.output, str)
            and ctx.expected_output.lower() in ctx.output.lower()
        ):
            return 0.8
        else:
            return 0.0


dataset.add_evaluator(MyEvaluator())
(本示例完整,可以直接运行)
评估流程
评估过程包括将任务应用于数据集中的所有案例:
将上述两个示例合并,并使用更声明式的 evaluators 参数到 Dataset :
simple_eval_complete.py
from pydantic_evals import Case, Dataset
from pydantic_evals.evaluators import Evaluator, EvaluatorContext, IsInstance

case1 = Case(
    name='simple_case',
    inputs='What is the capital of France?',
    expected_output='Paris',
    metadata={'difficulty': 'easy'},
)


class MyEvaluator(Evaluator[str, str]):
    def evaluate(self, ctx: EvaluatorContext[str, str]) -> float:
        if ctx.output == ctx.expected_output:
            return 1.0
        elif (
            isinstance(ctx.output, str)
            and ctx.expected_output.lower() in ctx.output.lower()
        ):
            return 0.8
        else:
            return 0.0


dataset = Dataset(
    cases=[case1],
    evaluators=[IsInstance(type_name='str'), MyEvaluator()],
)


async def guess_city(question: str) -> str:
    return 'Paris'


report = dataset.evaluate_sync(guess_city)
report.print(include_input=True, include_output=True, include_durations=False)
"""
                              Evaluation Summary: guess_city
┏━━━━━━━━━━━━━┳━━━━━━━━━━━━━━━━━━━━━━━━━━━━━━━━┳━━━━━━━━━┳━━━━━━━━━━━━━━━━━━━┳━━━━━━━━━━━━┓
┃ Case ID     ┃ Inputs                         ┃ Outputs ┃ Scores            ┃ Assertions ┃
┡━━━━━━━━━━━━━╇━━━━━━━━━━━━━━━━━━━━━━━━━━━━━━━━╇━━━━━━━━━╇━━━━━━━━━━━━━━━━━━━╇━━━━━━━━━━━━┩
│ simple_case │ What is the capital of France? │ Paris   │ MyEvaluator: 1.00 │ ✔          │
├─────────────┼────────────────────────────────┼─────────┼───────────────────┼────────────┤
│ Averages    │                                │         │ MyEvaluator: 1.00 │ 100.0% ✔   │
└─────────────┴────────────────────────────────┴─────────┴───────────────────┴────────────┘
"""
(本示例完整,可以直接运行)
与 LLMJudge 相关的评估
在本例中,我们评估了一种根据客户订单生成菜谱的方法。
judge_recipes.py
from __future__ import annotations

from typing import Any

from pydantic import BaseModel

from pydantic_ai import Agent
from pydantic_ai.format_as_xml import format_as_xml
from pydantic_evals import Case, Dataset
from pydantic_evals.evaluators import IsInstance, LLMJudge


class CustomerOrder(BaseModel):
    dish_name: str
    dietary_restriction: str | None = None


class Recipe(BaseModel):
    ingredients: list[str]
    steps: list[str]


recipe_agent = Agent(
    'groq:llama-3.3-70b-versatile',
    result_type=Recipe,
    system_prompt=(
        'Generate a recipe to cook the dish that meets the dietary restrictions.'
    ),
)


async def transform_recipe(customer_order: CustomerOrder) -> Recipe:
    r = await recipe_agent.run(format_as_xml(customer_order))
    return r.data


recipe_dataset = Dataset[CustomerOrder, Recipe, Any](
    cases=[
        Case(
            name='vegetarian_recipe',
            inputs=CustomerOrder(
                dish_name='Spaghetti Bolognese', dietary_restriction='vegetarian'
            ),
            expected_output=None,  #
            metadata={'focus': 'vegetarian'},
            evaluators=(
                LLMJudge(
                    rubric='Recipe should not contain meat or animal products',
                ),
            ),
        ),
        Case(
            name='gluten_free_recipe',
            inputs=CustomerOrder(
                dish_name='Chocolate Cake', dietary_restriction='gluten-free'
            ),
            expected_output=None,
            metadata={'focus': 'gluten-free'},
            # Case-specific evaluator with a focused rubric
            evaluators=(
                LLMJudge(
                    rubric='Recipe should not contain gluten or wheat products',
                ),
            ),
        ),
    ],
    evaluators=[
        IsInstance(type_name='Recipe'),
        LLMJudge(
            rubric='Recipe should have clear steps and relevant ingredients',
            include_input=True,
            model='anthropic:claude-3-7-sonnet-latest',
        ),
    ],
)


report = recipe_dataset.evaluate_sync(transform_recipe)
print(report)
"""
     Evaluation Summary: transform_recipe
┏━━━━━━━━━━━━━━━━━━━━┳━━━━━━━━━━━━┳━━━━━━━━━━┓
┃ Case ID            ┃ Assertions ┃ Duration ┃
┡━━━━━━━━━━━━━━━━━━━━╇━━━━━━━━━━━━╇━━━━━━━━━━┩
│ vegetarian_recipe  │ ✔✔✔        │     10ms │
├────────────────────┼────────────┼──────────┤
│ gluten_free_recipe │ ✔✔✔        │     10ms │
├────────────────────┼────────────┼──────────┤
│ Averages           │ 100.0% ✔   │     10ms │
└────────────────────┴────────────┴──────────┘
"""
(本示例完整,可以直接运行)
保存和加载数据集
数据集可以保存至并从 YAML 或 JSON 文件中加载。这样的表述更加自然和易于理解。
save_load_dataset_example.py
from pathlib import Path

from judge_recipes import CustomerOrder, Recipe, recipe_dataset

from pydantic_evals import Dataset

recipe_transforms_file = Path('recipe_transform_tests.yaml')
recipe_dataset.to_file(recipe_transforms_file)  # (1)!
print(recipe_transforms_file.read_text())
"""
# yaml-language-server: $schema=recipe_transform_tests_schema.json
cases:
- name: vegetarian_recipe
  inputs:
    dish_name: Spaghetti Bolognese
    dietary_restriction: vegetarian
  metadata:
    focus: vegetarian
  evaluators:
  - LLMJudge: Recipe should not contain meat or animal products
- name: gluten_free_recipe
  inputs:
    dish_name: Chocolate Cake
    dietary_restriction: gluten-free
  metadata:
    focus: gluten-free
  evaluators:
  - LLMJudge: Recipe should not contain gluten or wheat products
evaluators:
- IsInstance: Recipe
- LLMJudge:
    rubric: Recipe should have clear steps and relevant ingredients
    model: anthropic:claude-3-7-sonnet-latest
    include_input: true
"""

# Load dataset from file
loaded_dataset = Dataset[CustomerOrder, Recipe, dict].from_file(recipe_transforms_file)

print(f'Loaded dataset with {len(loaded_dataset.cases)} cases')
#> Loaded dataset with 2 cases
(本示例完整,可以直接运行)
并行评估
您可以在评估过程中控制并发,这有助于防止超出速率限制:
parallel_evaluation_example.py
import asyncio
import time

from pydantic_evals import Case, Dataset

# Create a dataset with multiple test cases
dataset = Dataset(
    cases=[
        Case(
            name=f'case_{i}',
            inputs=i,
            expected_output=i * 2,
        )
        for i in range(5)
    ]
)


async def double_number(input_value: int) -> int:
    """Function that simulates work by sleeping for a second before returning double the input."""
    await asyncio.sleep(0.1)  # Simulate work
    return input_value * 2


# Run evaluation with unlimited concurrency
t0 = time.time()
report_default = dataset.evaluate_sync(double_number)
print(f'Evaluation took less than 0.3s: {time.time() - t0 < 0.3}')
#> Evaluation took less than 0.3s: True

report_default.print(include_input=True, include_output=True, include_durations=False)
"""
      Evaluation Summary:
         double_number
┏━━━━━━━━━━┳━━━━━━━━┳━━━━━━━━━┓
┃ Case ID  ┃ Inputs ┃ Outputs ┃
┡━━━━━━━━━━╇━━━━━━━━╇━━━━━━━━━┩
│ case_0   │ 0      │ 0       │
├──────────┼────────┼─────────┤
│ case_1   │ 1      │ 2       │
├──────────┼────────┼─────────┤
│ case_2   │ 2      │ 4       │
├──────────┼────────┼─────────┤
│ case_3   │ 3      │ 6       │
├──────────┼────────┼─────────┤
│ case_4   │ 4      │ 8       │
├──────────┼────────┼─────────┤
│ Averages │        │         │
└──────────┴────────┴─────────┘
"""

# Run evaluation with limited concurrency
t0 = time.time()
report_limited = dataset.evaluate_sync(double_number, max_concurrency=1)
print(f'Evaluation took more than 0.5s: {time.time() - t0 > 0.5}')
#> Evaluation took more than 0.5s: True

report_limited.print(include_input=True, include_output=True, include_durations=False)
"""
      Evaluation Summary:
         double_number
┏━━━━━━━━━━┳━━━━━━━━┳━━━━━━━━━┓
┃ Case ID  ┃ Inputs ┃ Outputs ┃
┡━━━━━━━━━━╇━━━━━━━━╇━━━━━━━━━┩
│ case_0   │ 0      │ 0       │
├──────────┼────────┼─────────┤
│ case_1   │ 1      │ 2       │
├──────────┼────────┼─────────┤
│ case_2   │ 2      │ 4       │
├──────────┼────────┼─────────┤
│ case_3   │ 3      │ 6       │
├──────────┼────────┼─────────┤
│ case_4   │ 4      │ 8       │
├──────────┼────────┼─────────┤
│ Averages │        │         │
└──────────┴────────┴─────────┘
"""
(本示例完整,可以直接运行)
OpenTelemetry 集成
Pydantic Evals 与 OpenTelemetry 集成,用于实现追踪功能。
“ EvaluatorContext 包含一个名为 span_tree 的属性,该属性返回一个 SpanTree 的值。 SpanTree 允许查询和分析函数执行过程中生成的跨度,从而在评估期间方便地访问仪器测量的结果。”
备注
如果您只想编写确保在调用评估任务时产生特定跨度的单元测试,通常直接使用 logfire.testing.capfire fixture 会更加方便。
这有两个主要用途,非常实用。
opentelemetry_example.py
import asyncio
from typing import Any

import logfire

from pydantic_evals import Case, Dataset
from pydantic_evals.evaluators import Evaluator
from pydantic_evals.evaluators.context import EvaluatorContext
from pydantic_evals.otel.span_tree import SpanQuery

logfire.configure(  # ensure that an OpenTelemetry tracer is configured
    send_to_logfire='if-token-present'
)


class SpanTracingEvaluator(Evaluator[str, str]):
    """Evaluator that analyzes the span tree generated during function execution."""

    def evaluate(self, ctx: EvaluatorContext[str, str]) -> dict[str, Any]:
        # Get the span tree from the context
        span_tree = ctx.span_tree
        if span_tree is None:
            return {'has_spans': False, 'performance_score': 0.0}

        # Find all spans with "processing" in the name
        processing_spans = span_tree.find(lambda node: 'processing' in node.name)

        # Calculate total processing time
        total_processing_time = sum(
            (span.duration.total_seconds() for span in processing_spans), 0.0
        )

        # Check for error spans
        error_query: SpanQuery = {'name_contains': 'error'}
        has_errors = span_tree.any(error_query)

        # Calculate a performance score (lower is better)
        performance_score = 1.0 if total_processing_time < 0.5 else 0.5

        return {
            'has_spans': True,
            'has_errors': has_errors,
            'performance_score': 0 if has_errors else performance_score,
        }


async def process_text(text: str) -> str:
    """Function that processes text with OpenTelemetry instrumentation."""
    with logfire.span('process_text'):
        # Simulate initial processing
        with logfire.span('text_processing'):
            await asyncio.sleep(0.1)
            processed = text.strip().lower()

        # Simulate additional processing
        with logfire.span('additional_processing'):
            if 'error' in processed:
                with logfire.span('error_handling'):
                    logfire.error(f'Error detected in text: {text}')
                    return f'Error processing: {text}'
            await asyncio.sleep(0.2)
            processed = processed.replace(' ', '_')

        return f'Processed: {processed}'


# Create test cases
dataset = Dataset(
    cases=[
        Case(
            name='normal_text',
            inputs='Hello World',
            expected_output='Processed: hello_world',
        ),
        Case(
            name='text_with_error',
            inputs='Contains error marker',
            expected_output='Error processing: Contains error marker',
        ),
    ],
    evaluators=[SpanTracingEvaluator()],
)

# Run evaluation - spans are automatically captured since logfire is configured
report = dataset.evaluate_sync(process_text)

# Print the report
report.print(include_input=True, include_output=True, include_durations=False)
"""
                                              Evaluation Summary: process_text
┏━━━━━━━━━━━━━━━━━┳━━━━━━━━━━━━━━━━━━━━━━━┳━━━━━━━━━━━━━━━━━━━━━━━━━━━━━━━━━━━━━━━━━┳━━━━━━━━━━━━━━━━━━━━━━━━━━┳━━━━━━━━━━━━┓
┃ Case ID         ┃ Inputs                ┃ Outputs                                 ┃ Scores                   ┃ Assertions ┃
┡━━━━━━━━━━━━━━━━━╇━━━━━━━━━━━━━━━━━━━━━━━╇━━━━━━━━━━━━━━━━━━━━━━━━━━━━━━━━━━━━━━━━━╇━━━━━━━━━━━━━━━━━━━━━━━━━━╇━━━━━━━━━━━━┩
│ normal_text     │ Hello World           │ Processed: hello_world                  │ performance_score: 1.00  │ ✔✗         │
├─────────────────┼───────────────────────┼─────────────────────────────────────────┼──────────────────────────┼────────────┤
│ text_with_error │ Contains error marker │ Error processing: Contains error marker │ performance_score: 0     │ ✔✔         │
├─────────────────┼───────────────────────┼─────────────────────────────────────────┼──────────────────────────┼────────────┤
│ Averages        │                       │                                         │ performance_score: 0.500 │ 75.0% ✔    │
└─────────────────┴───────────────────────┴─────────────────────────────────────────┴──────────────────────────┴────────────┘
"""
(本示例完整,可以直接运行)
生成测试数据集
Pydantic Evals 允许您通过使用 LLMs 和 generate_dataset 注解来生成测试数据集。
数据集可以以 JSON 或 YAML 格式生成。无论哪种情况,都会生成一个与数据集一起创建并引用的 JSON 模式文件,这样您在编辑器中就可以获得类型检查和自动补全功能。
generate_dataset_example.py
from __future__ import annotations

from pathlib import Path

from pydantic import BaseModel, Field

from pydantic_evals import Dataset
from pydantic_evals.generation import generate_dataset


class QuestionInputs(BaseModel, use_attribute_docstrings=True):
    """Model for question inputs."""

    question: str
    """A question to answer"""
    context: str | None = None
    """Optional context for the question"""


class AnswerOutput(BaseModel, use_attribute_docstrings=True):
    """Model for expected answer outputs."""

    answer: str
    """The answer to the question"""
    confidence: float = Field(ge=0, le=1)
    """Confidence level (0-1)"""


class MetadataType(BaseModel, use_attribute_docstrings=True):
    """Metadata model for test cases."""

    difficulty: str
    """Difficulty level (easy, medium, hard)"""
    category: str
    """Question category"""


async def main():
    dataset = await generate_dataset(
        dataset_type=Dataset[QuestionInputs, AnswerOutput, MetadataType],
        n_examples=2,
        extra_instructions="""
        Generate question-answer pairs about world capitals and landmarks.
        Make sure to include both easy and challenging questions.
        """,
    )
    output_file = Path('questions_cases.yaml')
    dataset.to_file(output_file)
    print(output_file.read_text())
    """
    # yaml-language-server: $schema=questions_cases_schema.json
    cases:
    - name: Easy Capital Question
      inputs:
        question: What is the capital of France?
      metadata:
        difficulty: easy
        category: Geography
      expected_output:
        answer: Paris
        confidence: 0.95
      evaluators:
      - EqualsExpected
    - name: Challenging Landmark Question
      inputs:
        question: Which world-famous landmark is located on the banks of the Seine River?
      metadata:
        difficulty: hard
        category: Landmarks
      expected_output:
        answer: Eiffel Tower
        confidence: 0.9
      evaluators:
      - EqualsExpected
    """
(本示例完整,可直接运行——运行时需添加 asyncio.run(main(answer)) 才能执行 main )
您还可以将数据集保存为 JSON 格式的文件:
generate_dataset_example_json.py
from pathlib import Path

from generate_dataset_example import AnswerOutput, MetadataType, QuestionInputs

from pydantic_evals import Dataset
from pydantic_evals.generation import generate_dataset


async def main():
    dataset = await generate_dataset(
        dataset_type=Dataset[QuestionInputs, AnswerOutput, MetadataType],
        n_examples=2,
        extra_instructions="""
        Generate question-answer pairs about world capitals and landmarks.
        Make sure to include both easy and challenging questions.
        """,
    )
    output_file = Path('questions_cases.json')
    dataset.to_file(output_file)
    print(output_file.read_text())
    """
    {
      "$schema": "questions_cases_schema.json",
      "cases": [
        {
          "name": "Easy Capital Question",
          "inputs": {
            "question": "What is the capital of France?"
          },
          "metadata": {
            "difficulty": "easy",
            "category": "Geography"
          },
          "expected_output": {
            "answer": "Paris",
            "confidence": 0.95
          },
          "evaluators": [
            "EqualsExpected"
          ]
        },
        {
          "name": "Challenging Landmark Question",
          "inputs": {
            "question": "Which world-famous landmark is located on the banks of the Seine River?"
          },
          "metadata": {
            "difficulty": "hard",
            "category": "Landmarks"
          },
          "expected_output": {
            "answer": "Eiffel Tower",
            "confidence": 0.9
          },
          "evaluators": [
            "EqualsExpected"
          ]
        }
      ]
    }
    """
(本示例完整,可直接运行——运行时需添加 asyncio.run(main(answer)) 才能执行 main )
集成 Logfire(优化后的翻译)
Pydantic Evals 通过 OpenTelemetry 实现了对评估过程的跟踪。这些跟踪不仅包含了终端输出中的所有信息属性,还涵盖了评估任务函数执行的全链路跟踪。
您可以将这些追踪信息发送至任何与 OpenTelemetry 兼容的后端,例如 Pydantic Logfire。
只需配置 logfire.configure 中的 Logfire 即可
logfire 集成.py
import logfire
from judge_recipes import recipe_dataset, transform_recipe

logfire.configure(
    send_to_logfire='if-token-present',
    environment='development',
    service_name='evals',
)

recipe_dataset.evaluate_sync(transform_recipe)
Logfire 与 Pydantic Evals 跟踪实现了特殊集成,支持查看评估根跨度(每次调用 Dataset.evaluate 时生成)的评估结果表格视图:
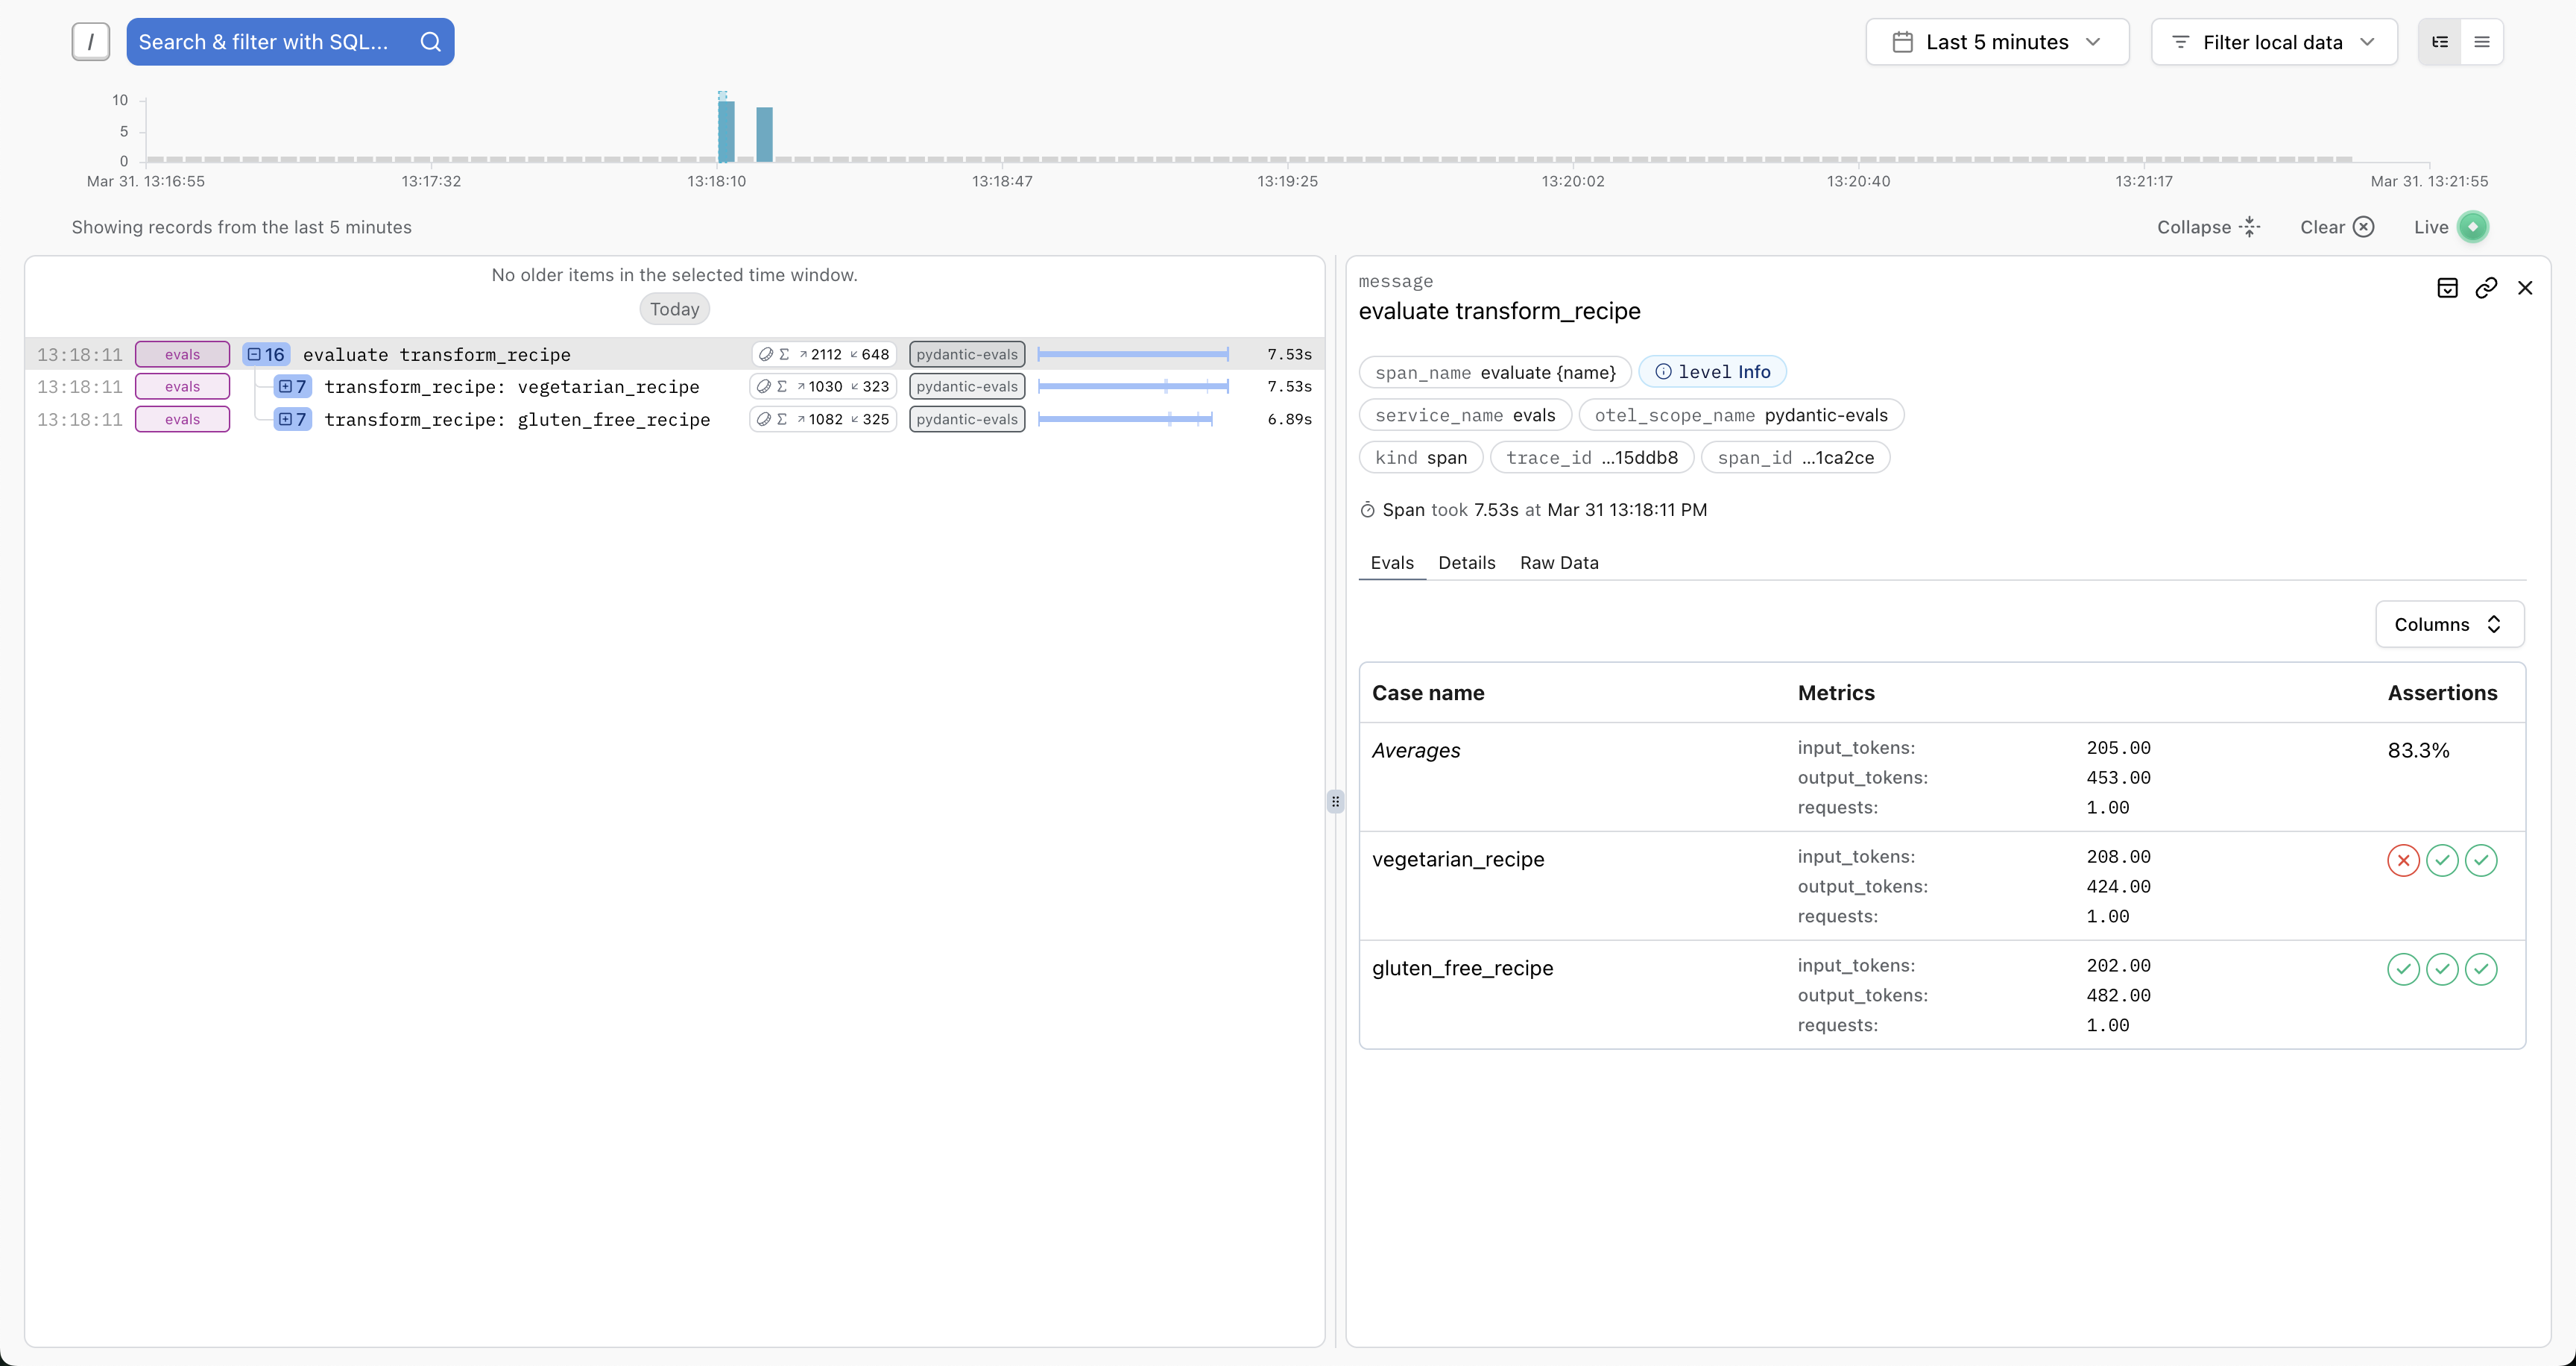
每个案例的输入输出执行详情查看:

此外,评估过程中生成的所有 OpenTelemetry 跨度信息将被发送至 Logfire,从而让您能够直观地查看评估过程中所调用代码的完整执行流程:
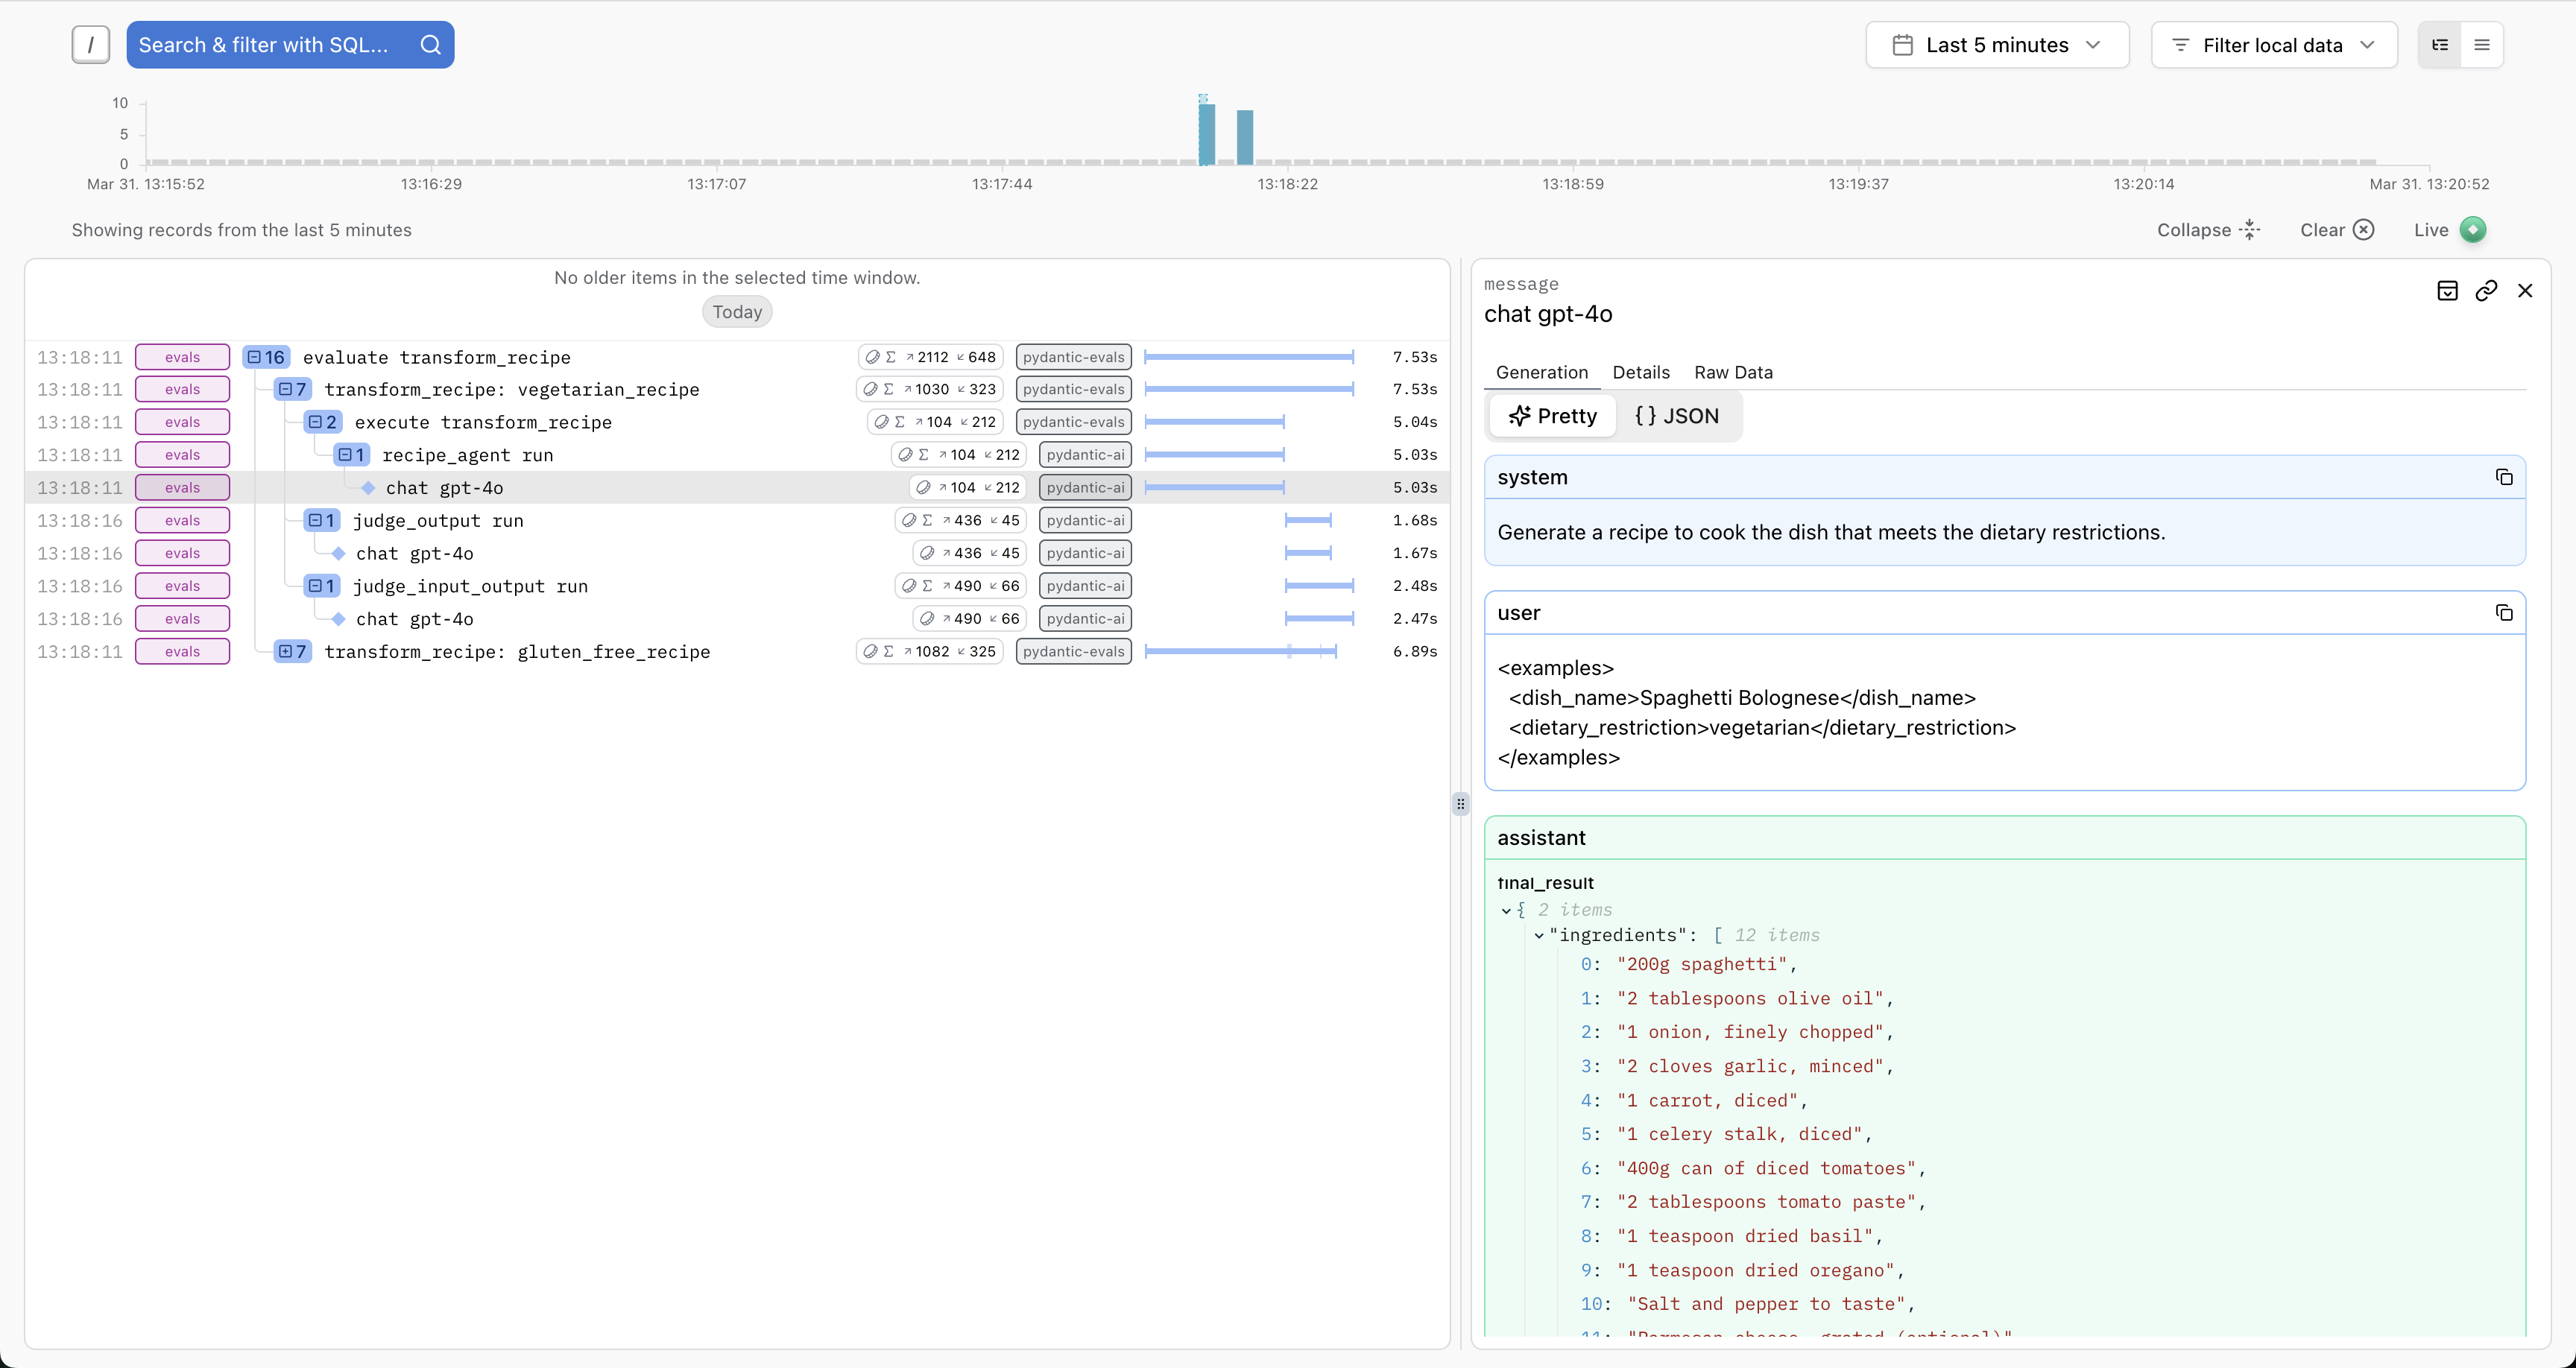
这在尝试编写利用上述 OpenTelemetry 集成部分中描述的 EvaluatorContext 的 span_tree 属性进行评估器编写时尤其有用。翻译更加自然,易于理解。
这允许您编写评估,这些评估依赖于在调用任务函数期间执行的代码路径信息,无需手动对要评估的代码进行仪器设置,只要要评估的代码已经用 OpenTelemetry 进行了充分的仪器设置即可。例如,对于 PydanticAI 代理,这可以用来确保在执行特定案例时,特定的工具被调用或未被调用。
以这种方式使用 OpenTelemetry 意味着,用于评估任务执行的所有数据都将可在代码的生产运行产生的跟踪中访问,这使得在生产数据上执行相同的评估变得非常方便。
图像、音频及文档输入
现在有一些LLMs能够理解音频、图像和文档内容,它们现在能够理解音频、图像和文档内容。
图像输入
信息
一些模型不支持图像输入功能。请查阅模型文档,确认该模型是否支持图像输入。
如果您有图像的直接链接,可以使用 ImageUrl :
main.py
from pydantic_ai import Agent, ImageUrl

agent = Agent(model='openai:gpt-4o')
result = agent.run_sync(
    [
        'What company is this logo from?',
        ImageUrl(url='https://iili.io/3Hs4FMg.png'),
    ]
)
print(result.data)
#> This is the logo for Pydantic, a data validation and settings management library in Python.
如果您本地有图片,也可以使用该标记 BinaryContent :
main.py
import httpx

from pydantic_ai import Agent, BinaryContent

image_response = httpx.get('https://iili.io/3Hs4FMg.png')  # Pydantic logo

agent = Agent(model='openai:gpt-4o')
result = agent.run_sync(
    [
        'What company is this logo from?',
        BinaryContent(data=image_response.content, media_type='image/png'),
    ]
)
print(result.data)
#> This is the logo for Pydantic, a data validation and settings management library in Python.
音频输入
信息
一些模型不支持音频输入功能。请查阅模型文档,确认该模型是否支持音频输入。
您可以使用 AudioUrl 或 BinaryContent 提供音频输入。这个过程与上面示例中的操作类似,更加自然易懂。
文档输入
信息
一些模型不支持文档输入功能。请查阅模型文档,确认该模型是否支持文档输入。
警告
使用 Gemini 模型时,无论您选择 DocumentUrl 或 BinaryContent ,文档内容都会以二进制数据形式发送。这是因为 Vertex AI 和 Google AI 在处理文档输入方面存在不同之处,使得这种做法成为必要。
更多详细信息,请参考此讨论。
如果您对这种表现不满意,请通过在 GitHub 上提交问题来反馈给我们,以便我们了解您的需求。
您可以使用 DocumentUrl 或 BinaryContent 来提供文档输入,操作步骤与上述示例相同。
如果您有文档的直接链接,可以使用 DocumentUrl :
main.py
from pydantic_ai import Agent, DocumentUrl

agent = Agent(model='anthropic:claude-3-sonnet')
result = agent.run_sync(
    [
        'What is the main content of this document?',
        DocumentUrl(url='https://storage.googleapis.com/cloud-samples-data/generative-ai/pdf/2403.05530.pdf'),
    ]
)
print(result.data)
#> This document is the technical report introducing Gemini 1.5, Google's latest large language model...
支持的文档格式根据不同模型会有所不同。
您还可以使用 BinaryContent 直接传递文档数据:
main.py
from pathlib import Path
from pydantic_ai import Agent, BinaryContent

pdf_path = Path('document.pdf')
agent = Agent(model='anthropic:claude-3-sonnet')
result = agent.run_sync(
    [
        'What is the main content of this document?',
        BinaryContent(data=pdf_path.read_bytes(), media_type='application/pdf'),
    ]
)
print(result.data)
#> The document discusses...
模型上下文协议(MCP)
PydanticAI 通过三种方式支持模型上下文协议(MCP):
- 代理作为 MCP 客户端,连接到 MCP 服务器以使用其工具,了解更多相关信息……
- 代理可在 MCP 服务器内部使用,了解更多相关信息……
- 作为 PydanticAI 项目的一部分,我们正在开发多个 MCP 服务器,具体信息请参考下文
什么是 MCP?
模型上下文协议是一种标准化协议,它允许 AI 应用(涵盖 PydanticAI 等程序化代理、光标等编码代理以及 Claude Desktop 等桌面应用程序)通过统一的接口连接到外部工具和服务。这样的翻译更加自然且易于理解。
与其他协议一样,MCP 的愿景是让各种应用能够相互沟通,无需进行特定的整合,这样的翻译更加自然和易于理解。
GitHub.com 上有一份详尽的 MCP 服务器列表。
这意味着的一些示例:
- PydanticAI 可以通过一个作为 MCP 服务器的网络搜索服务来实现深度研究代理,这样的设计更加合理和高效
- 光标可以连接到 Pydantic Logfire MCP 服务器,通过搜索日志、跟踪和指标来获取上下文信息,便于修复错误
- PydanticAI 或其他任何 MCP 客户端均可连接至我们的 Python MCP 服务器,在沙箱环境中执行任意 Python 代码
MCP 服务器
为了在 PydanticAI 中添加功能并使其尽可能广泛地被使用,我们正在将部分功能以 MCP 服务器的方式实现,使其更加自然和易于理解。
到目前为止,我们仅在 PydanticAI 中实现了一个 MCP 服务器:
- 运行 Python:一个专注于安全与安全的沙箱 Python 解释器,可执行任意代码。
客户端
PydanticAI 能够作为 MCP 客户端,连接至 MCP 服务器并使用其提供的工具。
安装
您需要安装 pydantic-ai 或 pydantic-ai-slim ,并可选择安装 mcp 组:
pip install "pydantic-ai-slim[mcp]"
uv add "pydantic-ai-slim[mcp]"
备注
MCP 集成必须使用 Python 3.10 或更高版本的 Python 环境。
使用示例
PydanticAI 提供两种连接到 MCP 服务器的途径:
- 使用 HTTP SSE 传输连接 MCP 服务器的
MCPServerHTTP(经过优化,使翻译更加自然易懂) MCPServerStdio作为子进程运行服务器,并通过 stdio 传输连接到它
下面展示了两个示例;在这两个示例中,都使用了 mcp-run-python 作为 MCP 服务器。
SSE 客户端
通过 HTTP + 服务器发送事件传输方式,通过 HTTP 连接至服务器。
备注
在调用之前必须有一个运行中的 MCP 服务器并接受 HTTP 连接。请注意,服务器运行并不由 PydanticAI 负责。
"HTTP 这个名字被选用,因为未来这个实现将适配使用目前正开发中的新型流式 HTTP。"
在创建 SSE 客户端之前,需要先启动服务器(相关文档请参阅此处):
来自终端(运行服务器端事件服务器)
deno run \
  -N -R=node_modules -W=node_modules --node-modules-dir=auto \
  jsr:@pydantic/mcp-run-python sse
mcp_sse 客户端.py
from pydantic_ai import Agent
from pydantic_ai.mcp import MCPServerHTTP

server = MCPServerHTTP(url='http://localhost:3001/sse')
agent = Agent('openai:gpt-4o', mcp_servers=[server])


async def main():
    async with agent.run_mcp_servers():
        result = await agent.run('How many days between 2000-01-01 and 2025-03-18?')
    print(result.data)
    #> There are 9,208 days between January 1, 2000, and March 18, 2025.
(此示例完整,可直接在 Python 3.10+环境下运行——运行时需添加 asyncio.run(main()) 标记)
这里发生了什么事?
- 模型正在接收提示:“从 2000 年 1 月 1 日到 2025 年 3 月 18 日之间相隔多少天?”
- 模型决定“哦,我找到了这个
run_python_code工具,这将是一个回答这个问题的好方法”,于是编写了一段 Python 代码来计算答案。这样的翻译更加自然,易于理解。 - 模型返回一个工具调用的结果
- PydanticAI 通过 SSE 传输将工具调用发送至 MCP 服务器,翻译更加自然流畅。
- 模型再次被调用,使用运行代码的返回值
- 模型返回的最终答案是
你可以清楚地看到这一点,甚至可以通过添加三行代码来使用 logfire 对示例进行监控,从而查看运行中的代码:
mcp_sse 客户端 logfire.py
import logfire

logfire.configure()
logfire.instrument_pydantic_ai()
将显示如下:
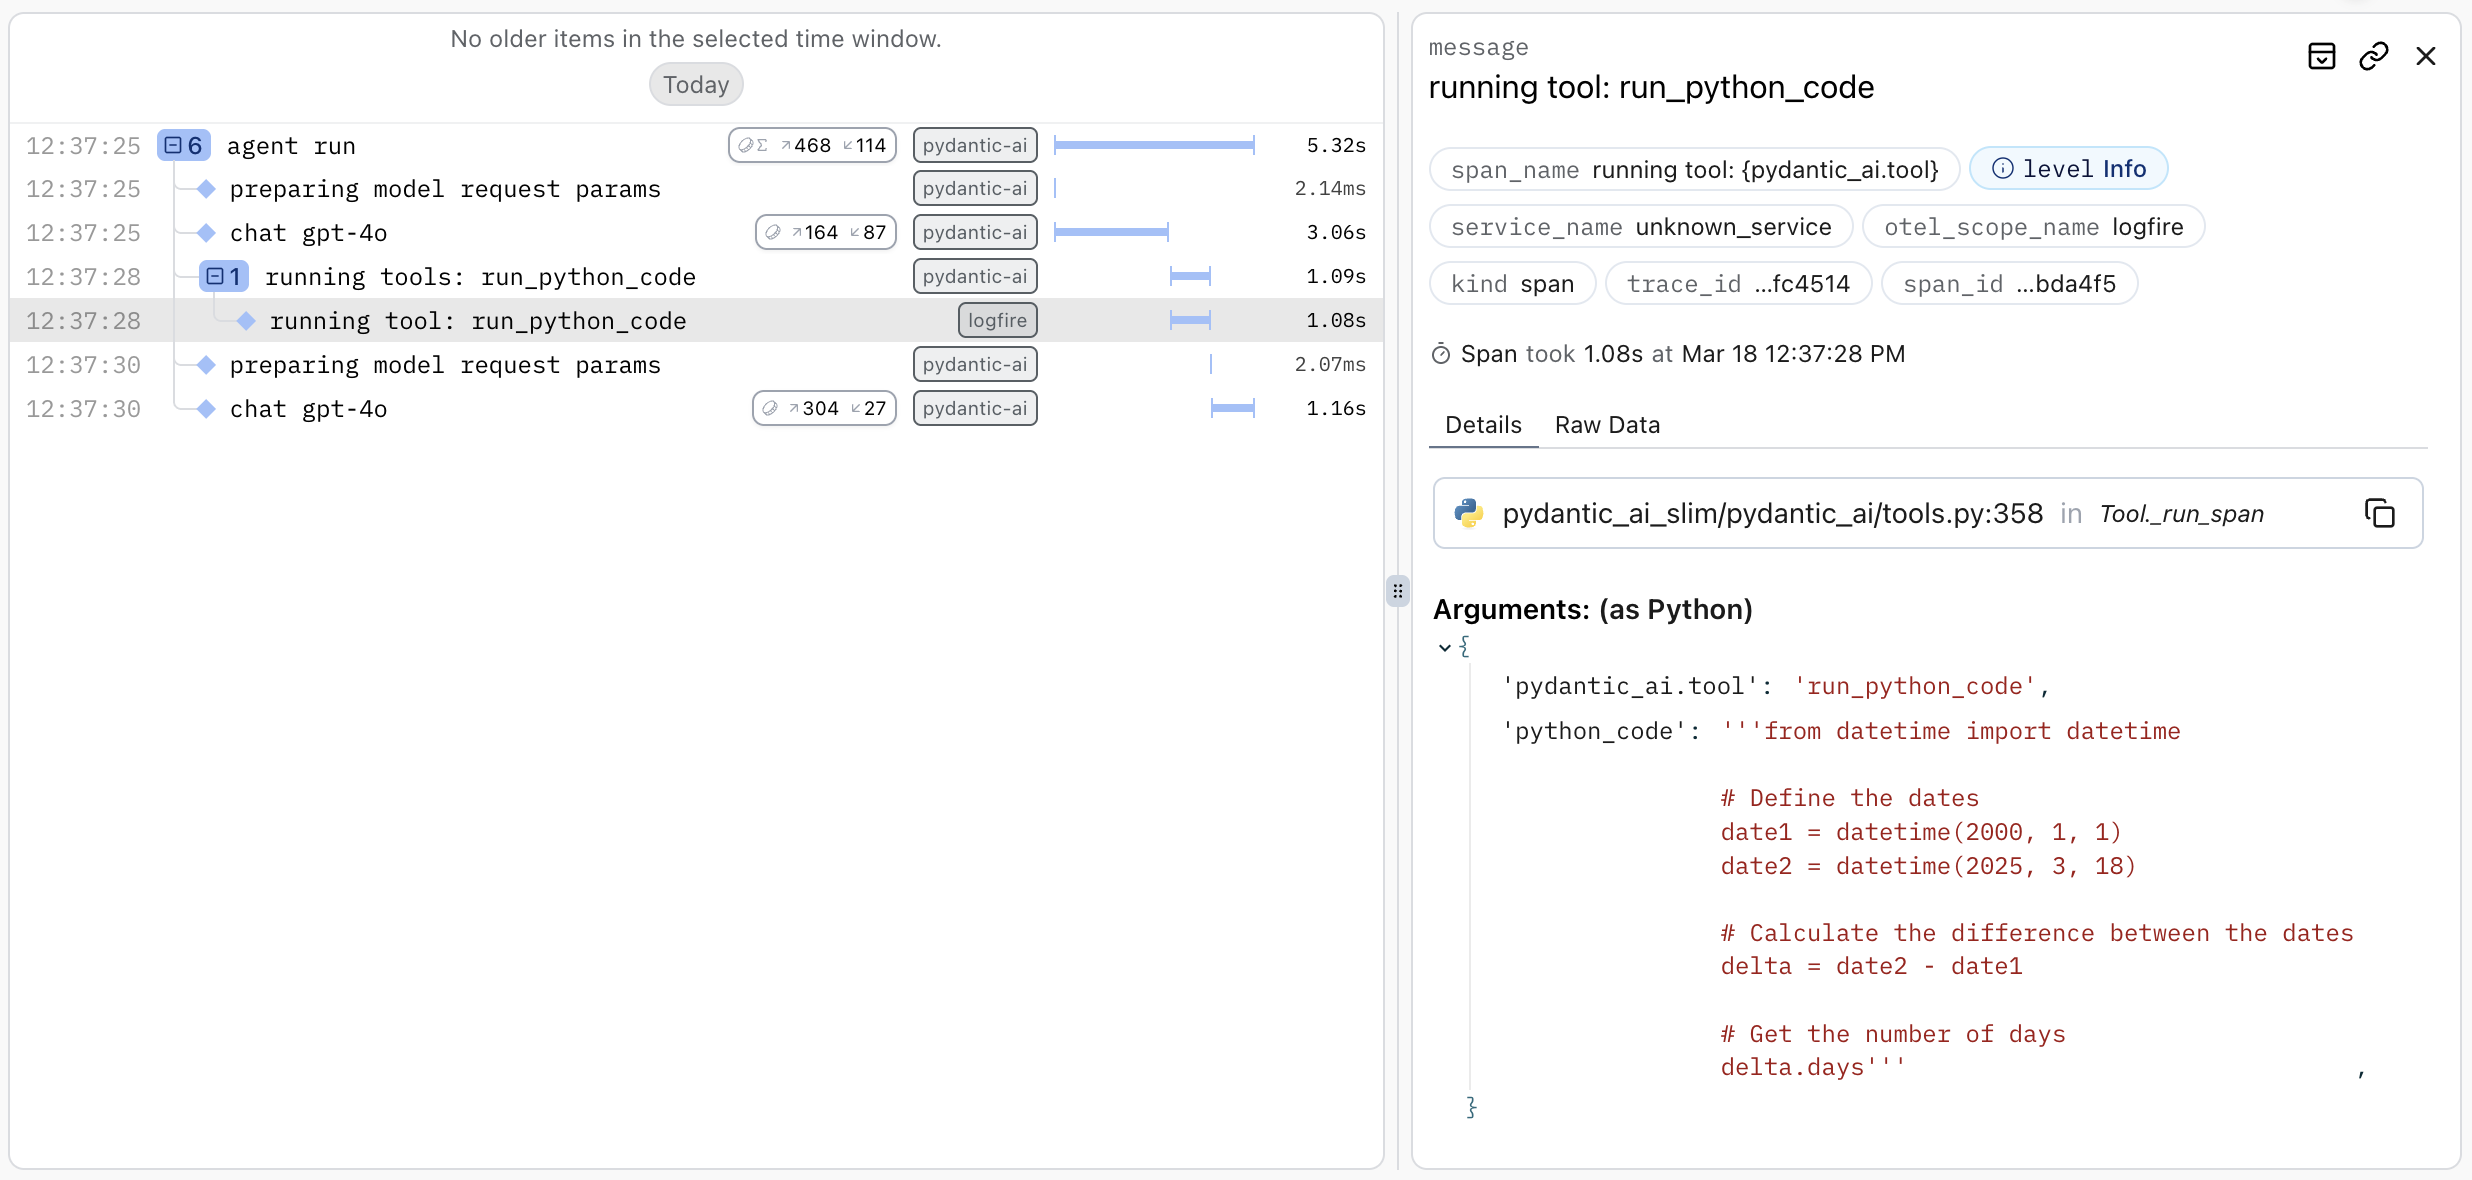
MCP "stdio" 服务器
MCP 提供的其他传输方式是 stdio 传输,服务器以子进程的形式运行,并通过 stdin 和 stdout 与客户端进行通信。在这种情况下,您应该使用 MCPServerStdio 类。
备注
当使用 MCPServerStdio 服务器时, agent.run_mcp_servers() 上下文管理器负责启动和停止服务器。 (原始翻译) 使用 MCPServerStdio 服务器时,由 agent.run_mcp_servers() 上下文管理器负责启动和关闭服务器。 (优化翻译)
mcp_stdio 客户端.py
from pydantic_ai import Agent
from pydantic_ai.mcp import MCPServerStdio

server = MCPServerStdio(
    'deno',
    args=[
        'run',
        '-N',
        '-R=node_modules',
        '-W=node_modules',
        '--node-modules-dir=auto',
        'jsr:@pydantic/mcp-run-python',
        'stdio',
    ]
)
agent = Agent('openai:gpt-4o', mcp_servers=[server])


async def main():
    async with agent.run_mcp_servers():
        result = await agent.run('How many days between 2000-01-01 and 2025-03-18?')
    print(result.data)
    #> There are 9,208 days between January 1, 2000, and March 18, 2025.
服务器
PydanticAI 模型同样适用于 MCP 服务器,使用起来非常方便。
这里是一个使用 PydanticAI 在工具调用中实现的简单 Python MCP 服务器的示例:
mcp_server.py
from mcp.server.fastmcp import FastMCP

from pydantic_ai import Agent

server = FastMCP('PydanticAI Server')
server_agent = Agent(
    'anthropic:claude-3-5-haiku-latest', system_prompt='always reply in rhyme'
)


@server.tool()
async def poet(theme: str) -> str:
    """Poem generator"""
    r = await server_agent.run(f'write a poem about {theme}')
    return r.data


if __name__ == '__main__':
    server.run()
该服务器可由任何 MCP 客户端查询。以下是一个使用直接 Python 客户端的示例:
mcp_client.py
import asyncio
import os

from mcp import ClientSession, StdioServerParameters
from mcp.client.stdio import stdio_client


async def client():
    server_params = StdioServerParameters(
        command='uv', args=['run', 'mcp_server.py', 'server'], env=os.environ
    )
    async with stdio_client(server_params) as (read, write):
        async with ClientSession(read, write) as session:
            await session.initialize()
            result = await session.call_tool('poet', {'theme': 'socks'})
            print(result.content[0].text)
            """
            Oh, socks, those garments soft and sweet,
            That nestle softly 'round our feet,
            From cotton, wool, or blended thread,
            They keep our toes from feeling dread.
            """


if __name__ == '__main__':
    asyncio.run(client())
注意:PydanticAI 目前不支持服务器从客户端请求进行采样,即获取 LLM 完成项的功能。
MCP 运行 Python
MCP Run Python 包是一个允许代理在安全沙箱环境中执行 Python 代码的 MCP 服务器。它通过 Pyodide 在 JavaScript 环境中运行 Python 代码,并利用 Deno 与宿主系统隔离执行,确保安全。
功能
- 安全执行:在隔离的 WebAssembly 环境中运行 Python 代码,确保代码安全执行
- 包管理:自动检测并安装所需的依赖项
- 完整结果:捕获标准输出、标准错误以及返回值
- 异步支持:正确执行异步操作
- 错误处理:提供详细的错误报告,便于调试
安装指南
从 npx 切换到 deno(使翻译更加自然和易于理解)
我们之前已经将 mcp-run-python 分发为一个 npm 包,供通过 npx 使用。现在我们更推荐使用 deno ,因为它提供了更好的沙盒化和安全性,使用起来更可靠。
MCP Run Python 服务器以 JSR 包的形式分发,可以直接运行,无需额外操作
来自终端
deno run \
  -N -R=node_modules -W=node_modules --node-modules-dir=auto \
  jsr:@pydantic/mcp-run-python [stdio|sse|warmup]
提取内容
-N -R=node_modules -W=node_modules(是--allow-net --allow-read=node_modules --allow-write=node_modules的别名)允许访问./node_modules的网络和读/写权限。这些权限是必需的,以便 Pyodide 能够下载并缓存 Python 的标准库和软件包。--node-modules-dir=auto指示 deno 使用本地node_modules目录- 以 Stdio MCP 传输运行服务器 — 适合本地作为子进程运行
- 运行服务器使用 SSE MCP 传输功能 — 以 HTTP 服务器模式运行,支持本地或远程连接
- 将运行一个最小的 Python 脚本,用于下载和缓存 Python 标准库。这也有助于检查服务器是否正常运行。以下翻译更加自然和易于理解: 将运行一个简单的 Python 脚本,用于下载并缓存 Python 标准库。这也有助于验证服务器是否正常运行。
使用 PydanticAI 的 jsr:@pydantic/mcp-run-python 的用法在客户端文档中有详细说明。
直接使用
除了使用 PydanticAI 的此服务器外,它还可以连接到其他 MCP 客户端。为了更清晰地展示,本例中我们直接通过 Python MCP 客户端进行连接。
mcp_run_python.py
from mcp import ClientSession, StdioServerParameters
from mcp.client.stdio import stdio_client

code = """
import numpy
a = numpy.array([1, 2, 3])
print(a)
a
"""
server_params = StdioServerParameters(
    command='deno',
    args=[
        'run',
        '-N',
        '-R=node_modules',
        '-W=node_modules',
        '--node-modules-dir=auto',
        'jsr:@pydantic/mcp-run-python',
        'stdio',
    ],
)


async def main():
    async with stdio_client(server_params) as (read, write):
        async with ClientSession(read, write) as session:
            await session.initialize()
            tools = await session.list_tools()
            print(len(tools.tools))
            #> 1
            print(repr(tools.tools[0].name))
            #> 'run_python_code'
            print(repr(tools.tools[0].inputSchema))
            """
            {'type': 'object', 'properties': {'python_code': {'type': 'string', 'description': 'Python code to run'}}, 'required': ['python_code'], 'additionalProperties': False, '$schema': 'http://json-schema.org/draft-07/schema#'}
            """
            result = await session.call_tool('run_python_code', {'python_code': code})
            print(result.content[0].text)
            """
            <status>success</status>
            <dependencies>["numpy"]</dependencies>
            <output>
            [1 2 3]
            </output>
            <return_value>
            [
              1,
              2,
              3
            ]
            </return_value>
            """
如果出现异常, status 将被替换为 install-error 或 run-error ,而 return_value 将被替换为包含错误信息和堆栈跟踪的 error 。
依赖
当代码执行时,依赖项会被安装。
依赖项可以通过两种方式之一来定义:
从导入推断得出
如果没有元数据,则根据代码中的导入推断依赖项,上例已展示。
内联脚本元数据
如 PEP 723 所介绍,这里详细解释,并由 uv 流行推广——依赖项可以在文件顶部注释中声明。
这允许使用代码中未导入的依赖项,表述更为明确,使内容更加清晰。
inline_script_metadata.py
from mcp import ClientSession
from mcp.client.stdio import stdio_client

# using `server_params` from the above example.
from mcp_run_python import server_params

code = """\
# /// script
# dependencies = ["pydantic", "email-validator"]
# ///
import pydantic

class Model(pydantic.BaseModel):
    email: pydantic.EmailStr

print(Model(email='hello@pydantic.dev'))
"""


async def main():
    async with stdio_client(server_params) as (read, write):
        async with ClientSession(read, write) as session:
            await session.initialize()
            result = await session.call_tool('run_python_code', {'python_code': code})
            print(result.content[0].text)
            """
            <status>success</status>
            <dependencies>["pydantic","email-validator"]</dependencies>
            <output>
            email='hello@pydantic.dev'
            </output>
            """
它还支持为非二进制包指定版本,以便进行版本锁定(Pyodide 仅支持其支持的二进制包的单个版本,例如 pydantic 和 numpy 版本)。
例如,您可以设置依赖项
# /// script
# dependencies = ["rich<13"]
# ///
日志
MCP Run Python 支持将 Python 执行的 stdout 和 stderr 转换为 MCP 日志消息输出,使日志记录更加便捷。
为了输出日志,您需要在连接到服务器时设置日志级别。默认情况下,日志级别被设置为最高级别,即 emergency 。
目前由于 Python MCP 客户端存在一个 bug,无法演示此功能,请参阅 modelcontextprotocol/python-sdk#201。
命令行界面(CLI)
PydanticAI 自带一个简单的参考命令行界面应用程序,您可以直接通过命令行与各种LLMs进行交互。它提供了一种便捷的方式与语言模型进行对话,并能在终端中快速获取答案。
我们最初开发这个 CLI 是为了自用,后来因为频繁使用,便决定将其作为 PydanticAI 包的一部分与大家分享。
我们计划持续增加新功能,包括与 MCP 服务器的交互、使用工具等,使其更加完善。
安装指南
使用 CLI,您可以选择安装 pydantic-ai ,或者安装 pydantic-ai-slim 并选择包含 cli 可选组的版本:
pip install "pydantic-ai[cli]"
uv add "pydantic-ai[cli]"
要启用命令行参数自动补全,请执行以下命令:
register-python-argcomplete pai >> ~/.bashrc  # for bash
register-python-argcomplete pai >> ~/.zshrc   # for zsh
使用示例
根据您打算使用的提供商,您需要设置一个环境变量。请根据实际情况调整,以确保正确配置。
如果您使用 OpenAI,请设置相应的环境变量 OPENAI_API_KEY :
export OPENAI_API_KEY='your-api-key-here'
然后只需简单执行:
这将启动一个交互式会话,您可以在其中与 AI 模型进行对话。在交互模式下,您可以使用一些特殊命令:
/exit: 退出当前会话- 显示最后一条响应的 Markdown 格式(优化版,使翻译更自然易懂)
- 使用 Ctrl+D 提交切换到多行输入模式
选择一个模型
您可以使用 --model 标志来指定要使用的模型
$ pai --model=openai:gpt-4 "What's the capital of France?"
使用 uvx 的示例
如果你已经安装了 uv 包,那么运行 CLI 的最快方式就是使用 uvx :
uvx --from pydantic-ai pai
示例
PydanticAI 使用示例及功能介绍。
使用示例
这些示例与 pydantic-ai 一起分发,您可以通过克隆 pydantic-ai 仓库或直接使用 PyPI 上的 pydantic-ai 安装包来运行它们。
安装必要的依赖项
无论哪种方式,运行部分示例都需要安装额外的依赖,只需安装 examples 可选依赖包即可,这样更为简洁明了。
如果您已经通过 pip/uv 安装了 pydantic-ai ,您可以按照以下步骤安装额外的依赖项:
pip install "pydantic-ai[examples]"
uv add "pydantic-ai[examples]"
如果您克隆了该仓库,建议您使用 uv sync --extra examples 来安装额外的依赖。
设置模型环境变量的示例
这些示例需要您设置与一个或多个 LLMs 的认证,具体操作请参考模型配置文档中的说明。
简洁来说:在大多数情况下,您需要设置以下环境变量之一:
export OPENAI_API_KEY=your-api-key
export GEMINI_API_KEY=your-api-key
运行示例
运行示例(无论您是否安装了 pydantic_ai ,或者克隆了仓库,此步骤都适用),请按照以下步骤操作:
python -m pydantic_ai_examples.<example_module_name></example_module_name>
uv run -m pydantic_ai_examples.<example_module_name></example_module_name>
例如,要运行这个非常简单的 pydantic_model 示例:
python -m pydantic_ai_examples.pydantic_model
uv run -m pydantic_ai_examples.pydantic_model
如果你喜欢简洁的代码并且正在使用 uv,无需任何设置即可运行 pydantic-ai 的示例:
OPENAI_API_KEY='your-api-key' \
  uv run --with "pydantic-ai[examples]" \
  -m pydantic_ai_examples.pydantic_model
你可能需要编辑示例代码,而不仅仅是执行它们。你可以通过以下命令将示例复制到新的目录:
python -m pydantic_ai_examples --copy-to examples/
uv run -m pydantic_ai_examples --copy-to examples/
Pydantic 模型
简单示例,使用 PydanticAI 从文本输入构建 Pydantic 模型。(经过润色,使翻译更加自然易懂)
展示内容:
运行示例
安装好依赖并配置好环境变量之后,请执行以下操作:
python -m pydantic_ai_examples.pydantic_model
uv run -m pydantic_ai_examples.pydantic_model
这个例子默认使用 openai:gpt-4o ,但与其他模型配合良好,比如您可以用 Gemini 来运行它:
PYDANTIC_AI_MODEL=gemini-1.5-pro python -m pydantic_ai_examples.pydantic_model
PYDANTIC_AI_MODEL=gemini-1.5-pro uv run -m pydantic_ai_examples.pydantic_model
(或 PYDANTIC_AI_MODEL=gemini-1.5-flash ... )
示例代码
pydantic_model.py
import os

import logfire
from pydantic import BaseModel

from pydantic_ai import Agent

# 'if-token-present' means nothing will be sent (and the example will work) if you don't have logfire configured
logfire.configure(send_to_logfire='if-token-present')


class MyModel(BaseModel):
    city: str
    country: str


model = os.getenv('PYDANTIC_AI_MODEL', 'openai:gpt-4o')
print(f'Using model: {model}')
agent = Agent(model, result_type=MyModel, instrument=True)

if __name__ == '__main__':
    result = agent.run_sync('The windy city in the US of A.')
    print(result.data)
    print(result.usage())
天气代理
示例:PydanticAI 与多个工具结合使用,LLM 需要依次调用以回答问题。
展示:
在这种情况下,想法是一个“天气”代理——用户可以询问多个地点的天气,代理将使用 get_lat_lng 工具获取这些地点的经纬度,然后使用 get_weather 工具获取这些地点的天气。
运行示例
为了正确运行此示例,您可能需要添加两个额外的 API 密钥 (注意,如果任一密钥缺失,代码将回退到模拟数据,因此它们不是必需的):
- 来自 tomorrow.io 的天气 API 密钥,通过
WEATHER_API_KEY设置 - 来自 geocode.maps.co 的地理编码 API 密钥,通过
GEO_API_KEY设置
在安装依赖项并设置环境变量后,运行:
python -m pydantic_ai_examples.weather_agent
uv run -m pydantic_ai_examples.weather_agent
示例代码
pydantic_ai_examples/weather_agent.py
from __future__ import annotations as _annotations

import asyncio
import os
from dataclasses import dataclass
from typing import Any

import logfire
from devtools import debug
from httpx import AsyncClient

from pydantic_ai import Agent, ModelRetry, RunContext

# 'if-token-present' means nothing will be sent (and the example will work) if you don't have logfire configured
logfire.configure(send_to_logfire='if-token-present')


@dataclass
class Deps:
    client: AsyncClient
    weather_api_key: str | None
    geo_api_key: str | None


weather_agent = Agent(
    'openai:gpt-4o',
    # 'Be concise, reply with one sentence.' is enough for some models (like openai) to use
    # the below tools appropriately, but others like anthropic and gemini require a bit more direction.
    system_prompt=(
        'Be concise, reply with one sentence.'
        'Use the `get_lat_lng` tool to get the latitude and longitude of the locations, '
        'then use the `get_weather` tool to get the weather.'
    ),
    deps_type=Deps,
    retries=2,
    instrument=True,
)


@weather_agent.tool
async def get_lat_lng(
    ctx: RunContext[Deps], location_description: str
) -> dict[str, float]:
    """Get the latitude and longitude of a location.

    Args:
        ctx: The context.
        location_description: A description of a location.
    """
    if ctx.deps.geo_api_key is None:
        # if no API key is provided, return a dummy response (London)
        return {'lat': 51.1, 'lng': -0.1}

    params = {
        'q': location_description,
        'api_key': ctx.deps.geo_api_key,
    }
    with logfire.span('calling geocode API', params=params) as span:
        r = await ctx.deps.client.get('https://geocode.maps.co/search', params=params)
        r.raise_for_status()
        data = r.json()
        span.set_attribute('response', data)

    if data:
        return {'lat': data[0]['lat'], 'lng': data[0]['lon']}
    else:
        raise ModelRetry('Could not find the location')


@weather_agent.tool
async def get_weather(ctx: RunContext[Deps], lat: float, lng: float) -> dict[str, Any]:
    """Get the weather at a location.

    Args:
        ctx: The context.
        lat: Latitude of the location.
        lng: Longitude of the location.
    """
    if ctx.deps.weather_api_key is None:
        # if no API key is provided, return a dummy response
        return {'temperature': '21 °C', 'description': 'Sunny'}

    params = {
        'apikey': ctx.deps.weather_api_key,
        'location': f'{lat},{lng}',
        'units': 'metric',
    }
    with logfire.span('calling weather API', params=params) as span:
        r = await ctx.deps.client.get(
            'https://api.tomorrow.io/v4/weather/realtime', params=params
        )
        r.raise_for_status()
        data = r.json()
        span.set_attribute('response', data)

    values = data['data']['values']
    # https://docs.tomorrow.io/reference/data-layers-weather-codes
    code_lookup = {
        1000: 'Clear, Sunny',
        1100: 'Mostly Clear',
        1101: 'Partly Cloudy',
        1102: 'Mostly Cloudy',
        1001: 'Cloudy',
        2000: 'Fog',
        2100: 'Light Fog',
        4000: 'Drizzle',
        4001: 'Rain',
        4200: 'Light Rain',
        4201: 'Heavy Rain',
        5000: 'Snow',
        5001: 'Flurries',
        5100: 'Light Snow',
        5101: 'Heavy Snow',
        6000: 'Freezing Drizzle',
        6001: 'Freezing Rain',
        6200: 'Light Freezing Rain',
        6201: 'Heavy Freezing Rain',
        7000: 'Ice Pellets',
        7101: 'Heavy Ice Pellets',
        7102: 'Light Ice Pellets',
        8000: 'Thunderstorm',
    }
    return {
        'temperature': f'{values["temperatureApparent"]:0.0f}°C',
        'description': code_lookup.get(values['weatherCode'], 'Unknown'),
    }


async def main():
    async with AsyncClient() as client:
        # create a free API key at https://www.tomorrow.io/weather-api/
        weather_api_key = os.getenv('WEATHER_API_KEY')
        # create a free API key at https://geocode.maps.co/
        geo_api_key = os.getenv('GEO_API_KEY')
        deps = Deps(
            client=client, weather_api_key=weather_api_key, geo_api_key=geo_api_key
        )
        result = await weather_agent.run(
            'What is the weather like in London and in Wiltshire?', deps=deps
        )
        debug(result)
        print('Response:', result.data)


if __name__ == '__main__':
    asyncio.run(main())
运行界面
您可以使用 Gradio 框架构建您的智能体多轮对话应用,这是一个完全用 Python 编写的 AI 网络应用框架。Gradio 内置聊天组件和智能体支持,因此整个 UI 都可以在一个 Python 文件中实现!
下面是天气智能体的 UI 界面:
注意,要运行 UI,您需要 Python 3.10+。
pip install gradio>=5.9.0
python/uv-run -m pydantic_ai_examples.weather_agent_gradio
UI 代码
pydantic_ai_examples/weather_agent_gradio.py
from __future__ import annotations as _annotations

import json
import os

from httpx import AsyncClient

from pydantic_ai.messages import ToolCallPart, ToolReturnPart
from pydantic_ai_examples.weather_agent import Deps, weather_agent

try:
    import gradio as gr
except ImportError as e:
    raise ImportError(
        'Please install gradio with `pip install gradio`. You must use python>=3.10.'
    ) from e

TOOL_TO_DISPLAY_NAME = {'get_lat_lng': 'Geocoding API', 'get_weather': 'Weather API'}

client = AsyncClient()
weather_api_key = os.getenv('WEATHER_API_KEY')
# create a free API key at https://geocode.maps.co/
geo_api_key = os.getenv('GEO_API_KEY')
deps = Deps(client=client, weather_api_key=weather_api_key, geo_api_key=geo_api_key)


async def stream_from_agent(prompt: str, chatbot: list[dict], past_messages: list):
    chatbot.append({'role': 'user', 'content': prompt})
    yield gr.Textbox(interactive=False, value=''), chatbot, gr.skip()
    async with weather_agent.run_stream(
        prompt, deps=deps, message_history=past_messages
    ) as result:
        for message in result.new_messages():
            for call in message.parts:
                if isinstance(call, ToolCallPart):
                    call_args = (
                        call.args.args_json
                        if hasattr(call.args, 'args_json')
                        else json.dumps(call.args.args_dict)
                    )
                    metadata = {
                        'title': f'🛠️ Using {TOOL_TO_DISPLAY_NAME[call.tool_name]}',
                    }
                    if call.tool_call_id is not None:
                        metadata['id'] = {call.tool_call_id}

                    gr_message = {
                        'role': 'assistant',
                        'content': 'Parameters: ' + call_args,
                        'metadata': metadata,
                    }
                    chatbot.append(gr_message)
                if isinstance(call, ToolReturnPart):
                    for gr_message in chatbot:
                        if (
                            gr_message.get('metadata', {}).get('id', '')
                            == call.tool_call_id
                        ):
                            gr_message['content'] += (
                                f'\nOutput: {json.dumps(call.content)}'
                            )
                yield gr.skip(), chatbot, gr.skip()
        chatbot.append({'role': 'assistant', 'content': ''})
        async for message in result.stream_text():
            chatbot[-1]['content'] = message
            yield gr.skip(), chatbot, gr.skip()
        past_messages = result.all_messages()

        yield gr.Textbox(interactive=True), gr.skip(), past_messages


async def handle_retry(chatbot, past_messages: list, retry_data: gr.RetryData):
    new_history = chatbot[: retry_data.index]
    previous_prompt = chatbot[retry_data.index]['content']
    past_messages = past_messages[: retry_data.index]
    async for update in stream_from_agent(previous_prompt, new_history, past_messages):
        yield update


def undo(chatbot, past_messages: list, undo_data: gr.UndoData):
    new_history = chatbot[: undo_data.index]
    past_messages = past_messages[: undo_data.index]
    return chatbot[undo_data.index]['content'], new_history, past_messages


def select_data(message: gr.SelectData) -> str:
    return message.value['text']


with gr.Blocks() as demo:
    gr.HTML(
        """
<div style="display: flex; justify-content: center; align-items: center; gap: 2rem; padding: 1rem; width: 100%">
    <img src="https://ai.pydantic.dev/img/logo-white.svg" style="max-width: 200px; height: auto">
    <div>
        <h1 style="margin: 0 0 1rem 0">Weather Assistant</h1>
        <h3 style="margin: 0 0 0.5rem 0">
            This assistant answer your weather questions.
        </h3>
    </div>
</div>
"""
    )
    past_messages = gr.State([])
    chatbot = gr.Chatbot(
        label='Packing Assistant',
        type='messages',
        avatar_images=(None, 'https://ai.pydantic.dev/img/logo-white.svg'),
        examples=[
            {'text': 'What is the weather like in Miami?'},
            {'text': 'What is the weather like in London?'},
        ],
    )
    with gr.Row():
        prompt = gr.Textbox(
            lines=1,
            show_label=False,
            placeholder='What is the weather like in New York City?',
        )
    generation = prompt.submit(
        stream_from_agent,
        inputs=[prompt, chatbot, past_messages],
        outputs=[prompt, chatbot, past_messages],
    )
    chatbot.example_select(select_data, None, [prompt])
    chatbot.retry(
        handle_retry, [chatbot, past_messages], [prompt, chatbot, past_messages]
    )
    chatbot.undo(undo, [chatbot, past_messages], [prompt, chatbot, past_messages])


if __name__ == '__main__':
    demo.launch()
银行支持
使用 PydanticAI 构建银行支持代理的小型但完整的示例。
展示:
运行示例
在 依赖项安装并环境变量设置后 ,运行:
python -m pydantic_ai_examples.bank_support
uv run -m pydantic_ai_examples.bank_support
(或 PYDANTIC_AI_MODEL=gemini-1.5-flash ... )
示例代码
bank_support.py
from dataclasses import dataclass

from pydantic import BaseModel, Field

from pydantic_ai import Agent, RunContext


class DatabaseConn:
    """This is a fake database for example purposes.

    In reality, you'd be connecting to an external database
    (e.g. PostgreSQL) to get information about customers.
    """

    @classmethod
    async def customer_name(cls, *, id: int) -> str | None:
        if id == 123:
            return 'John'

    @classmethod
    async def customer_balance(cls, *, id: int, include_pending: bool) -> float:
        if id == 123 and include_pending:
            return 123.45
        else:
            raise ValueError('Customer not found')


@dataclass
class SupportDependencies:
    customer_id: int
    db: DatabaseConn


class SupportResult(BaseModel):
    support_advice: str = Field(description='Advice returned to the customer')
    block_card: bool = Field(description='Whether to block their card or not')
    risk: int = Field(description='Risk level of query', ge=0, le=10)


support_agent = Agent(
    'openai:gpt-4o',
    deps_type=SupportDependencies,
    result_type=SupportResult,
    system_prompt=(
        'You are a support agent in our bank, give the '
        'customer support and judge the risk level of their query. '
        "Reply using the customer's name."
    ),
)


@support_agent.system_prompt
async def add_customer_name(ctx: RunContext[SupportDependencies]) -> str:
    customer_name = await ctx.deps.db.customer_name(id=ctx.deps.customer_id)
    return f"The customer's name is {customer_name!r}"


@support_agent.tool
async def customer_balance(
    ctx: RunContext[SupportDependencies], include_pending: bool
) -> str:
    """Returns the customer's current account balance."""
    balance = await ctx.deps.db.customer_balance(
        id=ctx.deps.customer_id,
        include_pending=include_pending,
    )
    return f'${balance:.2f}'


if __name__ == '__main__':
    deps = SupportDependencies(customer_id=123, db=DatabaseConn())
    result = support_agent.run_sync('What is my balance?', deps=deps)
    print(result.data)
    """
    support_advice='Hello John, your current account balance, including pending transactions, is $123.45.' block_card=False risk=1
    """

    result = support_agent.run_sync('I just lost my card!', deps=deps)
    print(result.data)
    """
    support_advice="I'm sorry to hear that, John. We are temporarily blocking your card to prevent unauthorized transactions." block_card=True risk=8
    """
SQL 生成
使用 PydanticAI 根据用户输入生成 SQL 查询的示例
展示:
运行示例
将生成的 SQL 通过在 PostgreSQL 上运行 EXPLAIN 查询进行验证。要运行此示例,您首先需要运行 PostgreSQL,例如通过 Docker:
docker run --rm -e POSTGRES_PASSWORD=postgres -p 54320:5432 postgres
(我们在端口 54320 上运行 PostgreSQL 以避免与其他可能正在运行的 PostgreSQL 实例发生冲突)
在 依赖项安装并环境变量设置后 ,运行:
python -m pydantic_ai_examples.sql_gen
uv run -m pydantic_ai_examples.sql_gen
或者使用自定义提示:
python -m pydantic_ai_examples.sql_gen "find me errors"
uv run -m pydantic_ai_examples.sql_gen "find me errors"
此模型默认使用 gemini-1.5-flash,因为 Gemini 擅长此类单次查询。
示例代码
sql_gen.py
import asyncio
import sys
from collections.abc import AsyncGenerator
from contextlib import asynccontextmanager
from dataclasses import dataclass
from datetime import date
from typing import Annotated, Any, Union

import asyncpg
import logfire
from annotated_types import MinLen
from devtools import debug
from pydantic import BaseModel, Field
from typing_extensions import TypeAlias

from pydantic_ai import Agent, ModelRetry, RunContext
from pydantic_ai.format_as_xml import format_as_xml

# 'if-token-present' means nothing will be sent (and the example will work) if you don't have logfire configured
logfire.configure(send_to_logfire='if-token-present')
logfire.instrument_asyncpg()

DB_SCHEMA = """
CREATE TABLE records (
    created_at timestamptz,
    start_timestamp timestamptz,
    end_timestamp timestamptz,
    trace_id text,
    span_id text,
    parent_span_id text,
    level log_level,
    span_name text,
    message text,
    attributes_json_schema text,
    attributes jsonb,
    tags text[],
    is_exception boolean,
    otel_status_message text,
    service_name text
);
"""
SQL_EXAMPLES = [
    {
        'request': 'show me records where foobar is false',
        'response': "SELECT * FROM records WHERE attributes->>'foobar' = false",
    },
    {
        'request': 'show me records where attributes include the key "foobar"',
        'response': "SELECT * FROM records WHERE attributes ? 'foobar'",
    },
    {
        'request': 'show me records from yesterday',
        'response': "SELECT * FROM records WHERE start_timestamp::date > CURRENT_TIMESTAMP - INTERVAL '1 day'",
    },
    {
        'request': 'show me error records with the tag "foobar"',
        'response': "SELECT * FROM records WHERE level = 'error' and 'foobar' = ANY(tags)",
    },
]


@dataclass
class Deps:
    conn: asyncpg.Connection


class Success(BaseModel):
    """Response when SQL could be successfully generated."""

    sql_query: Annotated[str, MinLen(1)]
    explanation: str = Field(
        '', description='Explanation of the SQL query, as markdown'
    )


class InvalidRequest(BaseModel):
    """Response the user input didn't include enough information to generate SQL."""

    error_message: str


Response: TypeAlias = Union[Success, InvalidRequest]
agent: Agent[Deps, Response] = Agent(
    'google-gla:gemini-1.5-flash',
    # Type ignore while we wait for PEP-0747, nonetheless unions will work fine everywhere else
    result_type=Response,  # type: ignore
    deps_type=Deps,
    instrument=True,
)


@agent.system_prompt
async def system_prompt() -> str:
    return f"""\
Given the following PostgreSQL table of records, your job is to
write a SQL query that suits the user's request.

Database schema:

{DB_SCHEMA}

today's date = {date.today()}

{format_as_xml(SQL_EXAMPLES)}
"""


@agent.result_validator
async def validate_result(ctx: RunContext[Deps], result: Response) -> Response:
    if isinstance(result, InvalidRequest):
        return result

    # gemini often adds extraneous backslashes to SQL
    result.sql_query = result.sql_query.replace('\\', '')
    if not result.sql_query.upper().startswith('SELECT'):
        raise ModelRetry('Please create a SELECT query')

    try:
        await ctx.deps.conn.execute(f'EXPLAIN {result.sql_query}')
    except asyncpg.exceptions.PostgresError as e:
        raise ModelRetry(f'Invalid query: {e}') from e
    else:
        return result


async def main():
    if len(sys.argv) == 1:
        prompt = 'show me logs from yesterday, with level "error"'
    else:
        prompt = sys.argv[1]

    async with database_connect(
        'postgresql://postgres:postgres@localhost:54320', 'pydantic_ai_sql_gen'
    ) as conn:
        deps = Deps(conn)
        result = await agent.run(prompt, deps=deps)
    debug(result.data)


# pyright: reportUnknownMemberType=false
# pyright: reportUnknownVariableType=false
@asynccontextmanager
async def database_connect(server_dsn: str, database: str) -> AsyncGenerator[Any, None]:
    with logfire.span('check and create DB'):
        conn = await asyncpg.connect(server_dsn)
        try:
            db_exists = await conn.fetchval(
                'SELECT 1 FROM pg_database WHERE datname = $1', database
            )
            if not db_exists:
                await conn.execute(f'CREATE DATABASE {database}')
        finally:
            await conn.close()

    conn = await asyncpg.connect(f'{server_dsn}/{database}')
    try:
        with logfire.span('create schema'):
            async with conn.transaction():
                if not db_exists:
                    await conn.execute(
                        "CREATE TYPE log_level AS ENUM ('debug', 'info', 'warning', 'error', 'critical')"
                    )
                    await conn.execute(DB_SCHEMA)
        yield conn
    finally:
        await conn.close()


if __name__ == '__main__':
    asyncio.run(main())
预定航班
多智能体流程的示例,其中一个智能体将工作委托给另一个,然后将其控制权转交给第三个智能体。
展示:
智能体委托 程序化智能体移交 使用限制 在这种场景中,一组智能体共同为用户寻找最佳航班。
此示例的控制流程可以概括如下:
运行示例
在 依赖项安装并环境变量设置后 ,运行:
python -m pydantic_ai_examples.flight_booking
uv run -m pydantic_ai_examples.flight_booking
flight_booking.py
import datetime
from dataclasses import dataclass
from typing import Literal

import logfire
from pydantic import BaseModel, Field
from rich.prompt import Prompt

from pydantic_ai import Agent, ModelRetry, RunContext
from pydantic_ai.messages import ModelMessage
from pydantic_ai.usage import Usage, UsageLimits

# 'if-token-present' means nothing will be sent (and the example will work) if you don't have logfire configured
logfire.configure(send_to_logfire='if-token-present')


class FlightDetails(BaseModel):
    """Details of the most suitable flight."""

    flight_number: str
    price: int
    origin: str = Field(description='Three-letter airport code')
    destination: str = Field(description='Three-letter airport code')
    date: datetime.date


class NoFlightFound(BaseModel):
    """When no valid flight is found."""


@dataclass
class Deps:
    web_page_text: str
    req_origin: str
    req_destination: str
    req_date: datetime.date


# This agent is responsible for controlling the flow of the conversation.
search_agent = Agent[Deps, FlightDetails | NoFlightFound](
    'openai:gpt-4o',
    result_type=FlightDetails | NoFlightFound,  # type: ignore
    retries=4,
    system_prompt=(
        'Your job is to find the cheapest flight for the user on the given date. '
    ),
    instrument=True,
)


# This agent is responsible for extracting flight details from web page text.
extraction_agent = Agent(
    'openai:gpt-4o',
    result_type=list[FlightDetails],
    system_prompt='Extract all the flight details from the given text.',
)


@search_agent.tool
async def extract_flights(ctx: RunContext[Deps]) -> list[FlightDetails]:
    """Get details of all flights."""
    # we pass the usage to the search agent so requests within this agent are counted
    result = await extraction_agent.run(ctx.deps.web_page_text, usage=ctx.usage)
    logfire.info('found {flight_count} flights', flight_count=len(result.data))
    return result.data


@search_agent.result_validator
async def validate_result(
    ctx: RunContext[Deps], result: FlightDetails | NoFlightFound
) -> FlightDetails | NoFlightFound:
    """Procedural validation that the flight meets the constraints."""
    if isinstance(result, NoFlightFound):
        return result

    errors: list[str] = []
    if result.origin != ctx.deps.req_origin:
        errors.append(
            f'Flight should have origin {ctx.deps.req_origin}, not {result.origin}'
        )
    if result.destination != ctx.deps.req_destination:
        errors.append(
            f'Flight should have destination {ctx.deps.req_destination}, not {result.destination}'
        )
    if result.date != ctx.deps.req_date:
        errors.append(f'Flight should be on {ctx.deps.req_date}, not {result.date}')

    if errors:
        raise ModelRetry('\n'.join(errors))
    else:
        return result


class SeatPreference(BaseModel):
    row: int = Field(ge=1, le=30)
    seat: Literal['A', 'B', 'C', 'D', 'E', 'F']


class Failed(BaseModel):
    """Unable to extract a seat selection."""


# This agent is responsible for extracting the user's seat selection
seat_preference_agent = Agent[None, SeatPreference | Failed](
    'openai:gpt-4o',
    result_type=SeatPreference | Failed,  # type: ignore
    system_prompt=(
        "Extract the user's seat preference. "
        'Seats A and F are window seats. '
        'Row 1 is the front row and has extra leg room. '
        'Rows 14, and 20 also have extra leg room. '
    ),
)


# in reality this would be downloaded from a booking site,
# potentially using another agent to navigate the site
flights_web_page = """
1. Flight SFO-AK123
- Price: $350
- Origin: San Francisco International Airport (SFO)
- Destination: Ted Stevens Anchorage International Airport (ANC)
- Date: January 10, 2025

2. Flight SFO-AK456
- Price: $370
- Origin: San Francisco International Airport (SFO)
- Destination: Fairbanks International Airport (FAI)
- Date: January 10, 2025

3. Flight SFO-AK789
- Price: $400
- Origin: San Francisco International Airport (SFO)
- Destination: Juneau International Airport (JNU)
- Date: January 20, 2025

4. Flight NYC-LA101
- Price: $250
- Origin: San Francisco International Airport (SFO)
- Destination: Ted Stevens Anchorage International Airport (ANC)
- Date: January 10, 2025

5. Flight CHI-MIA202
- Price: $200
- Origin: Chicago O'Hare International Airport (ORD)
- Destination: Miami International Airport (MIA)
- Date: January 12, 2025

6. Flight BOS-SEA303
- Price: $120
- Origin: Boston Logan International Airport (BOS)
- Destination: Ted Stevens Anchorage International Airport (ANC)
- Date: January 12, 2025

7. Flight DFW-DEN404
- Price: $150
- Origin: Dallas/Fort Worth International Airport (DFW)
- Destination: Denver International Airport (DEN)
- Date: January 10, 2025

8. Flight ATL-HOU505
- Price: $180
- Origin: Hartsfield-Jackson Atlanta International Airport (ATL)
- Destination: George Bush Intercontinental Airport (IAH)
- Date: January 10, 2025
"""

# restrict how many requests this app can make to the LLM
usage_limits = UsageLimits(request_limit=15)


async def main():
    deps = Deps(
        web_page_text=flights_web_page,
        req_origin='SFO',
        req_destination='ANC',
        req_date=datetime.date(2025, 1, 10),
    )
    message_history: list[ModelMessage] | None = None
    usage: Usage = Usage()
    # run the agent until a satisfactory flight is found
    while True:
        result = await search_agent.run(
            f'Find me a flight from {deps.req_origin} to {deps.req_destination} on {deps.req_date}',
            deps=deps,
            usage=usage,
            message_history=message_history,
            usage_limits=usage_limits,
        )
        if isinstance(result.data, NoFlightFound):
            print('No flight found')
            break
        else:
            flight = result.data
            print(f'Flight found: {flight}')
            answer = Prompt.ask(
                'Do you want to buy this flight, or keep searching? (buy/*search)',
                choices=['buy', 'search', ''],
                show_choices=False,
            )
            if answer == 'buy':
                seat = await find_seat(usage)
                await buy_tickets(flight, seat)
                break
            else:
                message_history = result.all_messages(
                    result_tool_return_content='Please suggest another flight'
                )


async def find_seat(usage: Usage) -> SeatPreference:
    message_history: list[ModelMessage] | None = None
    while True:
        answer = Prompt.ask('What seat would you like?')

        result = await seat_preference_agent.run(
            answer,
            message_history=message_history,
            usage=usage,
            usage_limits=usage_limits,
        )
        if isinstance(result.data, SeatPreference):
            return result.data
        else:
            print('Could not understand seat preference. Please try again.')
            message_history = result.all_messages()


async def buy_tickets(flight_details: FlightDetails, seat: SeatPreference):
    print(f'Purchasing flight {flight_details=!r} {seat=!r}...')


if __name__ == '__main__':
    import asyncio

    asyncio.run(main())
RAG
RAG 搜索示例。本演示允许您向 logfire 文档提出问题。
展示:
这通过创建包含 markdown 文档每个部分的数据库来实现,然后使用 PydanticAI 代理注册搜索工具。
从 markdown 文件中提取部分和包含该数据的 JSON 文件的逻辑在 这个片段 .
使用 PostgreSQL with pgvector 作为搜索数据库,使用 Docker 下载和运行 pgvector 的最简单方法是:
mkdir postgres-data
docker run --rm \
  -e POSTGRES_PASSWORD=postgres \
  -p 54320:5432 \
  -v `pwd`/postgres-data:/var/lib/postgresql/data \
  pgvector/pgvector:pg17
与 SQL 生成器 示例类似,我们运行 postgres 在端口 54320 以避免与其他可能正在运行的任何 postgres 实例冲突。我们还挂载 PostgreSQL 的 数据 目录到本地,以便在需要停止和重新启动容器时持久化数据。
在运行此程序并 安装依赖项和设置环境变量 后,我们可以使用以下命令构建搜索数据库( 警告 :这需要设置 OPENAI_API_KEY 环境变量,并且将调用 OpenAI 嵌入 API 大约 300 次以生成文档每个部分的嵌入):
python -m pydantic_ai_examples.rag build
uv run -m pydantic_ai_examples.rag build
(注意构建数据库目前不使用 PydanticAI,而是直接使用 OpenAI SDK。)
然后你可以向代理提出一个问题:
python -m pydantic_ai_examples.rag search "How do I configure logfire to work with FastAPI?"
uv run -m pydantic_ai_examples.rag search "How do I configure logfire to work with FastAPI?"
示例代码
rag.py
from __future__ import annotations as _annotations

import asyncio
import re
import sys
import unicodedata
from contextlib import asynccontextmanager
from dataclasses import dataclass

import asyncpg
import httpx
import logfire
import pydantic_core
from openai import AsyncOpenAI
from pydantic import TypeAdapter
from typing_extensions import AsyncGenerator

from pydantic_ai import RunContext
from pydantic_ai.agent import Agent

# 'if-token-present' means nothing will be sent (and the example will work) if you don't have logfire configured
logfire.configure(send_to_logfire='if-token-present')
logfire.instrument_asyncpg()


@dataclass
class Deps:
    openai: AsyncOpenAI
    pool: asyncpg.Pool


agent = Agent('openai:gpt-4o', deps_type=Deps, instrument=True)


@agent.tool
async def retrieve(context: RunContext[Deps], search_query: str) -> str:
    """Retrieve documentation sections based on a search query.

    Args:
        context: The call context.
        search_query: The search query.
    """
    with logfire.span(
        'create embedding for {search_query=}', search_query=search_query
    ):
        embedding = await context.deps.openai.embeddings.create(
            input=search_query,
            model='text-embedding-3-small',
        )

    assert len(embedding.data) == 1, (
        f'Expected 1 embedding, got {len(embedding.data)}, doc query: {search_query!r}'
    )
    embedding = embedding.data[0].embedding
    embedding_json = pydantic_core.to_json(embedding).decode()
    rows = await context.deps.pool.fetch(
        'SELECT url, title, content FROM doc_sections ORDER BY embedding <-> $1 LIMIT 8',
        embedding_json,
    )
    return '\n\n'.join(
        f'# {row["title"]}\nDocumentation URL:{row["url"]}\n\n{row["content"]}\n'
        for row in rows
    )


async def run_agent(question: str):
    """Entry point to run the agent and perform RAG based question answering."""
    openai = AsyncOpenAI()
    logfire.instrument_openai(openai)

    logfire.info('Asking "{question}"', question=question)

    async with database_connect(False) as pool:
        deps = Deps(openai=openai, pool=pool)
        answer = await agent.run(question, deps=deps)
    print(answer.data)


#######################################################
# The rest of this file is dedicated to preparing the #
# search database, and some utilities.                #
#######################################################

# JSON document from
# https://gist.github.com/samuelcolvin/4b5bb9bb163b1122ff17e29e48c10992
DOCS_JSON = (
    'https://gist.githubusercontent.com/'
    'samuelcolvin/4b5bb9bb163b1122ff17e29e48c10992/raw/'
    '80c5925c42f1442c24963aaf5eb1a324d47afe95/logfire_docs.json'
)


async def build_search_db():
    """Build the search database."""
    async with httpx.AsyncClient() as client:
        response = await client.get(DOCS_JSON)
        response.raise_for_status()
    sections = sessions_ta.validate_json(response.content)

    openai = AsyncOpenAI()
    logfire.instrument_openai(openai)

    async with database_connect(True) as pool:
        with logfire.span('create schema'):
            async with pool.acquire() as conn:
                async with conn.transaction():
                    await conn.execute(DB_SCHEMA)

        sem = asyncio.Semaphore(10)
        async with asyncio.TaskGroup() as tg:
            for section in sections:
                tg.create_task(insert_doc_section(sem, openai, pool, section))


async def insert_doc_section(
    sem: asyncio.Semaphore,
    openai: AsyncOpenAI,
    pool: asyncpg.Pool,
    section: DocsSection,
) -> None:
    async with sem:
        url = section.url()
        exists = await pool.fetchval('SELECT 1 FROM doc_sections WHERE url = $1', url)
        if exists:
            logfire.info('Skipping {url=}', url=url)
            return

        with logfire.span('create embedding for {url=}', url=url):
            embedding = await openai.embeddings.create(
                input=section.embedding_content(),
                model='text-embedding-3-small',
            )
        assert len(embedding.data) == 1, (
            f'Expected 1 embedding, got {len(embedding.data)}, doc section: {section}'
        )
        embedding = embedding.data[0].embedding
        embedding_json = pydantic_core.to_json(embedding).decode()
        await pool.execute(
            'INSERT INTO doc_sections (url, title, content, embedding) VALUES ($1, $2, $3, $4)',
            url,
            section.title,
            section.content,
            embedding_json,
        )


@dataclass
class DocsSection:
    id: int
    parent: int | None
    path: str
    level: int
    title: str
    content: str

    def url(self) -> str:
        url_path = re.sub(r'\.md, '', self.path)
        return (
            f'https://logfire.pydantic.dev/docs/{url_path}/#{slugify(self.title, "-")}'
        )

    def embedding_content(self) -> str:
        return '\n\n'.join((f'path: {self.path}', f'title: {self.title}', self.content))


sessions_ta = TypeAdapter(list[DocsSection])


# pyright: reportUnknownMemberType=false
# pyright: reportUnknownVariableType=false
@asynccontextmanager
async def database_connect(
    create_db: bool = False,
) -> AsyncGenerator[asyncpg.Pool, None]:
    server_dsn, database = (
        'postgresql://postgres:postgres@localhost:54320',
        'pydantic_ai_rag',
    )
    if create_db:
        with logfire.span('check and create DB'):
            conn = await asyncpg.connect(server_dsn)
            try:
                db_exists = await conn.fetchval(
                    'SELECT 1 FROM pg_database WHERE datname = $1', database
                )
                if not db_exists:
                    await conn.execute(f'CREATE DATABASE {database}')
            finally:
                await conn.close()

    pool = await asyncpg.create_pool(f'{server_dsn}/{database}')
    try:
        yield pool
    finally:
        await pool.close()


DB_SCHEMA = """
CREATE EXTENSION IF NOT EXISTS vector;

CREATE TABLE IF NOT EXISTS doc_sections (
    id serial PRIMARY KEY,
    url text NOT NULL UNIQUE,
    title text NOT NULL,
    content text NOT NULL,
    -- text-embedding-3-small returns a vector of 1536 floats
    embedding vector(1536) NOT NULL
);
CREATE INDEX IF NOT EXISTS idx_doc_sections_embedding ON doc_sections USING hnsw (embedding vector_l2_ops);
"""


def slugify(value: str, separator: str, unicode: bool = False) -> str:
    """Slugify a string, to make it URL friendly."""
    # Taken unchanged from https://github.com/Python-Markdown/markdown/blob/3.7/markdown/extensions/toc.py#L38
    if not unicode:
        # Replace Extended Latin characters with ASCII, i.e. `žlutý` => `zluty`
        value = unicodedata.normalize('NFKD', value)
        value = value.encode('ascii', 'ignore').decode('ascii')
    value = re.sub(r'[^\w\s-]', '', value).strip().lower()
    return re.sub(rf'[{separator}\s]+', separator, value)


if __name__ == '__main__':
    action = sys.argv[1] if len(sys.argv) > 1 else None
    if action == 'build':
        asyncio.run(build_search_db())
    elif action == 'search':
        if len(sys.argv) == 3:
            q = sys.argv[2]
        else:
            q = 'How do I configure logfire to work with FastAPI?'
        asyncio.run(run_agent(q))
    else:
        print(
            'uv run --extra examples -m pydantic_ai_examples.rag build|search',
            file=sys.stderr,
        )
        sys.exit(1)
流式 Markdown
本示例展示了如何使用 rich 库在终端中突出显示从代理流出的 Markdown。
如果设置了所需的环境变量,它将运行示例,使用 OpenAI 和 Google Gemini 模型。
展示:
运行示例
在 依赖项安装并环境变量设置后 ,运行:
python -m pydantic_ai_examples.stream_markdown
uv run -m pydantic_ai_examples.stream_markdown
示例代码
import asyncio
import os

import logfire
from rich.console import Console, ConsoleOptions, RenderResult
from rich.live import Live
from rich.markdown import CodeBlock, Markdown
from rich.syntax import Syntax
from rich.text import Text

from pydantic_ai import Agent
from pydantic_ai.models import KnownModelName

# 'if-token-present' means nothing will be sent (and the example will work) if you don't have logfire configured
logfire.configure(send_to_logfire='if-token-present')

agent = Agent(instrument=True)

# models to try, and the appropriate env var
models: list[tuple[KnownModelName, str]] = [
    ('google-gla:gemini-1.5-flash', 'GEMINI_API_KEY'),
    ('openai:gpt-4o-mini', 'OPENAI_API_KEY'),
    ('groq:llama-3.3-70b-versatile', 'GROQ_API_KEY'),
]


async def main():
    prettier_code_blocks()
    console = Console()
    prompt = 'Show me a short example of using Pydantic.'
    console.log(f'Asking: {prompt}...', style='cyan')
    for model, env_var in models:
        if env_var in os.environ:
            console.log(f'Using model: {model}')
            with Live('', console=console, vertical_overflow='visible') as live:
                async with agent.run_stream(prompt, model=model) as result:
                    async for message in result.stream():
                        live.update(Markdown(message))
            console.log(result.usage())
        else:
            console.log(f'{model} requires {env_var} to be set.')


def prettier_code_blocks():
    """Make rich code blocks prettier and easier to copy.

    From https://github.com/samuelcolvin/aicli/blob/v0.8.0/samuelcolvin_aicli.py#L22
    """

    class SimpleCodeBlock(CodeBlock):
        def __rich_console__(
            self, console: Console, options: ConsoleOptions
        ) -> RenderResult:
            code = str(self.text).rstrip()
            yield Text(self.lexer_name, style='dim')
            yield Syntax(
                code,
                self.lexer_name,
                theme=self.theme,
                background_color='default',
                word_wrap=True,
            )
            yield Text(f'/{self.lexer_name}', style='dim')

    Markdown.elements['fence'] = SimpleCodeBlock


if __name__ == '__main__':
    asyncio.run(main())
Stream whales
关于鲸鱼的信息——流式结构化响应验证的示例。
展示:
本脚本从 GPT-4 流式获取关于鲸鱼的结构化响应,验证数据,并在数据接收时以动态表格的形式使用 rich 显示。
运行示例
在 依赖项安装并环境变量设置后 ,运行:
python -m pydantic_ai_examples.stream_whales
uv run -m pydantic_ai_examples.stream_whales
应该输出如下:
示例代码
stream_whales.py
from typing import Annotated

import logfire
from pydantic import Field, ValidationError
from rich.console import Console
from rich.live import Live
from rich.table import Table
from typing_extensions import NotRequired, TypedDict

from pydantic_ai import Agent

# 'if-token-present' means nothing will be sent (and the example will work) if you don't have logfire configured
logfire.configure(send_to_logfire='if-token-present')


class Whale(TypedDict):
    name: str
    length: Annotated[
        float, Field(description='Average length of an adult whale in meters.')
    ]
    weight: NotRequired[
        Annotated[
            float,
            Field(description='Average weight of an adult whale in kilograms.', ge=50),
        ]
    ]
    ocean: NotRequired[str]
    description: NotRequired[Annotated[str, Field(description='Short Description')]]


agent = Agent('openai:gpt-4', result_type=list[Whale], instrument=True)


async def main():
    console = Console()
    with Live('\n' * 36, console=console) as live:
        console.print('Requesting data...', style='cyan')
        async with agent.run_stream(
            'Generate me details of 5 species of Whale.'
        ) as result:
            console.print('Response:', style='green')

            async for message, last in result.stream_structured(debounce_by=0.01):
                try:
                    whales = await result.validate_structured_result(
                        message, allow_partial=not last
                    )
                except ValidationError as exc:
                    if all(
                        e['type'] == 'missing' and e['loc'] == ('response',)
                        for e in exc.errors()
                    ):
                        continue
                    else:
                        raise

                table = Table(
                    title='Species of Whale',
                    caption='Streaming Structured responses from GPT-4',
                    width=120,
                )
                table.add_column('ID', justify='right')
                table.add_column('Name')
                table.add_column('Avg. Length (m)', justify='right')
                table.add_column('Avg. Weight (kg)', justify='right')
                table.add_column('Ocean')
                table.add_column('Description', justify='right')

                for wid, whale in enumerate(whales, start=1):
                    table.add_row(
                        str(wid),
                        whale['name'],
                        f'{whale["length"]:0.0f}',
                        f'{w:0.0f}' if (w := whale.get('weight')) else '…',
                        whale.get('ocean') or '…',
                        whale.get('description') or '…',
                    )
                live.update(table)


if __name__ == '__main__':
    import asyncio

    asyncio.run(main())
聊天应用与 FastAPI
使用 FastAPI 构建的简单聊天应用示例
展示:
这展示了在请求之间存储聊天历史,并使用它为模型提供新响应的上下文。
这里的大部分复杂逻辑都在 chat_app.py 之间,它将响应流式传输到浏览器,以及 chat_app.ts 之间,它负责在浏览器中渲染消息。
运行示例
在 依赖项安装并环境变量设置后 ,运行:
python -m pydantic_ai_examples.chat_app
uv run -m pydantic_ai_examples.chat_app
然后在 localhost:8000 打开应用。

示例代码
运行聊天应用的 Python 代码:
聊天应用.py
from __future__ import annotations as _annotations

import asyncio
import json
import sqlite3
from collections.abc import AsyncIterator
from concurrent.futures.thread import ThreadPoolExecutor
from contextlib import asynccontextmanager
from dataclasses import dataclass
from datetime import datetime, timezone
from functools import partial
from pathlib import Path
from typing import Annotated, Any, Callable, Literal, TypeVar

import fastapi
import logfire
from fastapi import Depends, Request
from fastapi.responses import FileResponse, Response, StreamingResponse
from typing_extensions import LiteralString, ParamSpec, TypedDict

from pydantic_ai import Agent
from pydantic_ai.exceptions import UnexpectedModelBehavior
from pydantic_ai.messages import (
    ModelMessage,
    ModelMessagesTypeAdapter,
    ModelRequest,
    ModelResponse,
    TextPart,
    UserPromptPart,
)

# 'if-token-present' means nothing will be sent (and the example will work) if you don't have logfire configured
logfire.configure(send_to_logfire='if-token-present')

agent = Agent('openai:gpt-4o', instrument=True)
THIS_DIR = Path(__file__).parent


@asynccontextmanager
async def lifespan(_app: fastapi.FastAPI):
    async with Database.connect() as db:
        yield {'db': db}


app = fastapi.FastAPI(lifespan=lifespan)
logfire.instrument_fastapi(app)


@app.get('/')
async def index() -> FileResponse:
    return FileResponse((THIS_DIR / 'chat_app.html'), media_type='text/html')


@app.get('/chat_app.ts')
async def main_ts() -> FileResponse:
    """Get the raw typescript code, it's compiled in the browser, forgive me."""
    return FileResponse((THIS_DIR / 'chat_app.ts'), media_type='text/plain')


async def get_db(request: Request) -> Database:
    return request.state.db


@app.get('/chat/')
async def get_chat(database: Database = Depends(get_db)) -> Response:
    msgs = await database.get_messages()
    return Response(
        b'\n'.join(json.dumps(to_chat_message(m)).encode('utf-8') for m in msgs),
        media_type='text/plain',
    )


class ChatMessage(TypedDict):
    """Format of messages sent to the browser."""

    role: Literal['user', 'model']
    timestamp: str
    content: str


def to_chat_message(m: ModelMessage) -> ChatMessage:
    first_part = m.parts[0]
    if isinstance(m, ModelRequest):
        if isinstance(first_part, UserPromptPart):
            assert isinstance(first_part.content, str)
            return {
                'role': 'user',
                'timestamp': first_part.timestamp.isoformat(),
                'content': first_part.content,
            }
    elif isinstance(m, ModelResponse):
        if isinstance(first_part, TextPart):
            return {
                'role': 'model',
                'timestamp': m.timestamp.isoformat(),
                'content': first_part.content,
            }
    raise UnexpectedModelBehavior(f'Unexpected message type for chat app: {m}')


@app.post('/chat/')
async def post_chat(
    prompt: Annotated[str, fastapi.Form()], database: Database = Depends(get_db)
) -> StreamingResponse:
    async def stream_messages():
        """Streams new line delimited JSON `Message`s to the client."""
        # stream the user prompt so that can be displayed straight away
        yield (
            json.dumps(
                {
                    'role': 'user',
                    'timestamp': datetime.now(tz=timezone.utc).isoformat(),
                    'content': prompt,
                }
            ).encode('utf-8')
            + b'\n'
        )
        # get the chat history so far to pass as context to the agent
        messages = await database.get_messages()
        # run the agent with the user prompt and the chat history
        async with agent.run_stream(prompt, message_history=messages) as result:
            async for text in result.stream(debounce_by=0.01):
                # text here is a `str` and the frontend wants
                # JSON encoded ModelResponse, so we create one
                m = ModelResponse(parts=[TextPart(text)], timestamp=result.timestamp())
                yield json.dumps(to_chat_message(m)).encode('utf-8') + b'\n'

        # add new messages (e.g. the user prompt and the agent response in this case) to the database
        await database.add_messages(result.new_messages_json())

    return StreamingResponse(stream_messages(), media_type='text/plain')


P = ParamSpec('P')
R = TypeVar('R')


@dataclass
class Database:
    """Rudimentary database to store chat messages in SQLite.

    The SQLite standard library package is synchronous, so we
    use a thread pool executor to run queries asynchronously.
    """

    con: sqlite3.Connection
    _loop: asyncio.AbstractEventLoop
    _executor: ThreadPoolExecutor

    @classmethod
    @asynccontextmanager
    async def connect(
        cls, file: Path = THIS_DIR / '.chat_app_messages.sqlite'
    ) -> AsyncIterator[Database]:
        with logfire.span('connect to DB'):
            loop = asyncio.get_event_loop()
            executor = ThreadPoolExecutor(max_workers=1)
            con = await loop.run_in_executor(executor, cls._connect, file)
            slf = cls(con, loop, executor)
        try:
            yield slf
        finally:
            await slf._asyncify(con.close)

    @staticmethod
    def _connect(file: Path) -> sqlite3.Connection:
        con = sqlite3.connect(str(file))
        con = logfire.instrument_sqlite3(con)
        cur = con.Cursor()
        cur.execute(
            'CREATE TABLE IF NOT EXISTS messages (id INT PRIMARY KEY, message_list TEXT);'
        )
        con.commit()
        return con

    async def add_messages(self, messages: bytes):
        await self._asyncify(
            self._execute,
            'INSERT INTO messages (message_list) VALUES (?);',
            messages,
            commit=True,
        )
        await self._asyncify(self.con.commit)

    async def get_messages(self) -> list[ModelMessage]:
        c = await self._asyncify(
            self._execute, 'SELECT message_list FROM messages order by id'
        )
        rows = await self._asyncify(c.fetchall)
        messages: list[ModelMessage] = []
        for row in rows:
            messages.extend(ModelMessagesTypeAdapter.validate_json(row[0]))
        return messages

    def _execute(
        self, sql: LiteralString, *args: Any, commit: bool = False
    ) -> sqlite3.Cursor:
        cur = self.con.Cursor()
        cur.execute(sql, args)
        if commit:
            self.con.commit()
        return cur

    async def _asyncify(
        self, func: Callable[P, R], *args: P.args, **kwargs: P.kwargs
    ) -> R:
        return await self._loop.run_in_executor(  # type: ignore
            self._executor,
            partial(func, **kwargs),
            *args,  # type: ignore
        )


if __name__ == '__main__':
    import uvicorn

    uvicorn.run(
        'pydantic_ai_examples.chat_app:app', reload=True, reload_dirs=[str(THIS_DIR)]
    )
简单 HTML 页面以渲染应用程序:
聊天应用.html
<!DOCTYPE html>
<html lang="en">
  <head>
    <meta charset="UTF-8" />
    <meta name="viewport" content="width=device-width, initial-scale=1.0" />
    <title>Chat App</title>
    <link
      href="https://cdn.jsdelivr.net/npm/bootstrap@5.3.3/dist/css/bootstrap.min.css"
      rel="stylesheet"
    />
    <style>
      main {
        max-width: 700px;
      }
      #conversation .user::before {
        content: "You asked: ";
        font-weight: bold;
        display: block;
      }
      #conversation .model::before {
        content: "AI Response: ";
        font-weight: bold;
        display: block;
      }
      #spinner {
        opacity: 0;
        transition: opacity 500ms ease-in;
        width: 30px;
        height: 30px;
        border: 3px solid #222;
        border-bottom-color: transparent;
        border-radius: 50%;
        animation: rotation 1s linear infinite;
      }
      @keyframes rotation {
        0% {
          transform: rotate(0deg);
        }
        100% {
          transform: rotate(360deg);
        }
      }
      #spinner.active {
        opacity: 1;
      }
    </style>
  </head>
  <body>
    <main class="border rounded mx-auto my-5 p-4">
      <h1>Chat App</h1>
      <p>Ask me anything...</p>
      <div id="conversation" class="px-2"></div>
      <div class="d-flex justify-content-center mb-3">
        <div id="spinner"></div>
      </div>
      <form method="post">
        <input id="prompt-input" name="prompt" class="form-control" />
        <div class="d-flex justify-content-end">
          <button class="btn btn-primary mt-2">Send</button>
        </div>
      </form>
      <div id="error" class="d-none text-danger">
        Error occurred, check the browser developer console for more
        information.
      </div>
    </main>
  </body>
</html>
<script
  src="https://cdnjs.cloudflare.com/ajax/libs/typescript/5.6.3/typescript.min.js"
  crossorigin="anonymous"
  referrerpolicy="no-referrer"
></script>
<script type="module">
  // to let me write TypeScript, without adding the burden of npm we do a dirty, non-production-ready hack
  // and transpile the TypeScript code in the browser
  // this is (arguably) A neat demo trick, but not suitable for production!
  async function loadTs() {
    const response = await fetch("/chat_app.ts");
    const tsCode = await response.text();
    const jsCode = window.ts.transpile(tsCode, { target: "es2015" });
    let script = document.createElement("script");
    script.type = "module";
    script.text = jsCode;
    document.body.appendChild(script);
  }

  loadTs().catch((e) => {
    console.error(e);
    document.getElementById("error").classList.remove("d-none");
    document.getElementById("spinner").classList.remove("active");
  });
</script>
TypeScript 处理消息渲染,为了简单起见(并且冒着冒犯前端开发者的风险)TypeScript 代码以纯文本形式传递到浏览器中并在浏览器中转译。
聊天应用.ts
// BIG FAT WARNING: to avoid the complexity of npm, this typescript is compiled in the browser
// there's currently no static type checking

import { marked } from "https://cdnjs.cloudflare.com/ajax/libs/marked/15.0.0/lib/marked.esm.js";
const convElement = document.getElementById("conversation");

const promptInput = document.getElementById("prompt-input") as HTMLInputElement;
const spinner = document.getElementById("spinner");

// stream the response and render messages as each chunk is received
// data is sent as newline-delimited JSON
async function onFetchResponse(response: Response): Promise<void> {
  let text = "";
  let decoder = new TextDecoder();
  if (response.ok) {
    const reader = response.body.getReader();
    while (true) {
      const { done, value } = await reader.read();
      if (done) {
        break;
      }
      text += decoder.decode(value);
      addMessages(text);
      spinner.classList.remove("active");
    }
    addMessages(text);
    promptInput.disabled = false;
    promptInput.focus();
  } else {
    const text = await response.text();
    console.error(`Unexpected response: ${response.status}`, {
      response,
      text,
    });
    throw new Error(`Unexpected response: ${response.status}`);
  }
}

// The format of messages, this matches pydantic-ai both for brevity and understanding
// in production, you might not want to keep this format all the way to the frontend
interface Message {
  role: string;
  content: string;
  timestamp: string;
}

// take raw response text and render messages into the `#conversation` element
// Message timestamp is assumed to be a unique identifier of a message, and is used to deduplicate
// hence you can send data about the same message multiple times, and it will be updated
// instead of creating a new message elements
function addMessages(responseText: string) {
  const lines = responseText.split("\n");
  const messages: Message[] = lines
    .filter((line) => line.length > 1)
    .map((j) => JSON.parse(j));
  for (const message of messages) {
    // we use the timestamp as a crude element id
    const { timestamp, role, content } = message;
    const id = `msg-${timestamp}`;
    let msgDiv = document.getElementById(id);
    if (!msgDiv) {
      msgDiv = document.createElement("div");
      msgDiv.id = id;
      msgDiv.title = `${role} at ${timestamp}`;
      msgDiv.classList.add("border-top", "pt-2", role);
      convElement.appendChild(msgDiv);
    }
    msgDiv.innerHTML = marked.parse(content);
  }
  window.scrollTo({ top: document.body.scrollHeight, behavior: "smooth" });
}

function onError(error: any) {
  console.error(error);
  document.getElementById("error").classList.remove("d-none");
  document.getElementById("spinner").classList.remove("active");
}

async function onSubmit(e: SubmitEvent): Promise<void> {
  e.preventDefault();
  spinner.classList.add("active");
  const body = new FormData(e.target as HTMLFormElement);

  promptInput.value = "";
  promptInput.disabled = true;

  const response = await fetch("/chat/", { method: "POST", body });
  await onFetchResponse(response);
}

// call onSubmit when the form is submitted (e.g. user clicks the send button or hits Enter)
document
  .querySelector("form")
  .addEventListener("submit", (e) => onSubmit(e).catch(onError));

// load messages on page load
fetch("/chat/").then(onFetchResponse).catch(onError);
问题图
提问和评估问题的图示例。
展示:
pydantic_graph
在 依赖项安装并环境变量设置后 ,运行:
python -m pydantic_ai_examples.question_graph
uv run -m pydantic_ai_examples.question_graph
question_graph.py
from __future__ import annotations as _annotations

from dataclasses import dataclass, field
from pathlib import Path

import logfire
from groq import BaseModel
from pydantic_graph import (
    BaseNode,
    End,
    Graph,
    GraphRunContext,
)
from pydantic_graph.persistence.file import FileStatePersistence

from pydantic_ai import Agent
from pydantic_ai.format_as_xml import format_as_xml
from pydantic_ai.messages import ModelMessage

# 'if-token-present' means nothing will be sent (and the example will work) if you don't have logfire configured
logfire.configure(send_to_logfire='if-token-present')

ask_agent = Agent('openai:gpt-4o', result_type=str, instrument=True)


@dataclass
class QuestionState:
    question: str | None = None
    ask_agent_messages: list[ModelMessage] = field(default_factory=list)
    evaluate_agent_messages: list[ModelMessage] = field(default_factory=list)


@dataclass
class Ask(BaseNode[QuestionState]):
    async def run(self, ctx: GraphRunContext[QuestionState]) -> Answer:
        result = await ask_agent.run(
            'Ask a simple question with a single correct answer.',
            message_history=ctx.state.ask_agent_messages,
        )
        ctx.state.ask_agent_messages += result.all_messages()
        ctx.state.question = result.data
        return Answer(result.data)


@dataclass
class Answer(BaseNode[QuestionState]):
    question: str

    async def run(self, ctx: GraphRunContext[QuestionState]) -> Evaluate:
        answer = input(f'{self.question}: ')
        return Evaluate(answer)


class EvaluationResult(BaseModel, use_attribute_docstrings=True):
    correct: bool
    """Whether the answer is correct."""
    comment: str
    """Comment on the answer, reprimand the user if the answer is wrong."""


evaluate_agent = Agent(
    'openai:gpt-4o',
    result_type=EvaluationResult,
    system_prompt='Given a question and answer, evaluate if the answer is correct.',
)


@dataclass
class Evaluate(BaseNode[QuestionState, None, str]):
    answer: str

    async def run(
        self,
        ctx: GraphRunContext[QuestionState],
    ) -> End[str] | Reprimand:
        assert ctx.state.question is not None
        result = await evaluate_agent.run(
            format_as_xml({'question': ctx.state.question, 'answer': self.answer}),
            message_history=ctx.state.evaluate_agent_messages,
        )
        ctx.state.evaluate_agent_messages += result.all_messages()
        if result.data.correct:
            return End(result.data.comment)
        else:
            return Reprimand(result.data.comment)


@dataclass
class Reprimand(BaseNode[QuestionState]):
    comment: str

    async def run(self, ctx: GraphRunContext[QuestionState]) -> Ask:
        print(f'Comment: {self.comment}')
        ctx.state.question = None
        return Ask()


question_graph = Graph(
    nodes=(Ask, Answer, Evaluate, Reprimand), state_type=QuestionState
)


async def run_as_continuous():
    state = QuestionState()
    node = Ask()
    end = await question_graph.run(node, state=state)
    print('END:', end.output)


async def run_as_cli(answer: str | None):
    persistence = FileStatePersistence(Path('question_graph.json'))
    persistence.set_graph_types(question_graph)

    if snapshot := await persistence.load_next():
        state = snapshot.state
        assert answer is not None, (
            'answer required, usage "uv run -m pydantic_ai_examples.question_graph cli <answer>"'
        )
        node = Evaluate(answer)
    else:
        state = QuestionState()
        node = Ask()
    # debug(state, node)

    async with question_graph.iter(node, state=state, persistence=persistence) as run:
        while True:
            node = await run.next()
            if isinstance(node, End):
                print('END:', node.data)
                history = await persistence.load_all()
                print('history:', '\n'.join(str(e.node) for e in history), sep='\n')
                print('Finished!')
                break
            elif isinstance(node, Answer):
                print(node.question)
                break
            # otherwise just continue


if __name__ == '__main__':
    import asyncio
    import sys

    try:
        sub_command = sys.argv[1]
        assert sub_command in ('continuous', 'cli', 'mermaid')
    except (IndexError, AssertionError):
        print(
            'Usage:\n'
            '  uv run -m pydantic_ai_examples.question_graph mermaid\n'
            'or:\n'
            '  uv run -m pydantic_ai_examples.question_graph continuous\n'
            'or:\n'
            '  uv run -m pydantic_ai_examples.question_graph cli [answer]',
            file=sys.stderr,
        )
        sys.exit(1)

    if sub_command == 'mermaid':
        print(question_graph.mermaid_code(start_node=Ask))
    elif sub_command == 'continuous':
        asyncio.run(run_as_continuous())
    else:
        a = sys.argv[2] if len(sys.argv) > 2 else None
        asyncio.run(run_as_cli(a))
参考API
未翻译,详见